Do you have a question about the MINI MAXX V2 and is the answer not in the manual?
Ensure vehicle is connected to a battery charger before flashing PCM to prevent power loss.
Allocate up to 30 minutes for the initial setup and installation process.
Instructions for updating the Mini Maxx device, including navigating menus and confirming vehicle selection.
Details on connecting the adapter plug to the OBDII port and the Mini Maxx to the adapter.
Explains how to navigate the device's main menu using touch and button controls.
Procedure to check and remove specific fuses for GM vehicles before installing the tune.
Reiterates the importance of a connected battery charger before starting installation.
Recommendation to turn off vehicle electronics to ensure a successful download.
Warning against interrupting or disconnecting the device during the download process.
Step-by-step instructions for installing the Mini Maxx software, including key position and engine status.
Instructions for wiring the device to the vehicle's fuse box for key-activated power control.
Guidance on selecting a location, running cables, and securing the device with the windshield mount.
The Mini Maxx V2 is a performance programmer designed to enhance vehicle performance by allowing users to modify engine parameters. It serves as a comprehensive tool for vehicle enthusiasts looking to optimize their driving experience, offering a range of functionalities from performance tuning to real-time monitoring.
The primary function of the Mini Maxx V2 is to act as a "Performance Programmer," enabling users to install custom tunes or modify existing engine settings. This process, often referred to as "flashing" the PCM (Powertrain Control Module), allows for adjustments to various aspects of the engine's operation, such as fuel delivery, timing, and boost pressure, to achieve increased horsepower, torque, and potentially improved fuel efficiency. The device is compatible with specific GM Duramax (2007-2016), Ford Power Stroke (2008-2019), and Dodge RAM Cummins (2007.5-2021) vehicles, as detailed in the application chart.
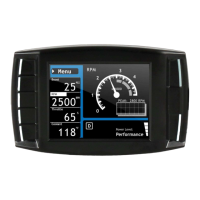
Beyond performance tuning, the Mini Maxx V2 also functions as a real-time monitoring device. Its display provides critical vehicle information at a glance, including boost pressure, RPM, throttle percentage, and coolant temperature. This allows drivers to keep track of their engine's health and performance metrics during operation. The device features a user-friendly interface with a menu system that allows navigation through various settings and data displays.
Another key function is its ability to update and manage vehicle-specific settings. Users can select their vehicle's make, year, and model through the device's menu, ensuring that the appropriate files and tunes are loaded for their specific application. The device also supports the installation of new software and updates, ensuring it remains current with the latest performance enhancements and bug fixes.
The Mini Maxx V2 is designed to be an integrated part of the vehicle's system, connecting via the OBDII (On-Board Diagnostics II) port. This connection facilitates communication with the vehicle's ECU (Engine Control Unit) for both programming and data acquisition. The device's power state can be controlled by the vehicle's key position, allowing it to automatically power on and off with the ignition, providing a seamless user experience.
The Mini Maxx V2 is designed for ease of use, with a straightforward installation and operation process.
Pre-Installation Checklist: Before any installation or tuning, users are advised to connect their vehicle to a battery charger. This is a critical step to ensure stable power during the PCM flashing process, preventing potential issues that could arise from low battery voltage. Ample time, approximately 30 minutes, should be allocated for the initial setup and installation.
Updating the Mini Maxx: The device requires an initial update process. Users wait for the main screen to load, then navigate to "Change Vehicle" to select their vehicle's make, year, and model. After confirming the selection, the Mini Maxx loads the necessary files and reboots into USB mode, preparing it for operation.
Mini Maxx Installation: Physical installation involves connecting the adapter plug to the vehicle's OBDII diagnostic port, typically located under the dash. The Mini Maxx device itself is then connected to the adapter plug using an HDMI cable. The adapter plug has a power switch that needs to be set to "BAT" position to power on the device. While full physical installation is not strictly necessary for tune installation, it is recommended for utilizing features like automatic power on/off and the Driving Coach.
Mini Maxx Main Menu: The device features a clear main menu accessible via a top-left button. Navigation is intuitive, with dedicated buttons for scrolling through menus and selecting highlighted items. Users can switch between daytime and nighttime display modes by pressing and holding specific buttons, enhancing visibility in different lighting conditions.
Before Installation (Tune): For GM vehicles, specific fuses must be checked and removed according to an included fuse card before installing a tune. Similar to the pre-installation checklist, ensuring the vehicle battery is connected to a charger is crucial. All vehicle electronics, including the stereo, should be turned off to prevent interference during the download process. It is vital not to interrupt or disconnect the Mini Maxx during the download to avoid potential damage or errors.
Mini Maxx Installation (Tune): To install a tune, the vehicle key must be in the "on" position without starting the engine. Users navigate to the Main Menu, select "Install Download," and follow the on-screen instructions. This process involves turning the key to "off" or "on" as prompted and pressing "Continue." It is critical not to start the engine at any point during the download. The device may prompt users to make vehicle-specific settings, such as adjusting the speed limiter. After the installation, any removed fuses should be replaced.
Finalizing the Installation: This step focuses on enabling the Mini Maxx to power on and off automatically with the vehicle's key position. This involves locating a "key-on fuse" using a 12-volt test light or the vehicle's owner's manual. This fuse should only have power when the key is in the "on" or "run" position. Once identified, the fuse is removed, and the unpowered (accessory) side of the fuse socket is located. The fuse spade is crimped onto the power wire, and the fuse tap is slid over one metal prong of the fuse. The tapped fuse is then reinserted into the unpowered side of the fuse socket. The black ground wire in the power cable is not typically required. Finally, the power cable is connected to the adapter, and the adapter plug switch is set to "KEY." The HDMI cable is then routed discreetly under the dash or weather stripping for a clean installation and protection.
Mounting the Mini Maxx: After cleaning and drying the windshield, a safe location is chosen for mounting the Mini Maxx, ensuring it does not obstruct the driver's view. The HDMI cable is stretched to ensure sufficient slack. The device attaches to a Universal Windshield Mount (UWM) using a T-slot on its back. The UWM's suction cup is positioned on the windshield, and a lever is pressed to secure it in place.
While the manual primarily focuses on installation and operation, several aspects touch upon maintenance implicitly:
Software Updates: The ability to load new files and reboot into USB mode suggests that the device can receive software updates. This is a crucial maintenance feature, as it allows the Mini Maxx V2 to stay current with the latest vehicle compatibility, performance enhancements, and bug fixes. Regular updates ensure optimal performance and reliability of the tuning capabilities.
Fuse Management: The instruction to check and remove specific fuses for GM vehicles before installation, and to replace them afterward, highlights a form of preventative maintenance. This ensures that the vehicle's electrical system is correctly configured during the tuning process and restored to its original state afterward. The detailed process of identifying and tapping into a "key-on fuse" also demonstrates careful electrical system interaction, minimizing potential issues.
Cable Management: The recommendation to run the HDMI cable discreetly under the dash or weather stripping is a practical maintenance tip. This protects the cable from wear and tear, accidental damage, and ensures a clean, professional installation, contributing to the longevity of the device and its connections.
Battery Management: The repeated emphasis on connecting the vehicle to a battery charger before flashing the PCM is a critical maintenance practice. This prevents potential issues during the tuning process that could arise from low battery voltage, which could otherwise lead to incomplete flashes or damage to the vehicle's ECU. This proactive step safeguards both the vehicle and the tuning device.
Troubleshooting Guidance: Although not explicitly detailed as a "maintenance" section, the instructions implicitly guide users to avoid common pitfalls. For example, the warning not to interrupt the download process or start the engine during tuning helps prevent errors that would require troubleshooting or re-installation, thus minimizing potential "maintenance" in the form of corrective actions.
In summary, the Mini Maxx V2 is a powerful and user-friendly performance programmer designed to give drivers greater control over their vehicle's performance. Its comprehensive features, from detailed tuning options to real-time monitoring and straightforward installation, make it a valuable tool for optimizing the driving experience. The emphasis on proper pre-installation procedures and careful handling during the tuning process underscores a design philosophy that prioritizes both performance enhancement and vehicle integrity.
| Form Factor | Mini-ITX |
|---|---|
| Memory Slots | 2 |
| Storage | 4 x SATA 6Gb/s |
| USB Ports | 4x USB 2.0 |
| Video Outputs | 1 x HDMI, 1 x DisplayPort |