EasyManua.ls Logo

MINN KOTA MKA-58 - User Manual

MINN KOTA MKA-58
24 pages
Print Icon
To Next Page IconTo Next Page
Loading...
1 | minnkota.johnsonoutdoors.com
©2023 Johnson Outdoors Marine Electronics, Inc.
MKA-58
BOAT DECK REINFORCEMENT KIT
1854058
The MKA-58 Boat Deck Reinforcement Kit is compatible with freshwater and saltwater electric-steer, bow-mount, QUEST series trolling
motors, including the Riptide Instinct, Ulterra, Riptide Terrova and Terrova.
22
1414
66
88
44
1212
1010
p Not shown on Parts Diagram.
Item/
Assembly
Part # Description Qty.
2 2371674 PLATE, REINFRCMNT, ANODIZED 1
A
Items
4-14
2994957 BAG ASM, REINFORCEMENT KIT 1
4 2383490 SCREW-3/8-16 X 3" PFHCS SS 6
6 2371796 BACKUP BAR 3/16 X 1 X 2 6
8 2383122 NUT 3/8-16 NYLON INST LOCKNUT 6
10 2383497
SCREW,3/8 16x1¾PFHCS NYSHLD
*QUICK RELEASE BRACKET*
6
12 2353412 SCREW-3/8-16 X 1.0" HHCS SS *MOTOR* 6
14 2378608 ANTI SEIZE TUBE, 4CC, TALON 1
p
2377183 INSTR.SHEET, REINFORCE.KIT 1
AA
TOOLS AND RESOURCES REQUIRED
#3 Phillips Screwdriver
#4 Phillips Screwdriver
Needle-nose Pliers
(for Terrova and RT Terrova)
Drill
13/32” Drill Bit
9/16” Box End/Open End Wrench
Awl or similar Marking Tool
A second person to help with
the installation
MOUNTING CONSIDERATIONS
The MKA-58 Boat Deck Reinforcement Kit provides additional strength and stability for mounting Minn Kota QUEST series trolling
motors, as well as versatility when choosing a mounting location. There are two options when installing a motor with the Boat Deck
Reinforcement Kit:
1. Mount the trolling motor directly to the Reinforcement Plate
2. Mount the trolling motor in combination with an MKA-56/RTA-55 Quick Release Bracket (1854056 - black or 1854055 - white) to
the Reinforcement Plate. The Inner Plate of the MKA-56/RTA-55 is installed to the Reinforcement Plate, while the Outer Plate is
attached to the motor. This allows for easy removal of the motor.
Direct Mount MKA-56/RTA-55
Question and Answer IconNeed help?

Do you have a question about the MINN KOTA MKA-58 and is the answer not in the manual?

Overview

The MKA-58 Boat Deck Reinforcement Kit (Part #1854058) is an accessory designed to enhance the strength and stability of mounting Minn Kota QUEST series trolling motors on boat decks. It is compatible with both freshwater and saltwater electric-steer, bow-mount trolling motors, including the Riptide Instinct, Ulterra, Riptide Terrova, and Terrova models.

Function Description:

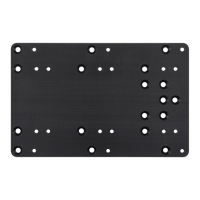
The primary function of the MKA-58 kit is to provide a robust and stable mounting platform for trolling motors, especially those in the Minn Kota QUEST series. It reinforces the boat deck, distributing the motor's weight and forces over a larger area, which is crucial for preventing damage to the deck and ensuring secure operation of the trolling motor. The kit offers versatility in mounting options, allowing for either a direct mount of the trolling motor to the reinforcement plate or an installation in combination with an MKA-56/RTA-55 Quick Release Bracket. The reinforcement plate features an assortment of threaded and recessed mounting holes, each serving a specific purpose in the installation process.

Important Technical Specifications:

The kit includes a variety of components essential for installation:

  • Plate, Reinforcement, Anodized (Part #2371674): This is the main reinforcement plate, designed to be installed on the boat deck.
  • Bag Assembly, Reinforcement Kit (Part #2994957): Contains various fasteners and smaller components.
  • Screws:
    • SCREW-3/8-16 X 3" PFHCS SS (Part #2383490): Six flat head screws used to secure the reinforcement plate to the boat deck.
    • SCREW,3/8 16x134PFHCS NYSHLD QUICK RELEASE BRACKET (Part #2383497): Six flat head screws specifically for quick release bracket installations.
    • SCREW-3/8-16 X 1.0" HHCS SS MOTOR (Part #2353412): Six hex head cap screws used to secure the motor directly to the reinforcement plate.
  • Backup Bar 3/16 X 1 X 2 (Part #2371796): Six backup bars used with the flat head screws for deck installation.
  • Nut 3/8-16 Nylon Inst Locknut (Part #2383122): Six nylon insert locknuts for securing the reinforcement plate to the deck.
  • Anti Seize Tube, 4CC, Talon (Part #2378608): One tube of anti-seize compound to prevent stainless steel hardware from seizing.
  • Instrument Sheet, Reinforce.Kit (Part #2377183): The installation instructions manual.

Required Tools and Resources:

  • #3 Phillips Screwdriver
  • #4 Phillips Screwdriver
  • Needle-nose Pliers (specifically for Terrova and RT Terrova motors)
  • Drill
  • 13/32" Drill Bit
  • 9/16" Box End/Open End Wrench
  • Awl or similar Marking Tool
  • A second person to assist with the installation (recommended due to the weight of the trolling motor, up to 90 lbs).

Usage Features:

The MKA-58 kit offers two primary installation methods:

  1. Direct Mount: The trolling motor's base extrusion is directly attached to the six threaded holes around the perimeter of the reinforcement plate.
  2. Quick Release Bracket Mount: An MKA-56/RTA-55 Quick Release Bracket's inner plate is installed to the twelve threaded holes inside the reinforcement plate, while the outer plate is attached to the motor. This allows for easy removal of the motor from the boat.

Mounting Considerations:

  • Motor Clearance: Before installation, it is crucial to ensure adequate clearance for the motor in both stowed and deployed positions. The motor must not encounter any obstructions when being lowered into the water or raised into the boat.
  • Stowed Position: In the stowed position, the slot in the motor's base extrusion must be positioned beyond the boat's gunwale, with the entire slot visible.
  • Deployed Position: When deployed, there must be a minimum required distance of 1.5 inches (3.81 cm) between the gunwale and the bottom of the steering housing and shaft.
  • Shaft and Control Head Clearance: In the stowed position, ensure sufficient room for the shaft and control head so they do not extend off the side of the boat.
  • Mounting Location: The motor should be mounted as close to the centerline or keel of the boat as possible for optimal stability. The mounting location must be flat, and the area underneath clear for drilling and securing hardware.
  • Mounting Bolts: All six recessed mounting bolts must be used to secure the reinforcement plate to the boat deck. Using bolts spaced furthest apart will maximize stability.
  • Wiring: When installing the motor, exercise caution to avoid pinching or damaging sensor wires that run alongside the base extrusion.

Installation Steps (Overview):

  1. Select a Mounting Location: Determine the ideal position on the boat bow, considering clearances and motor orientation (port or starboard). Mark the edges of the reinforcement plate on the bow.
  2. Choose a Mounting Hole Pattern: Select one of three potential mounting hole patterns for the reinforcement plate, ensuring at least one outside mounting hole is always used. The two center mounting holes are for additional security only and not for primary installation.
  3. Install Reinforcement Plate to Boat Deck:
    • Reposition the reinforcement plate over the marked holes.
    • Apply anti-seize compound to all hardware.
    • Secure the plate using six 3/8-16 x 3" flat head screws, six backup bars, and six 3/8-16 nylon insert locknuts. Screws are inserted from the top down.
    • Tighten all hardware securely using a #4 Phillips screwdriver and a 9/16" wrench.
  4. Install Motor to Reinforcement Plate (Direct Mount):
    • Place the motor on top of the reinforcement plate, aligning the motor's base extrusion mounting holes with the six threaded holes on the plate's perimeter.
    • Secure the motor using six 3/8-16 x 1.0" hex head cap screws. Screws are inserted from the top down.
    • Tighten to 120 in-lbs (13.56 Nm) using a 9/16" wrench, ensuring all hardware is secure.
    • Reassemble any springs that were disconnected (for Terrova QUEST and Riptide Terrova QUEST motors) using needle-nose pliers.
    • Reattach the sideplates using a #3 Phillips screwdriver.
  5. Install MKA-56/RTA-55 Inner Plate to Reinforcement Plate (Quick Release Bracket Mount):
    • Ensure the outer plate of the quick release bracket is already attached to the motor (refer to the MKA-56/RTA-55 manual for these instructions).
    • Align the inner plate of the MKA-56/RTA-55 with the reinforcement plate, either square or 1" further outboard for additional motor clearance.
    • Secure the inner plate assembly to the reinforcement plate using six 3/8-16 x 1.75" screws (included with the MKA-56/RTA-55 kit). Screws are inserted from the top down, through the stiffener plate and inner plate, into the reinforcement plate.
    • Tighten with a #4 Phillips screwdriver.
    • Place the outer plate and motor onto the inner plate.
    • Insert the handle assembly to secure the quick release bracket.
    • Insert the hair clip pin (Part #2260800) into the padlock pin to complete the assembly.

Maintenance Features:

  • Anti-Seize Compound: The kit includes anti-seize compound (Part #2378608) to be applied to stainless steel hardware during installation. This is crucial for preventing seizing, especially when using high-speed installation tools.
  • Hardware Tightening: It is important to tighten all hardware securely to prevent loosening over time.
  • Spring Handling: When working with springs (on Terrova QUEST and Riptide Terrova QUEST motors), handle them carefully with needle-nose pliers to avoid bending or pinching. Always maintain spring tension control to prevent unpredictable release or damage.
  • Pre-Use Check: Before using or transporting the trolling motor, always ensure the handle assembly is fully inserted and retained by the hair clip pin. Failure to do so can result in injury from a falling motor.
  • Theft Prevention: A padlock (1/4" diameter) can be used in place of the hair clip pin to prevent motor theft.

Safety Warnings:

  • Incorrectly secured trolling motors can cause injury. Follow all installation instructions carefully.
  • Always disconnect power cables from the battery or turn off the breaker before installation.
  • The trolling motor can weigh up to 90 lbs; a second person is recommended for assistance during installation.
  • Failure to follow proper product installation may lead to product failure and injury. Ensure the stiffener plate is present on the inner plate before installing mounting hardware for quick release brackets.
  • Do not use high-speed installation tools for stainless steel hardware to prevent seizing.
  • Do not use anti-seize on hex head cap screws when directly mounting the motor, as it may cause them to loosen over time.

MINN KOTA MKA-58 Specifications

General IconGeneral
BrandMINN KOTA
ModelMKA-58
CategoryBoating Equipment
LanguageEnglish

Related product manuals