Do you have a question about the Mira VGX-21 and is the answer not in the manual?
Ensures proper earthing for optimal touch protection.
Prohibits operation in explosive environments due to ignition risk.
Key instructions for safe operation and avoiding hazards.
Defines the operator's duties regarding user safety and device instruction.
Outlines employee obligations for safety and accident prevention.
Details potential risks from misuse or non-compliance with the manual.
Specifies the intended use of the device for valve seat refacing.
Lists conditions under which warranty and liability are voided.
Explains the meaning of warning symbols and notices used in the manual.
Covers requirements for safety equipment and checks.
Details installation and functioning of protective devices.
Emphasizes keeping the manual accessible and warnings visible.
Specifies that only trained users may operate the device.
Covers precautions for device electronics and electrical safety.
Highlights specific risks like rotating parts and magnetic bases.
Advises on handling dust/vapours and necessary protective gear.
Stresses timely servicing, repairs, and safety checks.
Prohibits unauthorized modifications to the device.
Guidelines for cleaning the device and disposing of waste materials.
Information on noise levels and recommended hearing protection.
Instructions for safely carrying and transporting the device.
States the exclusive copyright of the manual belongs to Minelli Corporation.
Manufacturer disclaims liability for accidents from incorrect operation or misuse.
Details warranty coverage, duration, and exclusions for defects.
Declares the product conforms to specified European directives and standards.
Highlights the VGX-21's hydraulic clamping and precise valve seat processing capabilities.
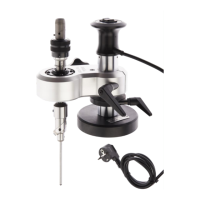
Identifies and labels the main components of the VGX-21 unit.
Identifies and labels the components of the AV-Mobile support system.
Step-by-step guide for mounting the AV-Mobile wall support securely.
Instructions for attaching carry arms, steel plate, and mount.
Describes the function of inclining plates for angled valve seats.
Shows upright clamping for straight valve seat processing.
Illustrates clamping with inclining plates for angled valve seats.
Emphasizes safety gear and careful handling during clamping.
Securing the cylinderhead and positioning the clamping plate.
Cleaning valve guides with a flex-hone brush before processing.
Mounting the VGX-21 and inserting the correct tool-head.
Selecting and inserting the appropriate pilot into the tool-head.
Choosing and slightly tightening the formtool for adjustment.
Inserting the valve into the formtool setting gauge.
Positioning the adjusting tongue and securing the valve.
Loosening screw to check valve adjustment without disturbing grip.
Adjusting the formtool using the setting gauge and tongue.
Placing pivot arm and loosening star grip for free spindle movement.
Disengaging magnetic base and inserting pilot into valve guide.
Placing magnet base and self-centering pilot in valve guide.
Lowering pivot arm using adjusting screw for fine adjustment.
Inspecting rubber cover for proper centering of the pilot.
Bringing pivot arm to highest level and clamping securely.
Fine-tuning pilot centering by hand and tightening star grip.
Firmly tightening star grip to lock spindle bearing.
Attaching the Vario Drive adapter and holding the handle.
Switching on Vario Drive, selecting speed, and starting cutting.
Continuing processing, using cutting oil, and ensuring smooth operation.
Reducing power, turning advancing device back, and releasing handle.
Checking the first valve seat for correct position and repeating steps if needed.
Testing valve seats for proper sealing using a vacuum tester.
Tips for achieving constant surfaces and avoiding defects.
Selecting the appropriate ring formtool for counterbore preparation.
Using the MIRA EM19-75 micrometer for precise formtool setting.
Removing the old insert valve seat ring carefully.
Machining counterbores in two operations for press-fit.
Emphasizes accuracy in press-fit to avoid cylinderhead damage.
Lists available tool-heads for different valve seat diameters.
Steps for safely removing and installing tool-heads.
Recommends keeping the device clean and using anti-rust liquid.
Procedure for cleaning and greasing the advancing device.
Warning about potential damage from careless handling of the advancing device.
Explains the hydraulic clamping system and the 1cm gap.
Step-by-step guide for refilling hydraulic oil if leakage occurs.
Suggests using an injection gun and specifies ISO68 oil.
Instructions for ordering spare parts, including serial and manufacturing numbers.
Lists components with their part numbers for easy identification.
Provides a detailed visual representation of the VGX-21 components.
Shows the electrical connections and components of the VGX-21.
Lists various tool-heads for different valve seat diameters.
Mentions special tools for preparing counterbores.
Describes double-edged tool-heads for accurate seat ring manufacturing.
Information on available pilot sizes and custom options.
Details the availability of formtools in various shapes and for specific vehicles.
How to use the EM19-75 micrometer for counterbore tool positioning.
Functionality of EM25-75 for adjusting tool-heads for seat ring processing.
Enhances cylinderhead workplace efficiency with variable speed control.
Mobile test unit for sealing tests on cylinderheads.
Table for placing VGX-21 and other units for tool and pilot management.
Wall support for processing small/medium cylinderheads with high precision.
Plates for inclined valve seats to bring them to horizontal position.
| Brand | Mira |
|---|---|
| Model | VGX-21 |
| Category | Control Unit |
| Language | English |