EasyManua.ls Logo

Mitsubishi Electric RCN-K-E User Manual

Mitsubishi Electric RCN-K-E
9 pages
To Next Page IconTo Next Page
Page #1 background imageLoading...
Page #1 background image
-
1
-
WARNING
¡
Fasten the wiring to the terminal securely and hold the cable securely so as not to apply unexpected
stress on the terminal.
Loose connection or hold will cause abnormal heat generation or fire.
¡
Make sure the power supply is turned off when electric wiring work.
Otherwise, electric shock, malfunction and improper running may occur.
CAUTION
¡
DO NOT install the wireless kit at the following places in order to avoid malfunction.
(1) Places exposed to direct sunlight
(2) Places near heat devices
(3) High humidity places
(4) Hot surface or cold surface enough to gen-
erate condensation
(5) Places exposed to oil mist or steam dir
ectly
(6) Uneven surface
(7) Places affected by the direct airflow of the
AC unit.
(8) P
laces where the receiver is influenced by
the fluorescent lamp (especially inverter
type) or sunlight.
(9) P
laces where the receiver is affected by
infrared rays of any other communication
devices
(10)
Places where some object may obstruct the
communication with the remote controller
¡
DO NOT leave the wireless kit without the cover.
In case the cover needs to be detached, protect the receiver with a packaging box or bag in order
to keep it away from water and dust.
Note
¡
Instruct the customer how to operate it correctly referring to the instruction manual.
¡
For the installation method of the air conditioner itself, refer to the installation manual enclosed in the package.
OPTION PARTS
Wireless kit
Question and Answer IconNeed help?

Do you have a question about the Mitsubishi Electric RCN-K-E and is the answer not in the manual?

Mitsubishi Electric RCN-K-E Specifications

General IconGeneral
BrandMitsubishi Electric
ModelRCN-K-E
CategoryAir Conditioner Accessories
LanguageEnglish

Summary

Option Parts

Wireless Kit

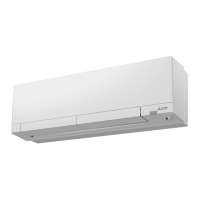
Details regarding the wireless kit as an optional part for the air conditioner unit.

WARNING

CAUTION

Note

Attention

Accessories

Preparation Before Installation

Setting on Site

Describes the switch settings on the Interface PCB for function configuration.

To Change Setting

Instructions on how to access and modify the switch settings on the Interface PCB.

How to Install the Control Assy (In Case of the Pipe Routed Through the Right)

Preparation Before Installing Control Assy

Steps for preparing and attaching the wiring and control assembly before installation.

Remove Panel

Instructions for safely removing the front panel of the indoor unit.

Install Receiver on Indoor Unit

Guide on how to physically install the receiver component inside the indoor unit.

Install Interface PCB Assy on Indoor Unit

Steps for installing the interface PCB assembly onto the indoor unit.

Fix Wiring Assy (for X, Y)

Procedure for fixing the wiring harness for specific unit models (X, Y).

Put Back Panel and Stick Label on Panel

Final steps to reassemble the unit panel and apply identification labels.

How to Install the Control Assy (In Case of the Pipe Routed Through the Left)

Preparation Before Installing Control Assy

Steps for preparing and attaching the wiring and control assembly before installation.

Remove Panel

Instructions for safely removing the front panel of the indoor unit.

Install Receiver on Indoor Unit

Guide on how to physically install the receiver component inside the indoor unit.

Install Interface PCB Assy on Indoor Unit

Steps for installing the interface PCB assembly onto the indoor unit.

Fix Wiring Assy (for X, Y)

Procedure for fixing the wiring harness for specific unit models (X, Y).

Put Back Panel and Stick Label on Panel

Final steps to reassemble the unit panel and apply identification labels.

How to Install the Control Assy (Put Back Panel and Stick Label)

Put Back Panel

Instructions for reattaching the front panel and securing it with screws.

Stick Label on Panel

Guidance on correctly placing the operational labels on the front panel.

How to Install the Wireless Remote Controller

Installation Tips for the Remote Controller Holder

Advice on mounting and positioning the remote control holder on the wall.

How to Insert Batteries

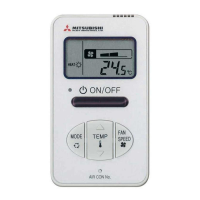
Step-by-step guide for inserting batteries into the wireless remote controller.

Function Setting of Interface PCB and Wireless Remote Controller

Master/Slave Setting When Using Plural Remote Controllers

Configuration for master/slave roles when using multiple controllers with one unit.

Setting to Avoid Mixed Communication

Procedure to prevent interference and ensure proper communication in multi-unit setups.

Setting to Disable the Auto Mode Operation

Instructions to disable the automatic mode selection for specific system types.

Wiring

Control Plural Indoor Units with One Remote Controller

Guidelines for wiring and connecting multiple indoor units to a single remote controller.

Restrictions on the Thickness and Length of Wire

Specifications for wire gauge and maximum extension length for wiring connections.

Wireless Remote Controller Operation Distance

Standard Signal Receiving Range

Defines the optimal range and conditions for the wireless remote signal reception.

Points for Attention in Connecting a Plural Number of Indoor Units

Considerations for signal reception when multiple indoor units are connected.

Trial Operation

Backup Switch

Information on using the backup switch for manual operation of the unit.

Cooling Test Run Operation

Procedure for performing a cooling test run after installation and power connection.

Related product manuals