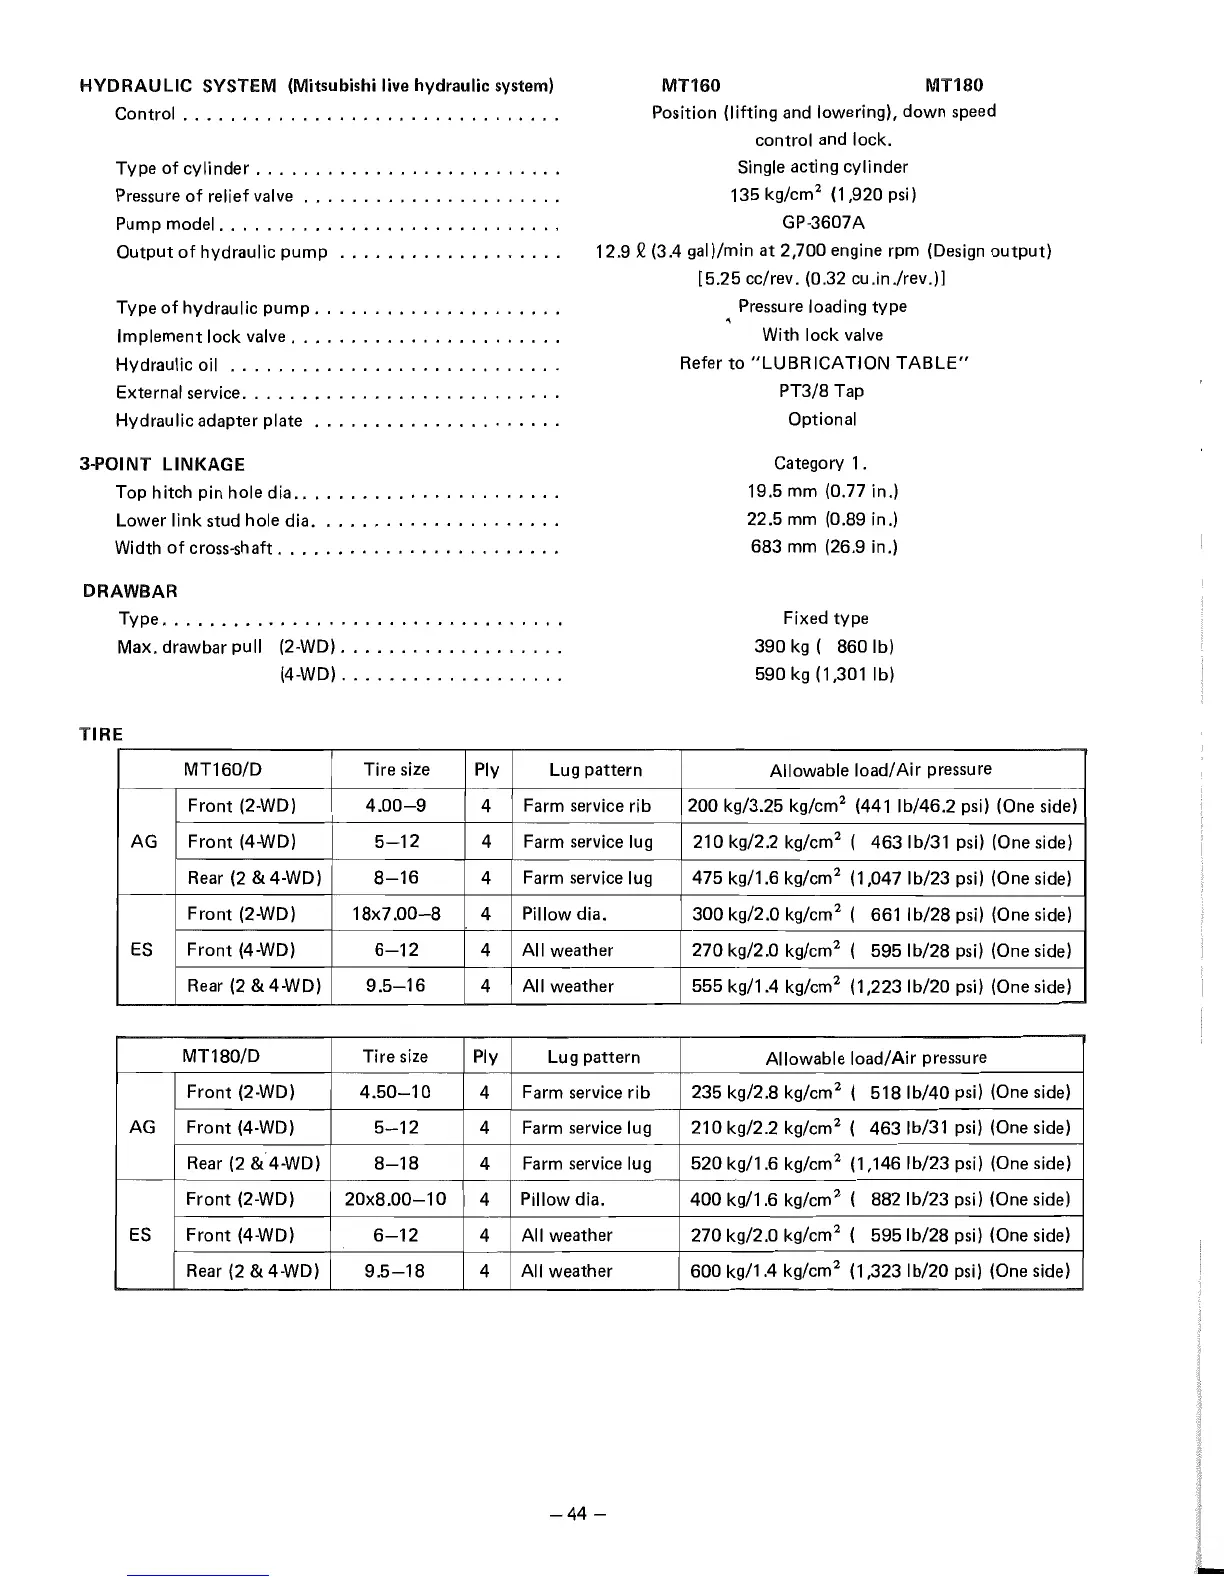
HYDRAULIC
SYSTEM (Mitsubishi live hydraulic system)
Control
...............................
.
Type
of
cylinder
.........................
.
Pressure
of
relief
valve
.....................
.
Pump model
............................
.
MT160
MT180
Position (lifting
and
lowering), down
speed
control
and
lock.
Single acting cylinder
135 kg/cm
2
(1,920 psi)
GP-3607A
Output
of
hydraulic pump
..................
.
12.9
Q (3.4 gal)/min at 2,700 engine rpm
(Design
output)
[5.25 cc/rev. (0.32 cu.in./rev.)]
Type
of
hydraulic pump
....................
.
Implement lock
valve
......................
.
Hydraulic oil
...........................
.
External
service
......
'
....................
.
Hydraulic adapter plate
3-POINT
LINKAGE
Top hitch pin hole dia
......................
.
Lower
link
stud hole dia
....................
.
Width
of
cross-shaft
.......................
.
DRAWBAR
Type
.................................
.
Max. drawbar pull (2-WD)
..................
.
(4-WD)
..................
.
TIRE
MT160/D
Tire
size
Ply Lug pattern
Front (2-WD)
4.00-9
4
Farm service rib
AG
Front (4-WD)
5-12
4
Farm service lug
Rear
(2
& 4-WD)
8-16
4
Farm service lug
Front (2-WD)
18x7.00-8
4
Pillow dia.
ES
Front (4-WD)
6-12
4
All
weather
Rear
(2
& 4-WD)
9.5-16
4 All weather
MT180/D Tire
size
Ply
Lug pattern
Front
(2-WD)
4.50-10
4 Farm service
rib
AG Front (4-WD)
5-12
4 Farm service lug
Rear
(2
&4-WD)
8-18
4 Farm service lug
Front (2-WD)
20x8.00-10
4
Pillow dia.
ES
Front (4-WD)
6-12
4
All weather
Rear
(2
& 4-WD)
9.5-18
4
All weather
-44
-
Pressure
loading type
With lock
valve
Refer to
"LUBRICATION
TABLE"
PT3/8
Tap
Optional
Category 1.
19.5 mm (0.77 in.)
22.5
mm
(0.89 in.)
683
mm
(26.9 in.)
Fixed type
390
kg
( 8601b)
590
kg
(1,301 Ib)
Allowable
load/Air
pressure
200 kg/3.25 kg/cm
2
(441
Ib/46.2 psi) (One side)
210 kg/2.2 kg/cm
2
(
4631b/31 psi)
(One
side)
475 kg/1.6 kg/cm
2
(1,047 Ib/23 psi) (One side)
300 kg/2.0 kg/cm
2
(
661
Ib/28 psi)
(One
side)
270 kg/2.0 kg/cm
2
(
595 Ib/28
psi)
(One side)
555 kg/1.4 kg/cm
2
(1,223 Ib/20
psi)
(One side)
Allowable
load/Air
pressure
235 kg/2.8 kg/cm
2
(
5181b/40 psi)
(One
side)
210 kg/2.2 kg/cm
2
(
463 Ib/31
psi)
(One
side)
520 kg/1.6 kg/cm
2
(1,146 Ib/23 psi)
(One
side)
400 kg/1.6 kg/cm
2
(
8821b/23 psi) (One side)
270 kg/2.0 kg/cm
2
(
595 Ib/28 psi) (One
side)
600 kg/1.4 kg/cm
2
(1,323 Ib/20
psi)
(One
side)
 Loading...