Do you have a question about the Mitsubishi P66E and is the answer not in the manual?
Specifies the required voltage and frequency for operation.
Details essential safety measures for operating the unit.
Provides guidelines for suitable and unsuitable placement of the unit.
Lists materials to avoid for cleaning and contact.
Instructions for cleaning the unit's exterior.
Explains thermal head wear and when replacement is needed.
Information on recommended thermal paper and its handling.
Outlines safety checks required for the equipment.
Information on supplier-provided technical documentation for repair.
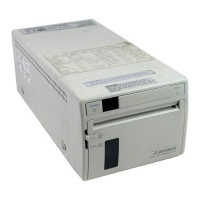
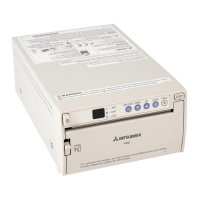
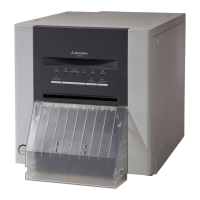
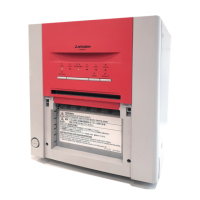
Identifies and describes components on the front panel.
Details buttons and their functions on the control tray.
Identifies and describes connectors and controls on the rear panel.
Precautions for handling paper to ensure print quality.
Steps to open the unit's door for paper loading.
Instructions for properly loading the paper roll.
Procedure for closing the door and pulling out the paper.
How to cut the paper end using the built-in cutter.
Instructions on how to adjust the lever after paper loading.
Key precautions to avoid paper jams during installation.
Important warnings regarding handling paper and internal components.
Guides on connecting external video equipment to the processor.
Details the standard settings for MODE 1 switches.
Instructions for connecting medical equipment.
Standard settings for MODE 1 switches for medical equipment.
Steps to prepare the unit for printing.
How to power on the video copy processor.
Instructions for initiating a print from the monitor.
How to cut the paper after printing.
Explains how to make multiple copies using the control tray.
How to connect and use the wired remote controller.
Warnings regarding overheating and paper handling during printing.
Details on the paper saving mode function.
How to adjust picture brightness and contrast.
Steps to access the control tray for adjustments.
How to select the brightness adjustment mode.
How to select the contrast adjustment mode.
How to modify the selected brightness or contrast value.
Explains the 'Ed' error for dew formation and its remedy.
Details the 'Ep' error for no paper and its resolution.
Describes the 'Ex' error for overheating and the cooling procedure.
Explains the 'EU' error for head position and how to reset.
Details the 'EL' error for incorrect lever position and its fix.
Describes the 'E6' error for invalid button input and its causes.
Explains the function of each DIP switch in MODE 1.
Describes the role of the EXTRA switch in MODE 1.
Details the FUNCTION switch's effect in MODE 1.
Explains how RESOLUTION switch affects print output.
Setting for video signal lines (PAL/NTSC).
Function of the AFC switch for picture quality.
Controls the PAL trap circuit for signal filtering.
Controls the NTSC trap circuit for signal filtering.
Setting for input impedance, useful for branching signals.
Overview of MODE 2 DIP switch functions.
Selects frame or field for printing, affecting motion.
Sets image to negative or positive display.
Controls print direction (normal or reversed).
Indicates an unused switch position.
Sets the aspect ratio of the printed picture.
Selects paper type (SUPER or HD) for printing.
Controls paper saving mode and margin size.
Indicates an unused switch position.
Settings for FUNCTION 1 group.
Settings for FUNCTION 2 group.
Settings for FUNCTION 3 group.
Adjusts the printed picture density.
Inverts signal polarity for brightness/contrast issues.
Adjusts the printed picture density.
Inverts signal polarity for brightness/contrast issues.
Selects frame or field for printing.
Sets image to negative or positive.
Selects printing direction.
Selects the aspect ratio of the printed picture.
Selects paper type based on recording paper.
Selects margin size for paper saving.
Selects y-curve for optimum print based on connected unit.
Enhances the printed picture contour.
Controls the dither function for improved graduation.
Selects whether the buzzer sounds for button presses or printing end.
Sets the number of copies to be printed.
Enables printing of a cumulative picture number.
Indicates the power status of the unit.
Shows the unit is in standby mode.
Displays the current printing status.
Shows the selected print density setting.
Displays saturation monitor setting.
Indicates the selected scan mode.
Shows the image mode setting.
Displays the print direction setting.
Shows the aspect ratio setting.
Displays the paper type setting.
Indicates the selected y-curve.
Shows the edge enhancement setting.
Displays the dither select mode.
Shows the buzzer setting.
Indicates the copy number setting.
Displays the cumulative picture number print mode.
Shows the brightness adjustment mode.
Displays the contrast adjustment mode.
Indicates detected error states.
Shows the paper feed mode.
Displays the paper saving mode.
Steps to turn on the unit for cleaning.
Procedure to open the unit's door.
Instructions for inserting the cleaning paper.
How to close the unit's door.
Action to select PAPER FEED mode.
Sets the lever for the cleaning process.
Initiates the cleaning paper feed.
How to remove the cleaning paper after use.
Repeating cleaning and verifying effectiveness.
Instructions for re-installing paper after cleaning.
Action to exit PAPER FEED mode.
Warnings regarding frequency of cleaning and potential issues.
Instructions for cleaning the main unit's exterior.
How to clean the rubber roller.
Instructions for cleaning the thermal head.
Identifies the product type.
Specifies the model number.
Details the required power input.
States the unit's power usage.
Lists available input/output terminals.
Specifies the print resolution capabilities.
Details the number of gradations supported.
States the printing speed.
Defines the standard print dimensions.
Lists environmental conditions for operation.
Provides physical dimensions of the unit.
States the unit's weight.
Lists included accessories.
Lists available optional accessories.
Guidance on when and how to contact service.
| Interface | USB 2.0 |
|---|---|
| Type | Photo Printer |
| Print Technology | Dye-Sublimation |
| Print Size | 4 x 6" |
| Resolution | 300 dpi |
| Printing Method | Dye-Sublimation |
| Print Width | 4" |