2
Date of publication: May 1, 2023
Printed in Japan
Mitutoyo Corporation 20-1, Sakado 1-Chome, Takatsu-ku, Kawasaki-shi, Kanagawa
213-8533, Japan
●
129Series
• If the reference point difference is ±0.01 mm or less
1
With the reference point conrmed, x the rod with the spindle clamp.
2
Insert the supplied key wrench into the hole on the rear of the reference line on the sleeve, and then rotate the
sleeve until the reference line is aligned with the zero graduation line on the thimble.
• If the reference point difference is approximately ±0.01 mm or more
1
With the reference point conrmed, x the rod with the spindle
clamp.
2
Remove the thimble cap while holding it in place with your ngers
to prevent the thimble from rotating.
3
Insert the supplied key wrench into the hole on the side of the
thimble xing nut and loosen the thimble xing nut.
4
Rotate the thimble while pushing it toward the ratchet stop and
align the thimble's gradations with the sleeve's reference line.
5
Tighten the thimble xing nut with the key wrench while gently
pushing the thimble in the direction of the sleeve, being careful not
to allow the thimble to rotate.
6
Mount the thimble cap and loosen the spindle clamp.
• Rod reference point adjustment
Important
• Dust and other debris adhering to the area where the rod collar contacts the rod end face can cause a reference
point error.
• Check the reference point again after temperature conditioning.
• If the rod is held in the hand for a long period of time during adjustment, the rod will expand, making accurate
reference point adjustment impossible. Please be careful.
• Be sure to adjust the reference point also when the rod is replaced.
• Set the rod into the body slowly. Setting the rod by dropping it rapidly can cause damage.
Although the rods are pre-adjusted for the reference point at the time of shipment, determine if the rod's reference point
needs to be adjusted after checking the reference point following the procedure below.
1
Mount the 0 to 25 mm rod and adjust the reference point of the Depth Micrometer body according to the method
described in "● If the reference point difference is ±0.01 mm or less" or "● If the reference point difference is
approximately ±0.01 mm or more."
2
Replace the rod with one in the measurement range to be used and perform "
■
Reference Point Conrmation".
3
If there is a reference point difference, adjust the reference point of the rod in accordance with the following
procedure.
• If the reference point difference is positive
1 Hold the thimble steady with your ngers and remove the thimble cap.
2 Pull out the mounted rod.
3 Insert the supplied key wrench into the hole on the side of the rod
collar and the supplied wrench into the tightening nut respectively.
4 Loosen the tightening nut about half a turn in the direction of arrow.
5 Loosen the rod collar set screws (x2) with the supplied hex wrench.
6 Move the rod collar to the end face of the tightening nut and lightly
tighten the set screw.
7 Insert the supplied key wrench into the hole on the side of the rod
collar and the supplied wrench into the tightening nut respectively.
8 Tighten the tightening nut in the direction of arrow.
7
Key wrench
Tightening nut
Rod collar
Wrench
5
6
Hex wrench
Set screw
Tightening nut
Rod collar
9 Tighten the rod collar set screws (x2) securely.
10 Insert the rod into the body and tighten the thimble cap securely.
11 Check the reference point again, and if further reference point adjustment is required, repeat steps 1 - 10
above.
• If the reference point difference is negative
1
Hold the thimble steady with your ngers and remove the thimble cap.
2 Pull out the mounted rod.
3
Loosen the rod collar set screws (x2) with the supplied hex wrench.
4 Insert the supplied key wrench into the hole on the side of the rod
collar and the supplied wrench into the tightening nut respectively.
5 Tighten the tightening nut in the direction of arrow.
» The rod collar moves in the direction of the arrow (Measurement
error amount moves).
6 Perform steps 7 to 9 of "• If the reference point difference is
positive".
7 Check the reference point again, and if further reference point
adjustment is required, repeat steps 1 - 6 above.
4. ChangingtheMeasurementRange
■
129Series(128SeriesCannotChangetheMeasurementRange)
Important
• Set the rod into the body slowly. Setting the rod by dropping it rapidly can cause damage.
• Insert the rod carefully until it protrudes from the base.
1
Hold the thimble steady with your ngers and remove the thimble cap.
2
Pull out the mounted rod and insert the appropriate rod.
3
Hold the thimble steady with your ngers and mount the thimble cap securely.
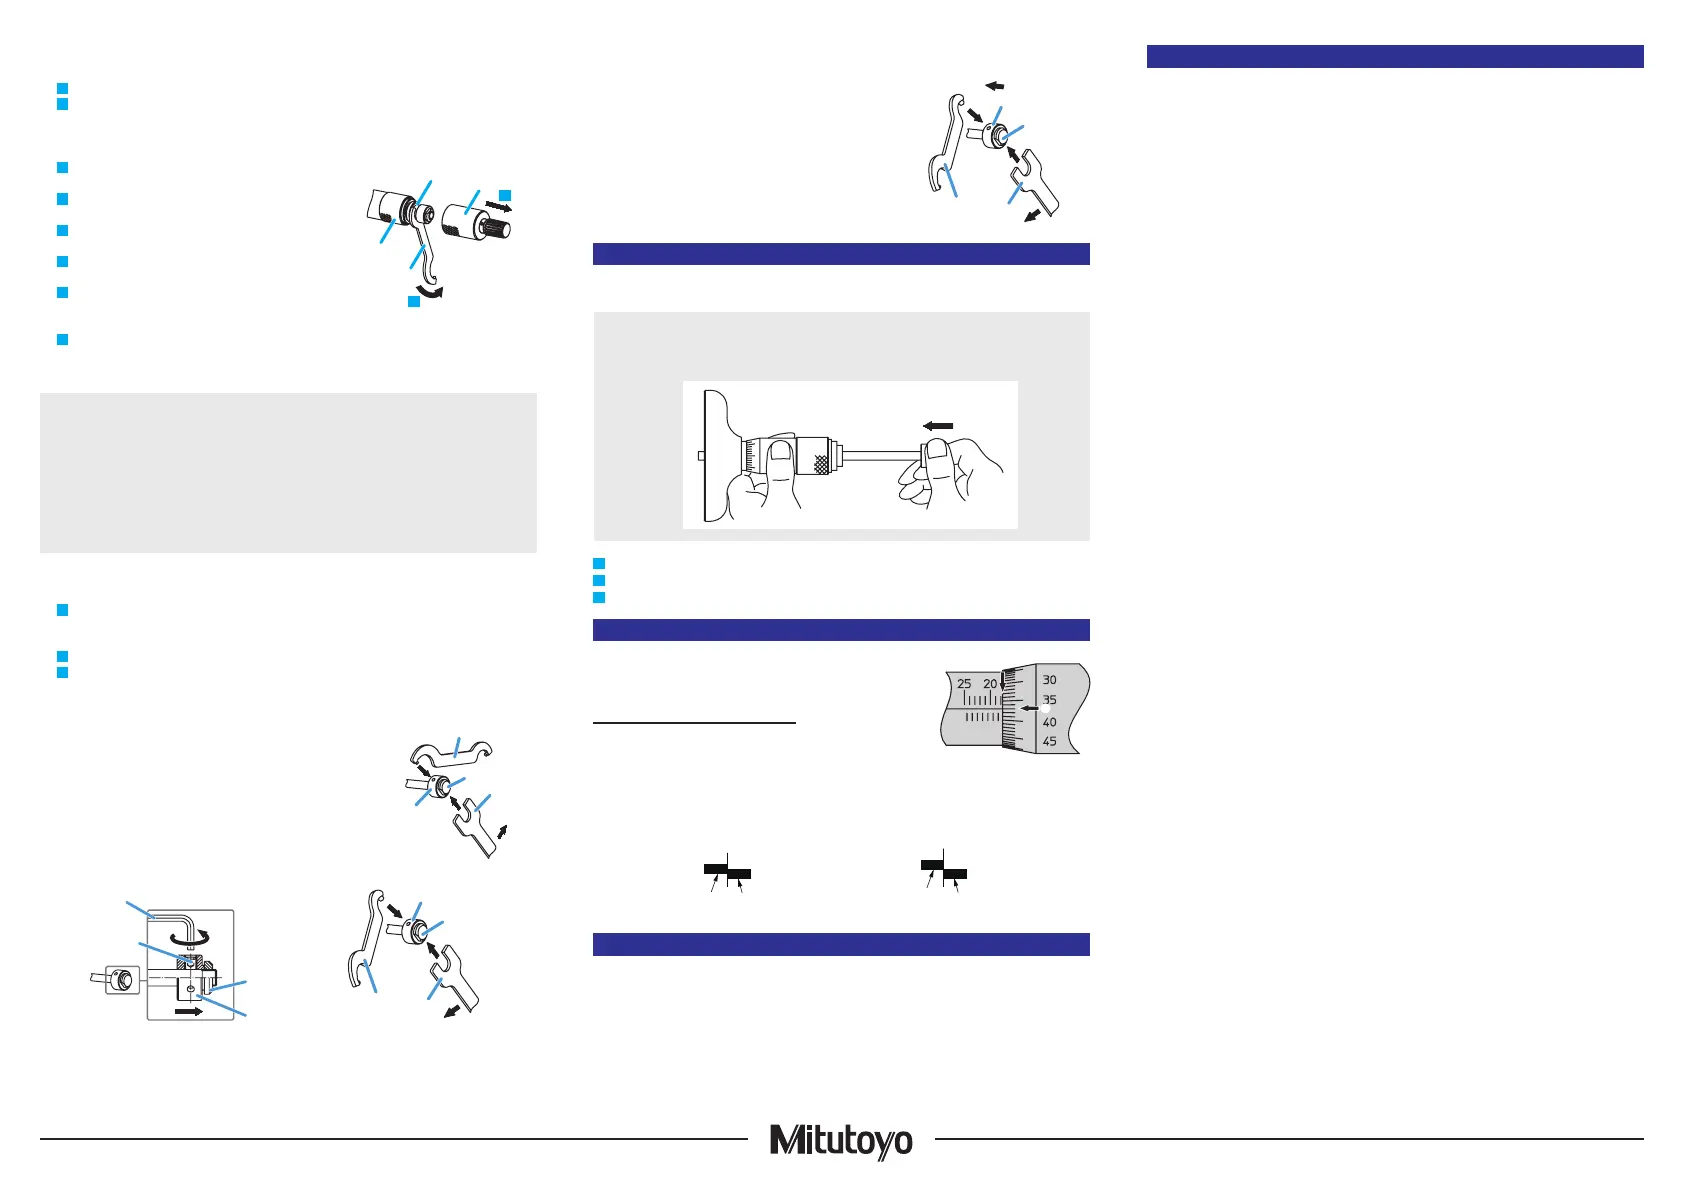
5. HowtoReadGraduations
Read the graduations as below.
①
Sleeve (outer sleeve) reading 17.5 mm
②
Thimble reading
0.37 mm
17.87 mm
Read the thimble at the location where the sleeve reference line matches the graduation line on the thimble.
This is normally read down to 0.01 mm as shown above,
but as shown in the gure below, it can also read by eye down to 0.001 mm.
Sleeve reference line Thimble graduation line Sleeve reference line Thimble graduation line
Approx. -1 µm Approx. -2 µm
6. Specications
• Maximum permissible measurement error : ±3 µm (±0.00015 in) (128 Series)
• Graduation : 0.01 mm (0.001 in)
• Operating temperature : 5 °C to 40 °C
• Storage temperature : -10 °C to 60 °C
4
4
Key wrench
Tightening nut
Rod collar
Wrench
②
7. PaidMaintenance
We recommend periodic inspections to check and maintain the product's accuracy. Also, if any of the following defects
occur, please contact the agent where you purchased the product or a Mitutoyo sales ofce.
・
Inconsistent measured values
Burrs or nicks generated by an impact on the measurement surfaces may affect measurement repeatability.
3
4
3
Key wrench
Rod collar
Tightening nut
Wrench
2
Thimble xing nut
Thimble cap
Thimble
Key wrench
 Loading...