7
Silver Solder: If extra strength is desired, and also to
avoid the lead in softer solder, silver solder can be used.
A propane torch is a must, as the melting point of silver
solder is much higher. Clean the metal and apply the flux
(liquid silver solder flux is better than the borax type). Cut
a very small piece of solder and lay it next to the joint.
This is necessary because, unlike soft solder, silver solder
will not break away from the roll. It tends to ball up on
the end. Next, heat the joint and solder it together. When
the correct temperature is reached the solder will jump
into the joint––job completed! Be careful to remove the
heat as soon as possible, because the brass also will be
near its melting point.
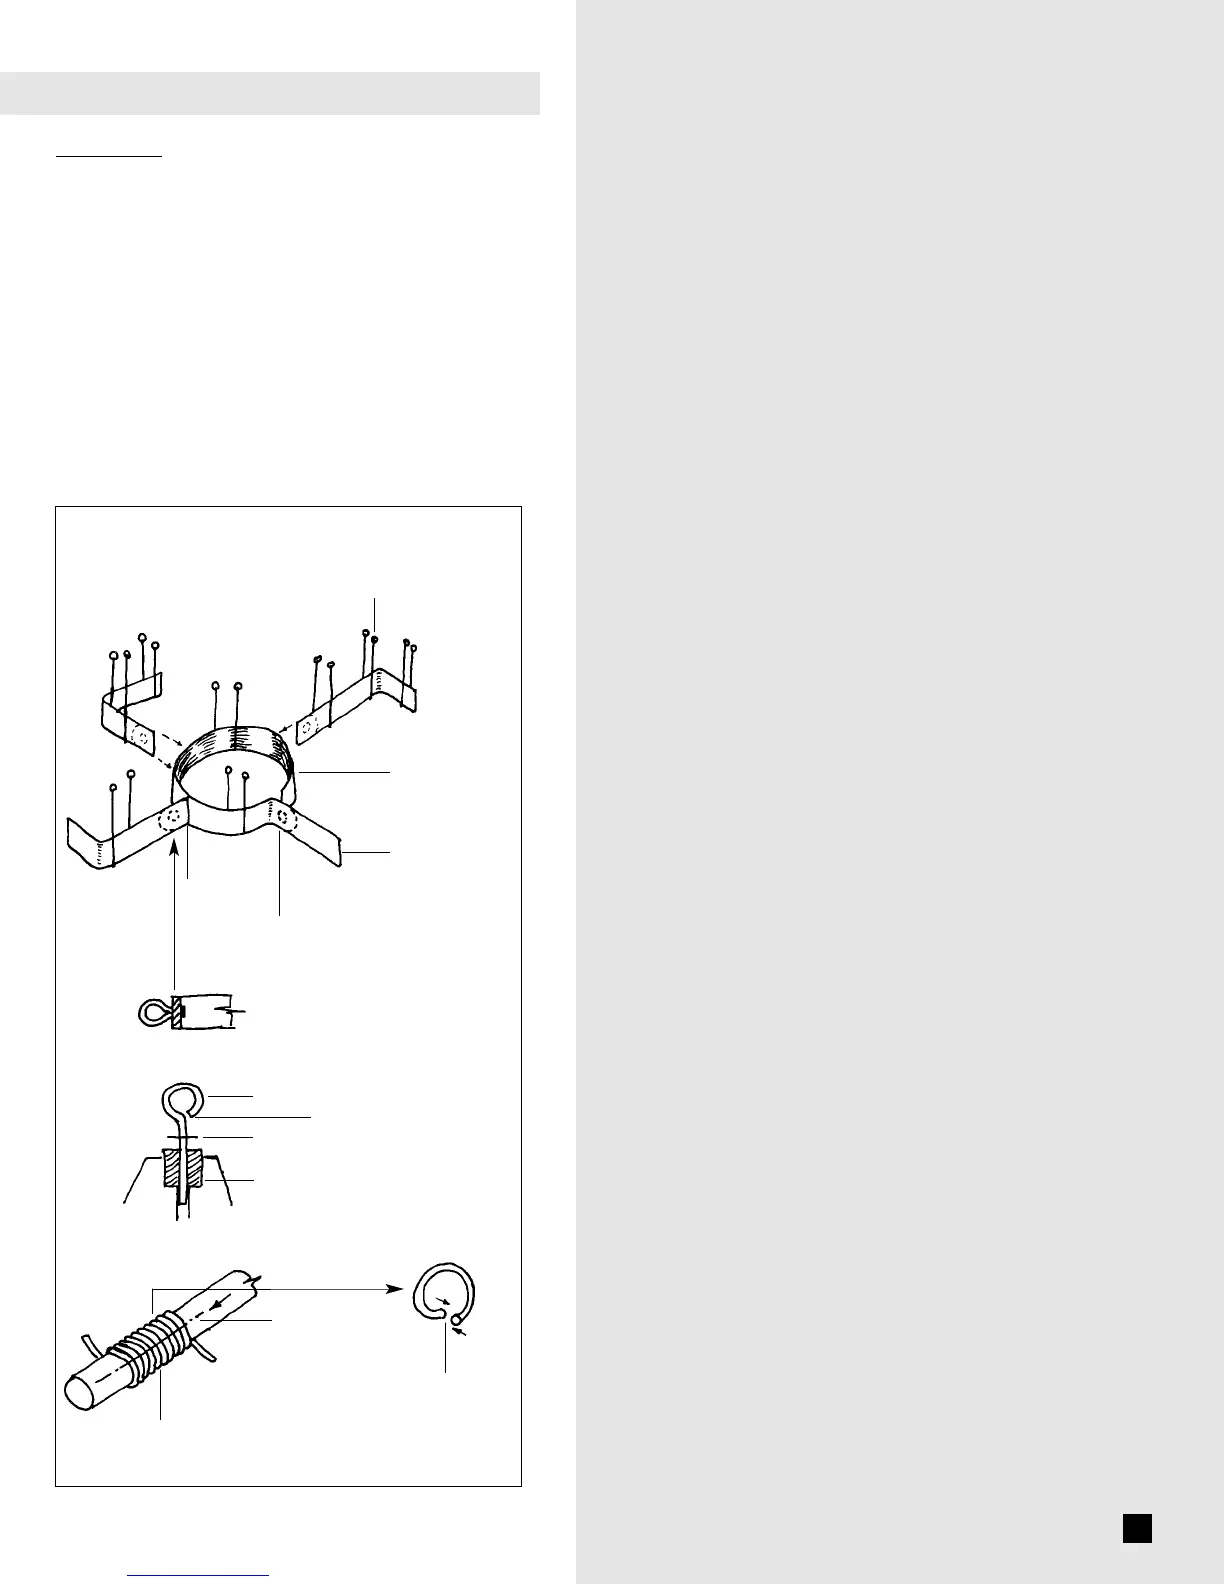
Figure 1a illustrates how to make mast bands, eyebolts
and rings. Rings can be soldered after they are used on
the model, or not soldered at all, unless there is some
strain on the ring from rigging.
The following tools and supplies are recommended for the
construction process. Modelers who have built before may have
their own favorites.
A.
Knives & Saws
1.
Hobby knife with No. 11 blades
2.
Coping saw (or jeweler’s saw frame) and fine blades
3. Razor saw
B. Files – Set of needle files
C. Carving Tools – Small chisel for carving center keel rabbet
D. Sharpening Stone – Necessary to keep the tools razor sharp
E. Clamps
1. A few small C-clamps
2. Several wooden clothespins
3. Rubber bands
F. Wire Cutters & Tin Snips
For cutting fine wire & chain; for cutting brass sheet
G. Boring Tools
1.
Set of miniature drills: #60 to #80
2. A pin vise
3. Larger bits: 1/16”, 3/32”, and 1/8”
H. Miscellaneous
1. Tack hammer
2. Tweezers (a few)
3. Small fine pointed scissors
4. Miniature pliers
a. small round for forming rings and eyes
b. flat nose (with serrated jaws)
5. Draftsman’s dividers
6. Proportional dividers
7. Bench vise (small) with own base for moving around
8. Soldering iron with 1/8” diameter tip and/or propane torch
a. solder
b. flux
9. Sewing thread (for seizings & lanyards; other rigging in kit)
a. black
b. beige
Beeswax (for treating rigging lines)
1/2” or 3/4” masking tape
I. Sandpaper – Fine and medium grit garnet or aluminum oxide
sandpaper (#100 to #220 grit)
J.
Finishing: –
Paint brushes
1.
Fine point for details
2. 1/4” to 1/2” flat square for hull
K. Supplies: – (will be covered in detail in the Painting &
Staining section and throughout instructions.)
1.
Paints
2.
Primer
3. Stains/varnish
4. White or Carpenter’s (yellow) wood glue
5. Five-minute epoxy
6. Super glue
L.
Cotton or linen cloth:
(fine weave) for sails, if added
Plastic: Plastic sheet or glass for windows, skylights
Note about Glues: White or Carpenter’s yellow wood glue will
suffice for most of the model. Five-minute epoxy provides extra
strength for gluing fittings. Cyanoacrylate (Super) glue such as Jet,
can be used for quick adhesion and is ideal for dabbing onto a
rigging seizing to hold it in place. The best cyanoacrylate glue for
most applications is a medium viscosity gap-filling type. The
watery-thin type is recommended to fill a narrow crack by
capillary action and for quick setting of hull planking.
WHAT YOU’LL NEED TO START CONSTRUCTION
Pins to hold
parts in place
EYEBOLTS
RINGS
Form around drill or rod
Cut off as required
Wood jaws in vise
Bend in
line – solder
Wrap wire
around rod
Saw or cut with
hobby knife
Solder
Form around
dowel or drill
Cut from
sheet brass
After soldering,
drill, cut and file
to shape
Flux/solder
all joints
Real ship
MAST BANDS
FIG. 1a - Making Mast Bands, Eyebolts and Rings
10.
11.
M.


 To Next Page