EasyManua.ls Logo

Moen CA87060 Series User Manual

Moen CA87060 Series
4 pages
To Next Page IconTo Next Page
Page #1 background imageLoading...
Page #1 background image
TWO-HANDLE KITCHEN FAUCET
MODEL CA87888, CA87889, CA87060 SERIES
MEZCLADORA PARA COCINA
DE DOS MANERALES
MODEL
O SERIE CA87888, CA87889, CA87060
ROBINET DE CUISINE
À DEUX POIGNÉES
MODÉLE CA87888, CA87889, CA87060
Please Call Moen First
For Installation Help, Missing or Replacement Parts
(USA)
1-800-BUY-MOEN
Mon. - Fri. 8:00 a.m. to 8:00 p.m. EST
Sat. 8:00 a.m. to 6:30 p.m. EST
WWW.MOEN.COM
(Canada)
1-800-465-6130
7:30 h à 17 h, EST
WWW.MOEN.CA
Llame por favor Moen Primero
Para la ayuda de Instalación, los Desaparecidos o las Piezas
de Recambio
01-800-718-4345
Lunes a viernes de 8:00 a 20:00 hs. (Costa Este)
Sáb. 8:00 a 18:30 hs. (Costa Este)
WWW.MOEN.MX
Veuillez appeler Moen d'abord
Pour l'aide d'installation, les Disparus ou les
Pièces de Rechange
1-800-465-6130
7:30 h à 17 h, EST
WWW.MOEN.CA
HELPFUL TOOLS
For safety and ease of faucet replacement, Moen
recommends the use of these helpful tools.
HERRAMIENTAS ÚTILES
P
ar
a que el cambio de la llave sea fácil y seguro,
Moen le recomienda usar estas útiles herramientas.
OUTILS UTILES
P
ar mesur
e de sécurité et pour faciliter l’installation,
Moen suggère l’utilisation des outils suivants
.
PRECAUCIÓN – CONSEJOS PARA
C
AMBIAR L
A LL
A
VE MEZCLADORA.
Siempr
e CIERRE la t
oma de agua an
t
es
de quitar la llave existente o desmontar la
válvula. Abra la llave para liberar la presión, y
asegúr
ese de que est
é bien cerrada el agua.
INSTRUCCIONES DE CUIDADO
Para conservar el acabado que cubre las partes
metálicas de su llave mezcladora Moen, aplique
cer
a que no sea abr
asiva, como una cera para autos.
Si usa algún tipo de limpiador
, deber
á enjuagar
lo
inmediatamente. Los abrasivos suaves son
aceptables en acabados Platinum y LifeShine®.
A
T
TENTION —SUGGESTIONS POUR ENLE
VER
LANCIEN ROBINET:
Toujours couper
l’alimentation en eau avant d’enlever ou de
démonter le robinet. Ouvrir le robinet pour
libérer la pression d’eau et pour s’assurer que
l’alimentation en eau a bien été coupée.
DIRECTIVES D’ENTRETIEN
P
our préserver le fini des pièces métalliques du
r
obinet M
oen, appliquer une cir
e non abrasive
comme une cire à voiture. Rincer immédiatement
le robinet après l’avoir nettoyé avec un agent
nettoyant. Les finis Platinum et LifeShine
®
peuvent
être nettoyés à l’aide de produits abrasifs doux.
CAUTION — TIPS FOR REMOVAL OF OLD
FAUCET: Always turn water supply OFF before
removing existing faucet or disassembling the
valve. Open faucet handle to relieve water pressure
and ensure that complete water shut-off has been
accomplished.
CARE INSTRUCTIONS
To preserve the finish on the metallic parts of your
Moen faucet, apply non-abrasive wax, such as car
wax. Any cleaners should be rinsed off
immediately. Mild abrasives are acceptable on
Platinum and LifeShine
®
finishes.
INS1678C - 3/10
M
odel Number/Número de modelo/Numéro de type
I
nstallation Date/Fecha de instalación/Date d'installation
For Warranty Support/Para la ayuda de la garantía/Pour l'appui de garantie
Question and Answer IconNeed help?

Do you have a question about the Moen CA87060 Series and is the answer not in the manual?

Moen CA87060 Series Specifications

General IconGeneral
BrandMoen
ModelCA87060 Series
CategoryPlumbing Product
LanguageEnglish

Summary

Moen Product Support and Contact Information

Installation and Replacement Parts Support

Provides phone numbers and website for installation help, missing, or replacement parts in USA and Canada.

Faucet Model Identification

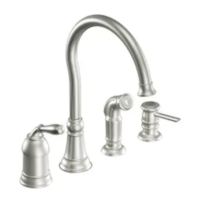
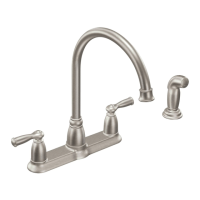
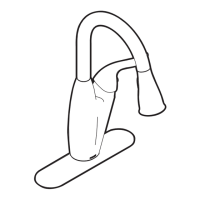
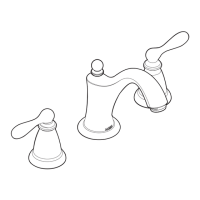
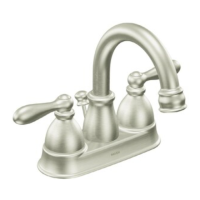
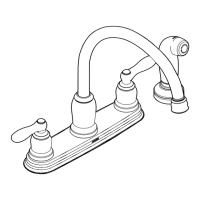
Lists the specific model numbers for the two-handle kitchen faucet series covered in this manual.

Two-Handle Kitchen Faucet Installation and Safety

Old Faucet Removal Precautions

Essential safety steps for turning off water and relieving pressure before removing an old faucet.

Faucet Care Instructions

Guidelines for maintaining the faucet's finish using non-abrasive wax and proper cleaning techniques.

Recommended Installation Tools

Lists helpful tools recommended by Moen for safe and easy faucet replacement.

Faucet Installation Diagrams

Installation Step 1 and 2

Illustrations showing the initial steps for installing the faucet, including part identification.

Installation Step 3

Diagram illustrating the third step in the faucet installation process.

Installation Step 4

Diagram illustrating the fourth step in the faucet installation process.

Installation Step 5

Diagram illustrating the fifth step in the faucet installation process.

Installation Step 6

Diagram illustrating the sixth step in the faucet installation process.

Installation Step 7

Diagram illustrating the seventh step in the faucet installation process.

Installation Step 8

Diagram illustrating the eighth step in the faucet installation process.

Installation Step 9

Diagram illustrating the ninth step in the faucet installation process.

Installation Step 10

Diagram illustrating the tenth step in the faucet installation process, showing hot and cold connections.

Consumer Information and Lead Content

Lead Exposure Reduction

Information on potential lead content in brass alloys and steps to reduce exposure, including water flushing.

Moen Lifetime Limited Warranty

Warranty Coverage Details

Outlines the warranty terms for homeowners and other purchasers, covering leaks, drips, parts, and finishes.

Exclusions and Limitations

Specifies damages not covered by the warranty, such as installation errors, abuse, or improper cleaners.

How to Make a Warranty Claim

Provides instructions on how to submit a warranty claim, including required documentation and contact information.

Related product manuals