INS10477C - 6/22
7
CONNECT DISPOSAL TO MOUNT ASSEMBLY
CONECTE EL TRITURADOR AL CONJUNTO DE MONTAJE
RACCORD DU BROYEUR À L’ASSEMBLAGE DE MONTAGE
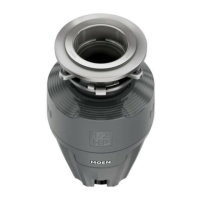
Before connecting the disposal to the mounting assembly under the sink, check that the Lower Mounting
Ring (I) is in place and the Cushion Mount (H) is engaged securely around the top lip of the disposal.
Antes de conectar el triturador al conjunto de montaje debajo del fregadero, verique que el anillo de
montaje inferior (I) esté en su lugar y que el montaje amortiguador (H) esté bien enganchado alrededor del
labio superior del triturador.
Avant de raccorder le broyeur à l’assemblage de montage sous l’évier, vérier que l’anneau de montage
inférieur (I) est bien placé et que le support compressible (H) est bien enclenché autour de la lèvre supérieure
du broyeur.
Cushion Mount
Montaje amortiguador
Support compressible
H
Lower Mounting Ring
Anillo de montaje inferior
Anneau de montage
inférieur
I
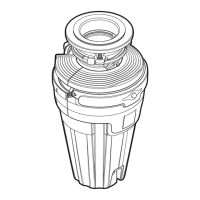
9
1. Align the discharge elbow with the drain connection and hang the disposal by aligning the 3 mounting tabs on the
lower mounting ring (I) with the slide-up ramps on the upper mounting ring (F).
2. Rotate the lower mounting ramp onto the upper mounting ring (verify all 3 tabs are engagaed).
1. Alinee el codo de descarga con la conexión del desagüe y cuelgue el triturador alineando las 3 aletas de montaje en el
anillo de montaje inferior (I) con las rampas de deslizamiento hacia arriba en el anillo de montaje superior (F).
2. Haga girar la rampa de montaje inferior sobre el anillo de montaje superior (verique que las 3 aletas estén enganchadas).
1. Aligner le coude du broyeur avec le raccord d’évacuation et suspendre le broyeur en alignant les 3 onglets de l’anneau
de montage inférieur (I) avec les rails de glissement de l’anneau de montage supérieure (F).
2. Faire pivoter la rampe de montage inférieure sur l’anneau de montage supérieur (vérier que les 3 onglets sont bien
enclenchés).
1
F
2
10
I
3X
Using a blunt instrument (steel punch or wooden dowel), knock out the
entire plug in the dishwasher inlet. Do not use a screwdriver or sharp
instrument. IMPORTANT: Do not remove the gasket and place it on the
disposal between the elbow and disposal. It must stay on the elbow to
make a proper seal.
When the plug has been knocked into the disposal, it should be removed
using a pair of kitchen tongs and thrown away.
Con un instrumento de punta roma (punzón de acero o clavija de
madera), rompa todo el tapón en la entrada del lavavajillas. No utilice
un destornillador u otro instrumento loso. IMPORTANTE: No retire el
empaque y colóquelo en el triturador entre el codo y el triturador. Debe
quedar en el codo para formar el sello correcto. Una vez desplazado dentro
del triturador, el tapón debe ser
retirado con un par de tenazas o pinzas de cocina y desechado.
À l’aide d’un outil à bord arrondi (poinçon en acier ou goujon en bois),
enfoncer la totalité du bouchon dans l’entrée du lave-vaisselle. Ne pas
utiliser un tournevis ou tout autre outil coupant. IMPORTANT : Ne pas
enlever le joint d’étanchéité ni le placer sur le broyeur entre le coude et
le broyeur. Il doit rester sur le coude pour créer l’étanchéité requise. Si le
bouchon a été repoussé dans le broyeur, il faut l’enlever en utilisant une
pince de cuisine et le jeter.
Knock Out Plug
Rompa el tapón
Bouchon défonçable
* Ne suivre cette étape que lors du raccord
d'un broyeur à un lave-vaisselle
8
* Only perform this step if
connecting disposal to dishwasher
* Lleve a cabo este Paso solamente si va
a conectar el triturador al lavavajillas
For installation requiring hardwire electrical connections, proceed to Page 10
Para instalaciones que requieran conexiones de cableado eléctrico, vaya al Paso 10.
Pour une installation exigeant un raccord électrique câblé, passer à la page 10.

 Loading...