EasyManua.ls Logo

Moen GX Series User Manual

Moen GX Series
16 pages
To Next Page IconTo Next Page
Page #1 background imageLoading...
Page #1 background image
Sealant
Sellador
Mastic
Flathead
Screwdriver
Destornillador
de punta chata
Tournevis à
tête plate
Phillips
Screwdriver
Destornillador
Phillips
Tournevis
Phillips
Adjustable Pliers
Alicate ajustable
Pinces réglables
Wire Cutters
Corta alambre
Pince coupe-ls
Cable Connector
Conector para cable
Connecteur de câble
Wire Nuts
Tuercas para cables
Capuchons de
connexion
Pencil
Lápiz
Crayon
Flashlight
Linterna
Lampe de poche
Safety Glasses
Gafas de seguridad
Lunettes de sécurité
Adjustable Wrench
Llave ajustable
Clé anglaise
Wire Strippers
Pelacables
Pince dénude-ls
Optional Dishwasher Connector Kit
Kit optativo para conexión del lavavajillas
Trousse optionnelle de raccord au lave-vaisselle
Required for Optional Hardwire Installation
Necesario para la instalación optativa del
cableado permanente
Requis pour l’installation câblée optionnelle
Please Contact Moen First
For Installation Help, Missing or
Replacement Parts
(USA)
1-800-BUY-MOEN (1-800-289-6636)
WWW.MOEN.COM
(Canada)
1-800-465-6130
WWW.MOEN.CA
Por favor, contáctese primero
con Moen
Para obtener ayuda de instalación, piezas
faltantes o de recambio
011 52 (800) 718-4345
WWW.MOEN.COM.MX
Veuillez d’abord contacter Moen
En cas de problèmes avec l’installation,
ou pour obtenir toute pièce manquante
ou de rechange
1-800-465-6130
WWW.MOEN.CA
INS10477C - 6/22
GARBAGE DISPOSAL
TRITURADOR DE DESPERDICIOS
BROYEUR À DÉCHETS
HELPFUL TOOLS For safety and ease of garbage disposal replacement, Moen recommends the use of these helpful tools.
• HERRAMIENTAS ÚTILES Para que el cambio del triturador sea fácil y seguro, Moen le recomienda usar estas útiles herramientas.
• OUTILS UTILES Par mesure de sécurité et pour faciliter le remplacement du broyeur à déchets, Moen suggère l’utilisation des outils suivants.
Register Online:
Regístrese en línea:
S’enregistrer en ligne :
www.moen.com/product-registration
Record Purchased Model and Serial Number:
Registre el modelo adquirido y su número de serie:
Inscrire les numéros du modèle et de série du produit acheté :
Image is for reference only
(Style varies by model)
La imagen es sólo como referencia
(El estilo varía por el modelo)
Cette image est fournie à titre iinformatif seulement
(Le style varie selon le modèle)
(Save instruction sheet for future reference)
(Guarde la hoja de instrucciones para futura referencia)
(Garder ces directives pour référence ultérieure)
Question and Answer IconNeed help?

Do you have a question about the Moen GX Series and is the answer not in the manual?

Moen GX Series Specifications

General IconGeneral
ModelGX Series
Grind Chamber MaterialStainless Steel
Sound InsulationYes
SoundSHIELDYes
Anti-Jamming FeatureYes
Horsepower1/2 HP, 3/4 HP, 1 HP
Feed TypeContinuous
DimensionsVaries by model
WeightVaries by model
Overload ProtectionYes

Summary

Contact Moen for Support

USA & Canada Support

Phone numbers and websites for customer assistance.

Mexico Support

Phone number and website for customer assistance.

Installation Tools

Recommended Tools

Lists essential tools for safe and easy installation.

Parts Identification

Assembly Components

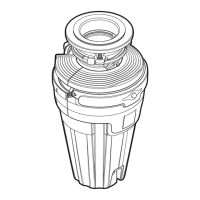
Lists and illustrates all parts of the disposal assembly.

Icon Key

Explains the meaning of various icons used in the manual.

Safety Instructions

General Safety Warnings

Crucial safety precautions to prevent fire, shock, or injury.

Disposal Removal

Standard Removal Steps

Instructions for unplugging or turning off power and disconnecting lines.

Hardwire Removal

Specific steps for removing a hardwired disposal unit.

Mounting Assembly Installation

Disassembly and Preparation

How to disassemble and prepare parts for the mounting assembly.

Sink Flange Sealing

Instructions for applying sealant and positioning the sink flange.

Discharge Elbow Attachment

Reassembling Mounting Parts

Steps to reassemble the fiber gasket, backup flange, and mounting ring.

Connecting Elbow and Flange

Instructions for installing the discharge elbow, gasket, and flange securely.

Dishwasher Connection

Dishwasher Inlet Knock Out

Procedure for removing the knockout plug for dishwasher connection.

Final Assembly Connection

Mounting Ring Engagement

Ensuring the lower mounting ring and cushion mount are properly engaged.

Disposal Hanging and Securing

Steps to hang the disposal and secure it to the mounting assembly.

Finalizing Installation

Securing the Disposal

Tightening the lower mounting ring and ensuring a secure fit.

Plumbing and Electrical Connections

Procedures for reconnecting plumbing, electrical hookup, and dishwasher hose.

Optional Hardwire Installation

Preparing Disposal for Hardwire

Steps to remove the power cord and prepare for hardwiring.

Connecting Hardwired Power

Instructions for connecting the disposal's internal wires to the power source.

Batch Feed Operation

Using the Batch Feed Stopper

Instructions on how to use the batch feed stopper for operation and sealing.

Grounding and Electrical Connections

Grounding Requirements

Instructions and warnings for proper grounding of the disposal.

Electrical Connection Guidelines

Procedures and safety notes for connecting the disposal to power.

Limited Warranty Information

Warranty Coverage Details

Explains what is covered, warranty periods, and exclusions.

Electrical Diagram

Model Identification

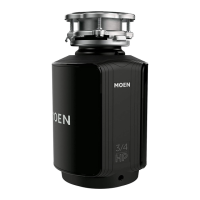
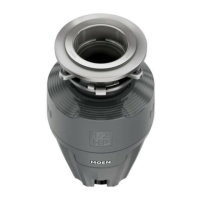
Shows diagram and lists model numbers.

Product Registration

Registration Methods

Provides options to register the product online, by phone, or by mail.

Product Registration Form

Contact and Product Details

Fields for personal and product information for registration.

Related product manuals