This document describes the Moes Smart Wi-Fi Switch, an instruction manual for a smart home device that integrates with Tuya, Google Assistant, and Alexa.
Function Description:
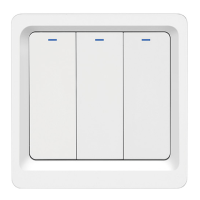
The Moes Smart Wi-Fi Switch is a newly designed wireless smart switch that replaces traditional switches. It offers multi-control association with other smart switches and features a backlight on/off and relay status. The scratch-resistant design is suitable for various decoration styles. This smart switch allows users to control their lighting and other connected devices remotely via Wi-Fi. It supports integration with smart home ecosystems like Tuya Smart/Smart Life App, Google Assistant, and Amazon Alexa, enabling voice control and advanced automation features. The switch is designed to provide convenience and enhance the smart home experience.
Important Technical Specifications:
- Model: WS-DL-EU/ WS-DL-EU-L
- Rated Voltage: 100-240V AC 50/60Hz
- Max. Load Power: 10-400W/gang INC, 5-200W/gang LED
- Wireless Protocol: Wi-Fi 2.4G
- Working Temperature: -20°C~45°C
- Support System: Android/ iOS
Usage Features:
The Moes Smart Wi-Fi Switch is designed for easy installation and integration into a smart home system.
- Installation:
- Safety First: Always turn off the power at the circuit breaker before wiring. Use an electrical tester to confirm no voltage in the circuit.
- Wiring Options: Two versions are available: one requiring a neutral wire and one without. Ensure the correct wiring according to the purchased switch. If a neutral wire is required, confirm your wall box contains a neutral wire (typically white). If unsure, consult a professional electrician.
- Wire Colors: The manual indicates that wire colors may differ in some houses.
- Secure Connections: Ensure wire conductors are securely fastened to each wire.
- Wi-Fi Signal: The Wi-Fi signal should be steady, and the switch should normally work before wiring. A Zigbee gateway hub is required if using a Zigbee version under the same 2.4GHz Wi-Fi network.
- Professional Help: If you lack wiring experience, contact a professional electrician.
- Step 1 (Power Off): Turn off the circuit breaker and use an electrical tester to confirm the power is off before wiring.
- Step 2 (Remove Old Switch): Carefully remove the old switch from the wall.
- Step 3 (Verify Power Off & Remove): Remove the switch and pull it away from the wall. Identify the Line/Load Wire (Note: The color of your wire may be different from the color shown in the manual). Use an electrical tester to verify no voltage in the circuit.
- Step 4 (Take Pictures & Follow Diagram): Take pictures of the wiring and follow the wiring diagram to connect the switch wires to the wires in the wall box with the wire conductors.
- Step 1 (Separate Parts): Separate the upper and lower parts from the switch by using a screwdriver. The dimension of the switch is 3.43.41.7 inches. Distinguish between each corresponding slot.
- Step 2 (Wiring Attention): There are two types of wiring: (2a) Without neutral wire and (2b) Neutral wire is required.
- Without Neutral Wire:
Neutral wire.
Live wire.
Switch.
Capacitor: Must be connected to L1 and Neutral wire.
Lighting: Between L1 and Neutral wire.
- Step 3 (Fix onto Wall):
- Put the switch lower parts into the switch box in the wall.
- Mount the two side screws.
- Install the upper top case (install from up above).
- Cover the upper top case into the switch.
- Turn on electricity, and the LED light will flash quickly for pairing.
- Indicator Light Status:
- Went out: Wi-Fi indicator light is off.
- Connected successfully: The switch is connected with the mobile phone app.
- Blinking slowly: The Wi-Fi indicator light is blinking slowly.
- Not connected to network: The switch is not connected to the network.
- Flashing continuously and quickly: The Wi-Fi indicator light is flashing continuously and quickly, indicating it is in matching status with the mobile phone app.
- Flash 1 time every 3 seconds: The Wi-Fi indicator light flashes once every 3 seconds, indicating it is in APP pairing mode.
- Preparation for Use (App Connection):
- Download MOES App: Download the MOES App from the App Store or Google Play by scanning the QR code provided. (Note: MOES App is upgraded and offers more compatibility than Tuya Smart/Smart Life App, with enhanced functional well for scene control by Siri, widget, and scene recommendations. Tuya Smart/Smart Life App still works, but MOES App is highly recommended).
- Registration/Login: Register or log in to the MOES Application. Enter the Register/Login interface, tap "Register" to create an account by entering your phone number to get a verification code and "Set password." Choose "Log in" if you already have a MOES account.
- Steps for Connecting the APP to the Device (Method One):
- Connect Phone: Make sure your phone is connected to Wi-Fi and Bluetooth.
- Reset: Press and hold the button for 8 seconds until the indicator flashes. Reset/repair is successful.
- Add Device: The app will search for nearby devices. Select "Add Device" and then "Add Manually" if needed.
- Enter Wi-Fi Password: Enter your Wi-Fi password and click "Next."
- Completion: Wait for the connection to complete. Add the device successfully, and you can edit the name of the device. Click "Done."
- Enjoy: Enjoy your smart life with home automation.
- How to Reset/Repair Wi-Fi Code: Press and hold the button for 8 seconds until the indicator flashes. Reset/repair is successful.
- Enter MOES Skill in Alexa APP:
- Complete Product Networking Configuration: Complete the device's networking configuration according to the prompts in the App. (Note: In the App, change the name of the device to an easily identifiable name such as "Alexa"; names are usually in English, such as "bed light").
- Configure Amazon Echo Device: (If you have already configured Amazon Echo, you can skip this step. The following instructions are based on the iOS client.)
- Make sure your Amazon Echo device is powered on and connected to a Wi-Fi network.
- Open the Alexa APP on your phone and log in.
- Tap on the menu in the upper left corner of the Home page, select "Settings," and tap "Set Up A New Device" to set up the Amazon Echo.
- Choose your Amazon Echo device type and language for connecting.
- Press and hold the small dot on the device until the light turns yellow.
Maintenance Features:
- Warranty Service: Moes provides a two-year worry-free after-sales service. If freight is not included, please do not alter the warranty service card to safeguard your legitimate rights and interests. If you need service or have any questions, consult the distributor or contact Moes.
- Product Quality Problems: If product quality problems occur within 24 months from the date of receipt, prepare the product and the packaging, applying for after-sales maintenance in the site or store where you purchased it. If the product is damaged due to personal reasons, a certain amount of maintenance fee will be charged for repair.
- Refusal of Warranty Service: Moes reserves the right to refuse to provide warranty service if:
- Products with damaged appearance, missing LOGO, or beyond the service term.
- Products that are disassembled, injured, privately repaired, modified, or have missing parts.
- The circuit is burned or the data cable or power interface is damaged.
- Products damaged by foreign matter intrusion (including but not limited to various forms of fluid, sand, dust, soot, etc.).
- Recycling Information: All products marked with the symbol for separate collection of waste electrical and electronic equipment (WEEE Directive 2012/19 / EU) must be disposed of separately from unsorted municipal waste. To protect your health and the environment, this equipment must be disposed of at designated collection points for electrical and electronic equipment designated by the government or local authorities. Correct disposal and recycling will help prevent potential negative consequences for the environment and human health. To find out where these collection points are and how they work, contact the installer or your local authority.
- Warranty Card: A warranty card is provided to record product information (name, type, purchase date, warranty period, dealer information, customer's name, phone, address) and maintenance records (failure date, cause of issue, fault content, principal).
- UK REP EVATOST CONSULTING LTD:
- Address: Suite 11, First Floor, Moy Road Business Centre, Taffs Well, Cardiff, Wales, CF15 7QR
- Tel: +44-292-1680945
- Email: contact@evatmaster.com
- EC REP AMZLAB GmbH:
- Address: Laubenhoef 23, 45326 Essen
- Made In China
- Manufacturer: WENZHOU NOVA NEW ENERGY CO.,LTD
- Address: Power Science and Technology Innovation Center, NO.238, Wei 11 Road, Yueqing Economic Development Zone, Yueqing, Zhejiang, China
- Tel: +86-577-57186815
- After-sale Service: service@moeshouse.com
- Follow Us:
- Facebook: @moessmart
- Twitter: @moes_smart
- Instagram: @moes_smart
- YouTube: MOES.Official
- TikTok: @moes_smart
- Website: www.moes.net