29
CALIBRATION POINTS (Continued)
FRONT PANEL (CONTINUED)
If Etherwave Theremin is to be set up in an installation (or as part of a performance) that requires
it to be silent when no one is near the instrument and to make sound as someone walks past, then a
stronger coupling is required to create a larger zero beat zone. Gently turn the trimmer potentiometer
fully clockwise for this kind of theremin behavior.
If the absolute smoothest bass response is desired, gently turn the trimmer potentiometer fully
counterclockwise. In this case the Mute Function can be used to keep Etherwave Theremin silent
when the player walks away from the instrument. Please note the coupling adjustment becomes
more sensitive as you approach the clockwise direction and less sensitive at counterclockwise.
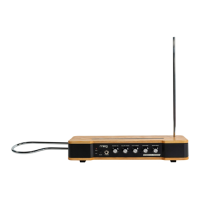
REAR PANEL
There are two access holes located between
the MUTE SWITCH jack and the PITCH CV OUT
jack. These provide access to the two trimpots
that control the Pitch to Control Voltage (CV)
circuit. The one closest to the PITCH CV OUT
jack controls the Scale parameter; the one closest
to the MUTE SWITCH jack controls the Range
parameter. These are calibrated at the factory to
deliver a 1V/OCT change in theremin frequency,
with the C below Middle C generating zero volts.
Access to adjustment is oered for those who
may need to “fine-tune” their Pitch control setup.
Scale adjusts for 1V/OCT, and Range adjusts for
the C note one octave below Middle C to output
zero volts.
UNDERSTANDING THE SCALE
AND RANGE PARAMETERS
To increase the gain of the CV output to provide
a value greater than 1V/OCT, gently adjust the
Scale control trimpot in the clockwise direction.
To decrease the gain of the CV output to provide
a value of less than 1V/OCT, gently adjust the
Scale control trimpot in the counterclockwise
direction. Adjusting the Range control should not
ever be necessary; external devices controlled by
the Etherwave Theremin PITCH CV OUT can be
tuned to match the Etherwave Theremin
frequency if desired.
Range
Scale
 Loading...