EasyManua.ls Logo

Moog Theremini - User Manual

Moog Theremini
6 pages
Print Icon
To Next Page IconTo Next Page
Loading...
Max For Live Device - How To
Moog Theremini
Max For Live Device - How To:
Moog Theremini
Introduction
The Moog Theremini is typically operated
using each hand to independently control the
pitch and velocity parameters as shown in the
diagram.!
The Theremini will function as a USB-MIDI
device. However, the pitch and velocity data
is transmitted as CC messages rather than
the conventional Note On/Note Off messages.
Therefore it will not initially respond as a
typical MIDI controller (such as a keyboard)
when connected to a DAW. !
To provide t h i s f u n c t i o n a l i t y w i t h i n A b l e t o n L i v e , O m n i M u s i c h a v e d e v e l o p e d a
Max for Live Device which converts the CC messages into Note On/Note Off.
This tutorial will guide you through its setup and use. This guide is written for
users with a basic familiarity of the Ableton Live software. !
Theremini Setup
Press and hold the <SETUP> button to begin configuring the Theremini.!
Calibration
First, calibrate the sensors to maximise the usable range of the Theremini. !
Press <SETUP> and <ROOT> together and follow the instructions on the
display. !
Calibration should be completed each time the Theremini is used.!
1
Pitch
Velocity
Theremini controls
Question and Answer IconNeed help?

Do you have a question about the Moog Theremini and is the answer not in the manual?

Summary

Introduction to Moog Theremini

Moog Theremini Setup and Configuration

Setting MIDI Output

Configure the Theremini's MIDI output settings for pitch and volume.

Installing the Max For Live Device

Instructions for downloading and placing the Max for Live Device file in Ableton Live.

Using the Moog Theremini in Ableton Live

MIDI Preferences Setup

Configure Ableton Live MIDI preferences to recognize the Moog Theremini.

Moog Theremini Device Features

Scales Selection

Choose the desired musical scale for pitch control.

Root Note Configuration

Set the root note (key note) for the selected scale.

Starting Octave Setting

Define the initial octave range for the Theremini.

Note Range Adjustment

Specify how many notes are included in the pitch range.

Note Duration Control

Select the duration for each triggered note.

Visual Feedback Explanation

Understand on-device indicators for pitch and velocity.

Advanced Live MIDI Effects and Development

Velocity MIDI Effect

Apply fixed velocity effects for one-handed Theremini operation.

Future Development Areas

Potential areas for future enhancements to the Max for Live device.

Overview

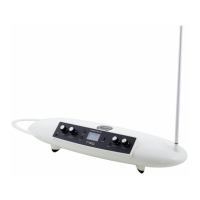
The Moog Theremini is a unique musical instrument that operates as a USB-MIDI device, designed to be used with a Max for Live Device developed by OmniMusic. This device addresses the Theremini's unconventional MIDI output, which transmits pitch and velocity data as Control Change (CC) messages rather than standard Note On/Note Off messages, making it incompatible with typical MIDI controllers like keyboards when connected to a Digital Audio Workstation (DAW). The Max for Live Device acts as a crucial intermediary, converting these CC messages into the conventional Note On/Note Off format, thereby enabling the Theremini to function as a fully integrated MIDI controller within Ableton Live.

Function Description

The core function of the Moog Theremini, when paired with the Max for Live Device, is to provide a unique and expressive way to control musical parameters within Ableton Live. The Theremini itself is designed for hands-on operation, with each hand independently controlling pitch and velocity. The Max for Live Device, named "M4L Theremini.axmd," is the software component that bridges the gap between the Theremini's specific MIDI output and Ableton Live's expected MIDI input. This conversion allows users to play virtual instruments, trigger samples, and manipulate other MIDI-controllable elements within their Live Set using the Theremini's distinctive gestural interface.

The Max for Live Device offers several key functionalities that enhance the Theremini's usability:

  • MIDI CC to Note On/Off Conversion: This is the primary function, transforming the Theremini's CC 74 (Pitch) and CC 2 (Volume/Velocity) messages into standard MIDI note events. This enables the Theremini to trigger notes in a musical context.
  • Scale Quantization: The device allows users to select a desired musical scale from a drop-down menu. This feature quantizes the Theremini's continuous pitch output to the notes within the chosen scale, ensuring that the played notes are always in tune with the musical context.
  • Root Note Selection: Users can select the root note (key note) of the chosen scale using a keyboard interface within the Max for Live Device. This provides flexibility in adapting the Theremini to different musical keys.
  • Starting Octave Control: The starting octave for the Theremini's pitch range can be selected, ranging from C0 to C6. This allows users to position the Theremini's playable range appropriately for their musical needs.
  • Note Range Adjustment: Users can choose how many notes are included in the Theremini's active pitch range. This helps in tailoring the sensitivity and scope of the pitch control.
  • Note Duration Control: The device allows users to select a specific duration for each note. A "Note Off" message will be triggered automatically once this time has elapsed, providing a way to control the sustain of notes.
  • Visual Feedback: The Max for Live Device includes a visual display on its left-hand side that indicates the current position within the Theremini's range. This provides real-time feedback to the user, helping them to understand and control their gestures more effectively. Users can also click and drag a circle on this display to model the sound of the Theremini in action, offering a visual representation of the pitch and velocity output.
  • Integration with Live MIDI Effects: The Max for Live Device is designed to work seamlessly with other MIDI Effects available in Ableton Live. For example, the "Fix 96.adv" MIDI Effect can be used in conjunction with the M4L Theremini device to constrain the output to a fixed velocity, enabling one-handed operation of the Theremini.

Usage Features

Setting up and using the Moog Theremini with the Max for Live Device involves a series of steps designed to ensure proper communication and optimal performance within Ableton Live.

  1. Theremini Setup:

    • Calibration: Before each use, the Theremini's sensors should be calibrated to maximize its usable range. This is done by pressing and holding the <SETUP> button, then pressing <SETUP> and <ROOT> together, and following the on-screen instructions.
    • MIDI Output Configuration: The Theremini's MIDI output needs to be configured to match the settings expected by the Max for Live Device. This involves pressing <SETUP> and <SCALE> together, navigating to "MIDI CV SETUP" using <SETUP>, and then pressing <EFFECT>. On the "MIDI CC OUT" page, the Pitch should be set to CC 74, Ch 1 Type 7bit, and Volume to CC 2, Ch 1 Type 7bit. The <SETUP> button advances through options, and the <PRESETS> dial adjusts them. Both Pitch and Volume must be set to Channel 1.
  2. Installing the Max for Live Device:

    • The "M4LTheremini.axmd" file needs to be downloaded and placed in the correct location within Ableton Live's User Library. This is typically User Library -> Presets -> MIDI Effects -> Max MIDI Effect. Users can open the User Library folder in their file browser (Explorer on Windows/Finder on Mac) by right-clicking it in Live.
  3. Using in a Live Set:

    • Ableton Live Preferences: In Live's Preferences (Live -> Preferences -> MIDI), ensure that the Moog Theremini appears as a MIDI Port. The 'Track' checkbox for the Theremini's input should be selected, while the 'Remote' option should remain unticked.
    • Adding the Device to a Track: Navigate to the Max MIDI Effects folder within Ableton Live's browser (User Library -> Presets -> MIDI Effects -> Max MIDI Effect) and drag and drop the "M4L Theremini.axmd" file onto a MIDI track in your Live Set.
    • Adding an Instrument: Add an instrument of your choice to the same MIDI track.
    • MIDI Input Selection: Select "Moog Theremini..." from the "MIDI From" drop-down menu on the MIDI track.
    • Arming the Track: Ensure the MIDI track is armed for recording or playback, indicated by a red light at the bottom of the track.
    • Activating the Max for Live Device: Make sure the "ON" button on the Max for Live Device is active.
    • Playing the Theremini: Once all settings are correctly configured, playing the Theremini will produce sound through the chosen instrument in Ableton Live. The blue lights on the Max for Live Device will activate when pitch and velocity data are received, providing visual confirmation of data flow.

Maintenance Features

The provided documentation does not explicitly detail "maintenance features" in the traditional sense (e.g., cleaning, firmware updates). However, it does emphasize a crucial aspect of maintaining optimal performance and usability:

  • Regular Calibration: The instruction to "Calibration should be completed each time the Theremini is used" highlights the importance of this step for consistent and accurate sensor performance. This is a user-performed maintenance task that ensures the Theremini's sensors are always operating at their maximum usable range, which is critical for precise control of pitch and velocity. Failing to calibrate regularly could lead to inconsistent or limited responsiveness from the instrument.

Beyond this, the "Further Development" section suggests areas for future enhancements, which could be considered as ongoing "maintenance" or improvement of the Max for Live Device itself:

  • Expansion of the Scales Library: Adding more musical scales would enhance the versatility and musical applicability of the device.
  • Pitch Bend and Sustain Options: Implementing dedicated controls for pitch bend and sustain would provide more expressive capabilities, bringing the Theremini closer to the functionality of traditional MIDI controllers.
  • Root Note Offset: Allowing adjustment of the positioning of the key note within the pitch range would offer greater flexibility in how the Theremini's physical space maps to musical intervals.

These planned developments indicate a commitment to evolving the device's functionality, ensuring its continued relevance and improved user experience over time. While not direct user maintenance, these are developer-side "maintenance" activities that benefit the end-user. The overall "maintenance" for the user primarily revolves around ensuring correct setup, calibration, and understanding of the software and hardware interaction.

Moog Theremini Specifications

General IconGeneral
TypeTheremin
Built-in SpeakerYes
Headphone OutputYes
USBYes
DisplayLCD
Presets32
Audio Output1/4" Mono
CV OutputNo
PolyphonyMonophonic
MIDI OutputYes
Power Supply12V DC Power Adapter
Pitch CorrectionYes
EffectsReverb
ConnectivityMIDI, USB

Related product manuals