EasyManua.ls Logo

Motorola HMN4079 series - User Manual

Motorola HMN4079 series
2 pages
Print Icon
To Next Page IconTo Next Page
Loading...
(Continued on Back)
FOREWORD
This device complies with part 15 of the FCC Rules.
Operation is subject to the following two conditions:
(1) This device may not cause harmful interference
(2) This device must accept any interference received,
including interference that may cause undesired
operation.
DESCRIPTION
The Mobile Keypad Microphone (Mic) (Motorola
®
Kit
numbers are mentioned in the title above) is a full keypad
handheld microphone. The keypad on this microphone is
intended to assist in navigating through the menus on its
parent device, as well as entering information such as phone
numbers and menu picks.
INSTALLATION
1. Refer to illustration below and attach hangup clip (1) to
vehicle using the two sheet metal screws and back-up
plate provided. Place back-up plate (4) behind
dashboard. Use flat-head screw (2) in top mounting hole
and hex-washer screw (3) in bottom mounting hole. Be
certain mounting screws fasten into holes in back-up
plate.
ITEM
NUMBER
MOTOROLA
PART NUMBER
DESCRIPTION
1 0180757T98 Hang-up Clip
2 0312002C01 Flat-Head Screw
3 0312002A01 Hex-Washer Head Screw
4 0780257N01 Back-up Plate
1
2
3
4
MAEPF-26073-O
Vehicle
Dashboard
2. Insert button on rear housing of Mic into hang-up clip.
3. Insert the GCAI plug on the radio end of the Mic cord into
the GCAI jack on the front of the radio.
4. Turn the locking collar on the radio end of the Mic cord ¼
turn clockwise to secure it in place.
DISCONNECTING MIC FROM RADIO
1. Turn the locking collar on the radio end of the Mic cord ¼
turn counter clockwise.
2. Pull cable from GCAI connector to release.
OPERATION
Press PTT switch before speaking into Mic. Position Mic
about 1-inch away from mouth and speak into Mic in a normal
voice.
TROUBLESHOOTING
Troubleshooting of Mic is limited to determining whether the
inoperable condition of a Mic is caused by a faulty Mic Cord
or a faulty Mic Head. To make this determination and correct
the fault, replace the Mic Cord with the spare first. If replacing
the Mic Cord does not restore operation, replace the Mic
Head. The Mic Cord and Mic Head are not repairable items,
therefore they must be replaced when they are determined to
be faulty.
REPLACING MIC CORD
Removing Cord from Mic Body
1. Refer to illustration on next page. Grasp locking collar
and, while pushing it firmly towards Mic body, turn it
counterclockwise
¼ turn to disengage it from Mic body.
2. Disconnect cord from Mic body by pulling TELCO
connector (which has no tab on it) out of TELCO jack on
circuit board inside Mic body.
Installing Cord Into Mic Body
1. Slide locking collar on Mic end of cord away from TELCO
plug and past strain relief on cord.
2. Orient TELCO plug on Mic end of cord so that it aligns
with TELCO jack inside Mic body and its contacts face
rear of Mic housing.
3. Pass TELCO plug through hole at bottom of Mic body
and plug it into TELCO jack on circuit board inside Mic
body.
4. Slide locking collar back up on cord with tabs on its sides
facing sides of Mic body.
5. Push locking collar firmly into hole at bottom of Mic body
then turn it
¼ turn clockwise to secure it in place.
*6881097C72*
MOBILE MICROPHONE
HMN4079_, HMN4108_, HMN4109_,
HMN4110_, HMN4111_
© 2005, 2008, 2010, 2013 by Motorola Solutions, Inc.
All rights reserved.
MOTOROLA, MOTO, MOTOROLA SOLUTIONS and the Stylized M
logo are trademarks or registered trademarks of Motorola Trademark
Holdings, LLC and are used under license. All other trademarks are
the property of their respective owners.
6881097C72-T
97C72_Text.fm Page 1 Friday, May 10, 2013 9:33 AM
Question and Answer IconNeed help?

Do you have a question about the Motorola HMN4079 series and is the answer not in the manual?

Summary

Foreword

Description

Installation

Disconnecting Mic from Radio

Operation

Troubleshooting

Replacing Mic Cord

Removing Cord from Mic Body

Grasp locking collar, push towards mic body, turn counterclockwise to disengage, then pull connector out.

Installing Cord Into Mic Body

Align TELCO plug, pass through hole, plug into jack, slide collar, then turn clockwise to secure.

Overview

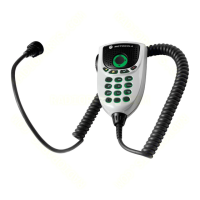
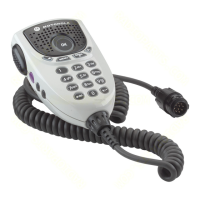
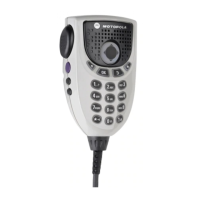
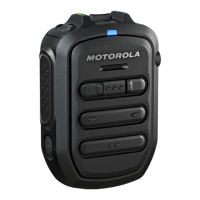
The Motorola Mobile Keypad Microphone, identified by kit numbers HMN4079_, HMN4108_, HMN4109_, HMN4110_, and HMN4111_, is a full keypad handheld microphone designed for use with a parent device. This device complies with part 15 of the FCC Rules, ensuring that its operation does not cause harmful interference and that it accepts any received interference.

Function Description

The primary function of the Mobile Keypad Microphone is to facilitate communication and navigation within the menus of its associated parent device. It features a comprehensive keypad that allows users to enter information such as phone numbers and select menu options. The microphone is equipped with a Push-to-Talk (PTT) switch, which must be pressed before speaking to activate the microphone.

Usage Features

The microphone is designed for ease of use and integrates several features to enhance its functionality:

  • Keypad: A full keypad is provided for data entry and menu navigation.
  • Navigation Keys: Dedicated navigation keys (up, down, left, right) are included to move through menus.
  • Data Key: A specific data key is available for data-related functions.
  • Home Key: A home key allows users to quickly return to the main screen or a predefined home function.
  • Cancel Key: A cancel key is present to exit menus or cancel operations.
  • OK Key: An OK key is used to confirm selections or actions.
  • Programmable Buttons: The microphone includes programmable buttons, allowing users to customize their functions for quick access to frequently used features.
  • Push-to-Talk (PTT) Button: A prominent PTT button is located on the side of the microphone for initiating voice transmissions. Users are instructed to press this button before speaking.
  • Optimal Speaking Distance: For clear communication, users should position the microphone approximately one inch away from their mouth and speak in a normal voice.

Installation

The installation process for the Mobile Keypad Microphone is straightforward:

  1. Hang-up Clip Attachment: The hang-up clip (1) is attached to the vehicle using two sheet metal screws and a back-up plate (4). The back-up plate is placed behind the dashboard. A flat-head screw (2) is used in the top mounting hole, and a hex-washer screw (3) is used in the bottom mounting hole, ensuring that the screws fasten securely into the holes in the back-up plate.
  2. Microphone Insertion: The button on the rear housing of the microphone is inserted into the hang-up clip.
  3. GCAI Plug Connection: The GCAI plug on the radio end of the microphone cord is inserted into the GCAI jack located on the front of the radio.
  4. Securing the Cord: The locking collar on the radio end of the microphone cord is turned 1/4 turn clockwise to secure it in place.

Disconnection

To disconnect the microphone from the radio:

  1. Unlocking the Collar: Turn the locking collar on the radio end of the microphone cord 1/4 turn counter-clockwise.
  2. Releasing the Cable: Pull the cable from the GCAI connector to release it.

Maintenance Features

Troubleshooting and maintenance for the Mobile Keypad Microphone primarily involve identifying and replacing faulty components, as the individual parts are not designed for repair.

  • Troubleshooting Inoperability: If the microphone is inoperable, the issue is typically attributed to either a faulty microphone cord or a faulty microphone head.
  • Component Replacement: To diagnose and correct the fault, users are advised to first replace the microphone cord with a spare. If this does not restore operation, the microphone head should then be replaced.
  • Non-Repairable Items: Both the microphone cord and the microphone head are considered non-repairable items. Once determined to be faulty, they must be replaced.

Replacing the Microphone Cord

The process for replacing the microphone cord involves removing the old cord and installing a new one:

Removing Cord from Mic Body:

  1. Disengaging Locking Collar: Grasp the locking collar and, while pushing it firmly towards the microphone body, turn it 1/4 turn counter-clockwise to disengage it.
  2. Disconnecting TELCO Connector: Disconnect the cord from the microphone body by pulling the TELCO connector (which lacks a tab) out of the TELCO jack on the circuit board inside the microphone body.

Installing Cord Into Mic Body:

  1. Sliding Locking Collar: Slide the locking collar on the microphone end of the cord away from the TELCO plug and past the strain relief.
  2. Orienting TELCO Plug: Orient the TELCO plug on the microphone end of the cord so that it aligns with the TELCO jack inside the microphone body, with its contacts facing the rear of the microphone housing.
  3. Plugging into TELCO Jack: Pass the TELCO plug through the hole at the bottom of the microphone body and plug it into the TELCO jack on the circuit board inside the microphone body.
  4. Positioning Locking Collar: Slide the locking collar back up on the cord, ensuring that the tabs on its sides face the sides of the microphone body.
  5. Securing Locking Collar: Push the locking collar firmly into the hole at the bottom of the microphone body, then turn it 1/4 turn clockwise to secure it in place.

Field Replaceable Units:

The following components are identified as field replaceable units:

  • Mic Head (N/A part number)
  • O-Ring, White (On Mic Head) (Part number 3205508Z02)
  • Cord (Part number 3064153H04)

This comprehensive design ensures that the Motorola Mobile Keypad Microphone is a reliable and user-friendly accessory for communication and device control.
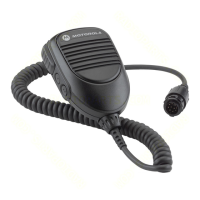
Motorola HMN4079 series Specifications

General IconGeneral
PTT ButtonYes
Swivel ClipYes
ConnectionWired
ColorBlack
CompatibilityTwo-way radios

Related product manuals