Do you have a question about the Motorola LS720D and is the answer not in the manual?
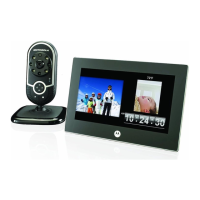
Details buttons for Screen 2, including ON/OFF, EXIT, RIGHT/NEXT, and OK.
Details buttons for Screen 1, including ON/OFF, EXIT, and Navigation/OK.
Crucial warnings regarding product placement, heat, disassembly, and power adapter use.
Specifies that only JPEG format is supported for displaying photos.
Instructions for attaching the stand to place the frame in landscape mode.
Instructions for attaching the stand to place the frame in portrait mode.
Steps to connect the AC power adapter to turn on the device.
Instructions for inserting memory cards/USB drives and notes on supported formats.
Explains how to use the physical buttons on the photo frame for operation.
Details the functions of buttons specific to SCREEN 2.
Details the functions of buttons specific to SCREEN 1.
Details the functions of the remote control buttons for SCREEN 1.
Details the functions of the remote control buttons for SCREEN 2.
Explains how to navigate and use the main menu options on SCREEN 1.
Steps to copy photos from external storage to internal memory.
Steps to delete photos from the device or storage.
Selects the speed of the slideshow.
Selects the transition effect to be applied in slideshow.
Allows you to set up the date and time.
Activates/deactivates the alarm clock function and configures its settings.
Selects an OSD (On-screen display) language.
Enables/disables the Auto power on/off options.
Sets the level of brightness and contrast.
Options for viewing photos, like original aspect ratio or fit to screen.
Turns background music on or off in slideshow mode.
Options for copying files using original or reduced file size.
Resets device settings to their default values.
Formats internal memory, deleting all photo and music files.
How to navigate and use the main menu options on SCREEN 2.
Selects the speed of slideshow.
Selects the transition effect to be applied in slideshow.
Selects an OSD (On-screen display) language.
Sets the level of brightness and contrast.
Options for viewing photos on SCREEN 2.
Resets system default settings.
Information on troubleshooting steps and contacting customer service for assistance.
Details the scope of the product warranty coverage and who is covered.
Lists product categories and their warranty coverage length.
Details what is not covered by the warranty, such as abuse and misuse.
Lists conditions excluding warranty and exclusions related to communication services.
Instructions on how to obtain service or information about the product.
Declaration of Conformity and CE compliance statements.
FCC compliance details and measures to correct interference.
Compliance statements for FCC and Industry Canada regulations.
Information regarding WEEE directive and recycling.
Steps for mounting the photo frame in portrait orientation on a wall.
Steps for mounting the photo frame in landscape orientation on a wall.
| Brand | Motorola |
|---|---|
| Model | LS720D |
| Category | Digital Photo Frame |
| Language | English |