QUICK START GUIDE
1. Setting up your Digital Video Baby Monitor
MODELS:
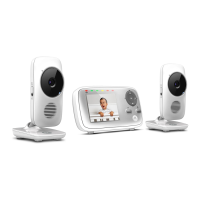
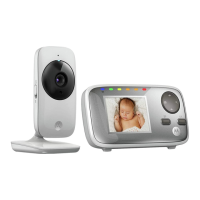
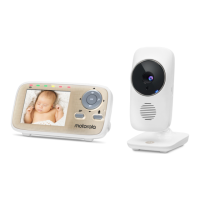
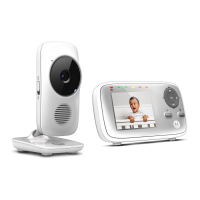
MBP48
MBP48-2,
MBP48-3,
MBP48-4
• Connect the small plug of the power
adapter to the Baby Unit and the other
end to a suitable mains power outlet.
• Only use the enclosed adapter (6V DC /
500mA).
• Ensure the ON/OFF switch is at the
"ON" position.
A. Connecting the power supply for the Baby Unit.
WARNING:
Strangulation Hazard: Children have STRANGLED in cords. Keep this cord out of the
reach of children (more than 3 feet away).
Never use extension cords with AC Adapters. Only use the AC Adapters provided.
US EN
• Connect the micro USB plug of the power adapter to the parent unit and the other
end to a suitable mains power outlet.
• Only use the enclosed adapter (5V DC/1000mA).
• A rechargeable battery inside the Parent Unit allows you to move it without losing the
link and picture from the Baby Unit. The battery gives up to 5 hours operation for the
Parent Unit. We recommend you charge it for at least 16 hours before first use, or
when the Parent Unit indicates the battery is low.
• Press and hold the POWER button
0 on the top of the Parent Unit to turn it ON.
NE
U U
U
U
B. Connecting the power supply for the Parent Unit.
2. Basic operation of the keys
Parent Unit
0
ON/OFF button
Press and hold to switch the Parent Unit ON//OFF.
Press to turn the screen off (audio stays on and any
button turns screen back on).
UP/DOWN buttons
When in zoom mode, press and hold to move up
or down the image.
Press to adjust menu settings.
LEFT/RIGHT
buttons
When in zoom mode, press and hold to move left
or right across the image.
Press to access different menu options.
MENU button Press to open or close the menu options.
OK button Press to confirm a selection.
VIDEO button Press to turn the LCD screen ON/OFF.
TALK button Press and hold to talk to your baby.
Volume buttons Press -/+ to select volume level of the parent unit.
RESET button Press and hold with a small pin to reset the unit.
Baby Unit
ON/OFF switch
Slide the power switch down to switch on the Unit.
Slide the power switch up to switch off the Unit.
PAIR button Press and hold to pair with a Parent Unit.
3. General Information
If your product is not working properly, read this Quick Start Guide or the User’s Guide of one of the
models listed on page 1.
Contact Customer Service:
US and Canada 1-888-331-3383
sortotorostoreo
Consumer Products and Accessories Limited Warranty ("Warranty")
Thank you for purchasing this Motorola branded product manufactured under license by Binatone
Electronics International LTD ("BINATONE").
What Does this Warranty Cover?
Subject to the exclusions contained below, BINATONE warrants that this Motorola branded product
("Product") or certified accessory ("Accessory") sold for use with this product that it manufactured to
be free from defects in materials and workmanship under normal consumer usage for the period
outlined below. This Warranty is your exclusive warranty and is not transferable.
THIS WARRANTY GIVES YOU SPECIFIC LEGAL RIGHTS, AND YOU MAY HAVE OTHER RIGHTS
THAT VARY BY STATE, PROVINCE OR COUNTRY. FOR CONSUMERS WHO ARE COVERED BY
CONSUMER PROTECTION LAWS OR REGULATIONS IN THEIR COUNTRY OF PURCHASE OR, IF
DIFFERENT, THEIR COUNTRY OF RESIDENCE, THE BENEFITS CONFERRED BY THIS LIMITED
WARRANTY ARE IN ADDITION TO ALL RIGHTS AND REMEDIES CONVEYED BY SUCH
CONSUMER PROTECTION LAWS AND REGULATIONS. FOR A FULL UNDERSTANDING OF
YOUR RIGHTS YOU SHOULD CONSULT THE LAWS OF YOUR COUNTRY, PROVINCE OR
STATE.
GUIDE DE DÉMARRAGE RAPIDE
1. Installation de votre moniteur vidéo numérique
pour bébé
MODÈLES :
MBP48
MBP48-2,
MBP48-3,
MBP48-4
US FR
A. Alimentation électrique de l’unité bébé
• Branchez le connecteur micro USB de
l’adaptateur secteur à l’unité bébé et
branchez l’adaptateur à une prise de
courant adéquate.
•Utilisez uniquement l'adaptateur secteur
6V DC / 500mA mA fourni.
• Vérifiez que le commutateur MARCHE/
ARRÊT est sur « MARCHE ».
AVERTISSEMENT:
Danger d’étranglement : des enfants se sont accidentellement ÉTRANGLÉS avec les
cordons. Tenez ce cordon hors de portée des enfants (à plus d'un mètre de distance).
N’utilisez jamais de prolongateurs avec les adaptateurs secteur. Utilisez uniquement les
adaptateurs secteur fournis.
B. Alimentation électrique de l’unité parents
• Branchez le connecteur micro USB de l’ad
aptateur secteur à l’unité parents et
branchez l’adaptateur à une prise de courant adéquate.
• Utilisez uniquement l'adaptateur
secteur 5 Vcc/1000 mA fourni.
•La batterie rechargeable intégrée à l'unité parents vous permet de déplacer cette
dernière sans perdre la liaison et les images de l'unité bébé. L'autonomie de la batterie est
d'environ 5 heures. Nous vous recommandons de la charger pendant au moins 16 heures
avant la première utilisation ou lorsque l'unité parents indique que la charge est faible.
• Appuyez longuement sur la touche MARCHE/ARRÊT
0 en haut de l'unité parents
pour mettre celle-ci sous tension.
REMARQUE
Lorsque l'unité bébé et l'unit
é parents sont toutes les deux sous tension, les images
captées par la caméra de l’unité bébé s’affi
chent en couleur sur l’unité parents, mais
si la pièce est sombre les images sont en noir
et blanc et l’icône s’affiche, en raison
de l’éclairage infrarouge
provenant de l'unité bébé.
2. Fonction de base des touches
Unité parents
0
Touche MARCHE/
ARRÊT
Appuyez longuement pour mettre l’unité parents sous ou
hors tension.
Appuyez pour désactiver l'écran (l'audio reste activé et l'écran
paut être réactivé en appuyant sur n'importe quelle touche).
Touches HAUT/BAS
En mode zoom, appuyez longuement pour déplacer l'image
vers le haut ou le bas.
Appuyez pour effectuer les réglages.
Touches GAUCHE/
DROITE
En mode zoom, appuyez longuement pour déplacer l'image
vers la gauche ou la droite.
Appuyez pour accéder aux différentes options du menu.
Touche MENU Appuyez pour ouvrir ou fermer le menu.
Touche OK Appuyez pour confirmer une sélection.
Touche VIDÉO Appuyez pour activer ou désactiver l’écran LCD.
Touche PAROLE Maintenez cette touche enfoncée pour parler à votre bébé.
Touches de volume Appuyez sur -/+ pour régler le volume de l'unité parents.
Touche de
RÉINITIALISATION
Appuyez longuement avec un objet pointu (par ex. une
épingle) pour réinitialiser l'appareil.
Unité bébé
Commutateur
MARCHE/ARRÊT
Faites-le glisser vers le bas pour mettre l’a ppareil sous tension.
Faites-le glisser vers le haut pour mettre l’appareil hors
tension.
Touche COUPLAGE
Appuyez longuement pour coupler l'unité bébé à une unité
parents.
3. Généralités
Si votre produit ne fonctionne pas correctement, lisez ce guide de démarrage ou le guide utilisateur de
l'un des modèles listés en page 1.
Adressez-vous à notre service clientèle :
USA et Canada : 1-888-331-3383
Courriel : sortotorostoreo
Garantie limitée pour les produits et accessoires grand public (« Garantie »)
Merci d'avoir acheté ce produit de marque Motorola fabriqué sous licence par Binatone Electronics
International LTD (« BINATONE »).
Que couvre la présente Garantie ?
Sous réserve des exclusions indiquées ci-dessous, la société BINATONE garantit que ce produit
(« Produit ») de marque Motorola ou cet accessoire certifié et vendu pour être utilisé avec le Produit
(« Accessoire ») fabriqué par BINATONE est exempt de défauts de matériaux et de fabrication, sous
réserve d’une utilisation normale pendant la période stipulée ci-dessous. La présente Garantie est votre
unique garantie et n’est pas transférable.
LA PRÉSENTE GARANTIE VOUS CONFÈRE DES DROITS LÉGAUX SPÉCIFIQUES ; IL EST POSSIBLE
QUE VOUS AYEZ D'AUTRES DROITS POUVANT VARIER EN FONCTION DE L'ÉTAT, DE LA RÉGION
OU DU PAYS. POUR LES CONSOMMATEURS COUVERTS PAR LES LOIS ET RÉGLEMENTATIONS
DE PROTECTION DES CONSOMMATEURS DANS LE PAYS D'ACHAT OU, S'IL DIFFÈRE, DANS
LEUR PAYS DE RÉSIDENCE, LES AVANTAGES OCTROYÉS PAR LA PRÉSENTE GARANTIE LIMITÉE
SONT ACCORDÉS EN SUS DE L'ENSEMBLE DES DROITS ET RECOURS CONFÉRÉS PAR LESDITES
LOIS ET LESDITES RÉGLEMENTATIONS DE PROTECTION DES CONSOMMATEURS. POUR UNE
BONNE COMPRÉHENSION DE VOS DROITS, CONSULTEZ LA LÉGISLATION DE VOTRE PAYS,
PROVINCE OU ÉTAT.
GUÍA RÁPIDA DE INICIO
1. Configuración de su Monitor para bebé con video digital
MODELOS:
MBP48
MBP48-2,
MBP48-3,
MBP48-4
US ES
• Conecte el enchufe pequeño del
transformador a la Unidad para el bebé y
el otro extremo a un tomacorriente
adecuado.
• Sólo utilice el transformador que se
adjunta (6V CC/500mA).
• Asegúrese de que el interruptor de
ENCENDIDO/APAGADO esté en la
posición "ON" (ENCENDIDO).
A. Conectar el suministro eléctrico de la Unidad para el Bebé.
PRECAUCIÓN:
Peligro de Estrangulamiento: Se han presentado casos de ESTRANGULAMIENTO de
niños con cables. Mantenga este cable fuera del alcance de los niños (a más de 3 pies (1m)).
Nunca utilice cables de extensión con transformadores de CA. Sólo utilice los
Transformadores de CA que se adjuntan.
•Enchufe el conector micro USB del transformador a la Unidad para los padres y el otro
extremo a un tomacorriente adecuado.
• Sólo utilice el transformador que se adjunta (5V CC/1000mA).
•Una batería recargable dentro de la Unidad para los padres le permite moverla sin perder
el enlace ni la imagen de la Unidad para el bebé. La batería le brinda hasta 5 horas de
funcionamiento a la Unidad para los padres. Le recomendamos que cargue la unidad por
16 horas como mínimo antes de utilizarla por primera vez, o cuando la Unidad para los
padres indique que la carga de la batería está baja.
•Mantenga presionado el botón de ENCENDIDO 0 en la parte superior de la Unidad
para los padres para ENCENDER la unidad.
NOTA
Cuando la Unidad para el bebé y la Unidad para los padres están encendidas y dentro del
alcance, en la Unidad para los padres debe aparecer una imagen a color capturada por
la cámara de la Unidad para el bebé, pero si la habitación está oscura la imagen será en
blanco y negro, con un ícono que así lo indica, debido a la iluminación infrarroja de la
Unidad para el bebé.
B. Conectar el suministro eléctrico de la Unidad para los padres.
2. Funcionamiento básico de los botones
Unidad para los padres
0
Botón de ENCENDIDO/
APAGADO
Mantenga presionado para ENCENDER/APAGAR la Unidad
para los padres.
Presione para apagar la pantalla (el audio permanece
encendido y cualquier botón vuelve a encender la pantalla).
Botones ARRIBA/ABAJO
Cuando está en modo zoom (ampliación de imagen),
mantenga presionado para subir o bajar por la imagen.
Presione para ajustar las configuraciones del menú.
Botones IZQUIERDA/
DERECHA
Cuando está en modo zoom (ampliación de imagen),
mantenga presionado para desplazarse hacia la izquierda o
derecha por la imagen.
Presione para acceder a diferentes opciones del menú.
Botón MENÚ Presione para abrir o cerrar las opciones del menú.
Botón Aceptar Presione para confirmar la selección.
Botón de VIDEO Presione para ENCENDER/APAGAR la pantalla LCD.
Botón HABLAR Mantenga presionado para hablarle a su bebé.
Botones de Volumen
Presione -/+ para seleccionar el nivel de volumen de la
unidad para los padres.
Botón de REINICIO
Mantenga presionado con un alfiler pequeño para reiniciar la
unidad.
Unidad para el bebé
Interruptor de
ENCENDIDO/
APAGADO
Deslice el interruptor de encendido hacia abajo para
encender la Unidad.
Deslice el interruptor de encendido hacia arriba para apagar
la Unidad.
Botón PAIR (vincular)
Mantenga presionado para vincular la unidad con la unidad
para los padres.
3. General Information
Si su producto no está funcionando correctamente, lea esta Guía rápida de inicio o la Guía de usuario.
Contáctese con el Servicio de atención al cliente:
1-888-331-3383 para Estados Unidos y Canadá
Correo electrónico:sortotorostoreo
Garantía limitada para productos y accesorios de consumo ("Garantía")
Gracias por comprar este producto de marca Motorola fabricado bajo licencia otorgada por Binatone
Electronics International LTD ("BINATONE").
¿Qué cobertura tiene esta Garantía?
Sujeto a las exclusiones que aquí se detallan, BINATONE garantiza que este producto de marca
Motorola ("Producto") o todo accesorio certificado ("Accesorio") que se vende para ser utilizado con
este producto que fabrica están libres de defectos en los materiales y mano de obra conforme a
condiciones normales de uso por parte del consumidor para el período que se detalla a continuación.
La presente Garantía es de carácter exclusivo y no es transferible.
ESTA GARANTÍA LE OTORGA DERECHOS LEGALES ESPECÍFICOS, Y ES POSIBLE QUE USTED
TAMBIÉN CUENTE CON OTROS DERECHOS QUE VARÍAN SEGÚN EL ESTADO, LA PROVINCIA O
EL PAÍS. PARA CONSUMIDORES QUE ESTÉN CUBIERTOS POR LAS LEYES O REGULACIONES DE
PROTECCIÓN AL CONSUMIDOR EN EL PAÍS EN QUE SE HAYA COMPRADO EL PRODUCTO O,
SU PAÍS DE RESIDENCIA, LOS BENEFICIOS QUE OFRECE ESTA GARANTÍA LIMITADA SE SUMAN
A TODOS LOS DERECHOS Y RECURSOS QUE CONCEDAN DICHAS LEYES Y REGULACIONES
DE PROTECCIÓN AL CONSUMIDOR. PARA CONOCER A FONDO SUS DERECHOS DEBERÁ
CONSULTAR LAS LEYES DE SU PAÍS, PROVINCIA O ESTADO.
¿Quién está cubierto?
La presente Garantía cubre solamente al primer comprador usuario y no es transferible.