THANK YOU for your purchase of the M100 GameSpy Digital Camera. Please
read this booklet before using the unit. If you should have any questions about this
product or any other Moultrie product, please contact us using the information on
the back of this booklet. Please register your camera at www.moultriefeeders.com
to activate your warranty.
Instructions for M100
GameSpy Digital Camera
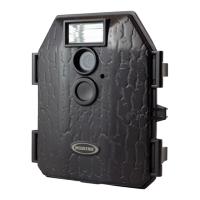
ON/OFF/AIM
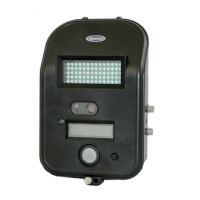
LCD Display
Navigation Buttons
Camera Lens
Aim LED
LED Flash
TV Out
USB Port
SD Card Slot
Power Panel Port
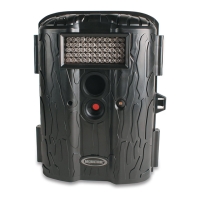
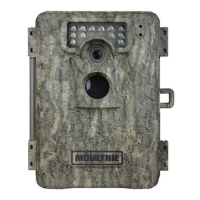
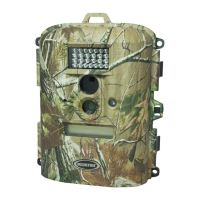
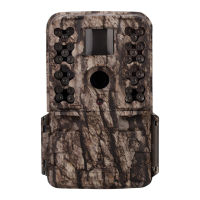
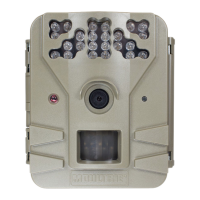
M100 GameSpy Digital Camera
Enter Button
Mode Button
Light Sensor
FRONT VIEW
SIDE VIEW
Unlock for slide-out battery compartment
Microphone
ON / OFF / AIM SWITCH
Used for turning On, turning Off, or Aiming the camera. When in AIM position the
red LED light on the front of the camera will illuminate. To help find the center field
of view for the camera, stand out in front of the camera and move left or right as you
observe the AIM LED - as you walk away from direct center the LED light will be
less bright. As you walk towards center the LED will appear brighter.
MODE BUTTON
The Mode Button selects the 3 modes of the camera - Camera Setup Photo Review or
Main Screen . When camera mode is selected, the UP and DOWN buttons navigate
through the menu options. The Mode Button is also used to wake-up the camera and
turn on the display when the camera is in a power saving mode
.
ENTER, UP/DOWN and LEFT/RIGHT BUTTONS
The ENTER button selects the item to be changed. The UP/DOWN and LEFT/RIGHT
buttons are used to step through the menu options. Pressing the ENTER button again,
selects the option indicated on the display. The ENTER button is also used to
manually take a picture.
PHOTO REVIEW
To view pictures use the RIGHT or LEFT button to sequence to the next/previous
captured picture or video clip. The camera’s menu display shows the picture number
being viewed. To delete current picture or video, press the DOWN button.
BATTERY COMPARTMENT
The Camera is powered by four(4) or eight(8) AA size alkaline or lithium batteries.
Slide the Unlock switch to the right and grab the small handle under the switch to
slide-out the battery compartment tray.
NOTE: It is recommended to use lithium batteries for best performance.
SD CARD SLOT
Accepts up to a 32GB SD Card for photo and video storage. Note: An SD Card
must be installed for the camera to operate (sold separately).
USB PORT
Download still pictures and video onto your computer by connecting provided cable.
POWERPANEL PORT
Accepts the Moultrie PowerPanel accessory (sold separately) only. Refer to
www.moultriefeeders.com for more information.
TV OUT JACK
View still pictures and videos on your TV by connecting a 2.5mm video cable
(separately).
M100 GameSpy Digital Camera
SAVING FILES OVERVIEW
Use the Save File features of the PlotStalker
software to create a single photo, reduce the
overall size of the .mlt file, exclude unwanted
photos in the front, or create a video that can
be viewed using a standard media player.
1
2
3
On the main screen, choose a starting image/
photo (frame) by using the scroll bar on the
bottom of the display or the frame-by-frame
search feature.
Press the SAVE button
Select the Current Image (*.jpg) radio button
Press Change... to enter the directory and
filename to save the image
Press Export to save the file
4
Select the appropriate 50, 100, or 200 images video clip radio button.
This will create a MLT format file from the starting frame plus the
next 50, 100, or 200 frames.
Select the Change button to select the desired location to save the export file.
Enter the directory and filename to save the file
Select the Export button to save the file. These files are viewable with
Plot Stalker Software.
EXPORTING MLT FILE
5
EXPORTING WMV FILE
1
2
3
4
1
2
3
4
Select the appropriate 50, 100, or 200 images video clip radio button. This will
create a .wmv format file of the starting frame plus the next 50, 100, or 200 frames.
Select the Change button to select the desired location to save the export file.
Enter the directory and filename to save the file
Select the Export button to save the file. The program will convert the images
to video based on the chosen settings. The .wmv file can be viewed using a
standard media player.
PLOTSTALKER SAVE FILE
C
Great for uploading to the internet or emailing.
EXPORTING AN IMAGE/PHOTO