GB
environment, out of the reach of children.
D6. Let the motor cool down before it is
stored in any environment.
D7. To reduce the risk of fire, clean any leaves,
grass or excess oil from the brush cutter,
especially its motor, cooling fins, exhaust
pipe and fuel tank.
D8. If the fuel tank has to be drained, do so
outdoors when the motor is cold.
D9. Do not add, remove or modify any
machine components.
This could cause:
– injuries to the operator and other peo-
ple present
– damage to the machine
moreover, this invalidates the warranty.
D10. To respect the environment do not dispose of
oil or petrol by pouring it into the drainage
system, gutters or into the ground. A local
service station can have oil and fuel recycled
in total safety.
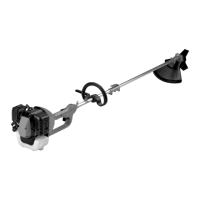
ASSEMBLY INSTRUCTIONS
OPERATING THE SHAFT (ON MODELS WITH
REMOVABLE SHAFT)
Fitting the lower shaft.
1. Remove the guard from the lower shaft (A).
Press and hold the locking lever (B) until the
lower shaft is pressing against the click-in fix-
ing tooth (Fig. 3A)
2. Position and lock the click-in mechanism of the
locking lever (B) in the main hole (C) (Fig.3A).
PRECAUTIONS: for safe use, the tooth of the
locking lever (B) must be fitted into the main
hole (C) in fig. 1A and the knob (D) in fig. 1B
must be clamped tightly.
3. Clamp the knob (D) tightly clockwise before
using the machine (Fig.1B).
4. Loosen the knob slightly by turning it counter-
clockwise. Hold the locking lever down to
adjust the correct position, stop when you feel
the click. Then clamp the knob securely (clock-
wise).
PRECAUTION: unless otherwise indicated in
the specific operator manual for connection,
the main hole must be used for connection. All
couplings have been designed to be fitted
using the main hole (C) in fig.1A. Use of the
wrong hole can cause injury or damage to the
machine..
THE HANDGRIP
It is necessary fasten the front grip with barrier
using the bottom cap. Once the grip and the bottom
cap have been fitted to the drive pipe, the edge of
the grip has to be positioned on the edge of the
label indicated by the arrow. Fit the screws (with
washers) into the grip holes and fit the bolts into
their seats. Tighten the screws a little (Fig. 1A).
Then tighten the screws completely, ensuring that
they are all fastened equally.
WARNING
The grip has to be fastened to the drive pipe in line
with the edge of the label indicated by the arrow
(label shown on page 16 of this manual). This
position must never been changed.
GUARD
PRECAUTION: The guard must be fitted appropri-
ately to comply with the correct position of the line-
cutting blade and protect the operator.
Never work without the guard. The guard must
be fitted with the screws with washers that come
with the machine (Fig. 3).
The guard must be the correct type both for the
machine model and for the cutting tool.
When the line head is used, the guard must be fit-
ted with a line-cutting blade. If the blade disk
guard is not fitted with a line cutter, then the guard
has to be fitted with the bottom band with knife.
After the bottom band and its guides have been fit-
ted into the seats, press the band towards the
guard so that all the teeth are released (Fig. 4).
WARNING
In order to guarantee that the brush cutter is used
properly and safely, the assembly instructions
for the protection and safety components must
be followed meticulously. The manufacturer shall
not be held liable if the brush cutter is used without
the aforementioned protection and safety devices.
CUTTING TOOL ASSEMBLY
The use of cutting tools other than the 2-line
heads, metal disks or circular saw blades may
cause premature wear or damage the machine.
METAL DISKS (Fig. 5)
a) Put on a pair of protective gloves before
touching the metal disk.
 Loading...