Mr12volt P600 Series
For Volvo/Range Rover
L322/Aston
Martin/Freelander 2
Basic, High Performance, Premium sound
system
Model No: P600-LP1606VO
1. Introduction
The MR12VOLT P600 Series lets you connect Bluetooth
devices, USB flash drive, Micro SD card and AUX In devices
to your original car radio, providing Hi-Fi quality music
playback and simple menu based control through your
radio. The Bluetooth also provides you A2DP music
streaming and hands free functions which integrates to
your original steering wheel buttons.
Package content :
• Main Module
• Optical cable (M.O.S.T.)
• Power Lead
• 3.5mm Jack to Jack cable
• Microphone (270cm)
2. Programming & Qualifier
⚫ No Coding required for Volvo
⚫ Phone contact list does not work on Volvo/Aston
Martin & Range Rover L322 radios
⚫ Text capable
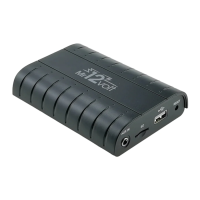
Main Module Overview
3. Installation
Important note: When you connect the power harness
please make sure that you feed the Mr12Volt device with
+12V non-switched constant power.
⚫ Please make sure that during installation, you don’t
disconnect other devices of the optical ring, (for
example the amplifier of the car).
⚫ Mr12volt P600 and factory Head Unit CD
player/Changers can be installed at the same.
However, when an audio source is connected to
P600, it will temporary take over the function of
Head Unit player and emulates CDs function, when
disconnected, however will play CD player back
again
Range Rover & Aston Martin: P600 must be
installed behind Head Unit, it cannot be installed
in Rear trunk or behind Glove box
Installation steps
1. 3 way split F.O. cable is used to install and bridge
behind Head Unit through the M.O.S.T fiber (simply
remove Head Unit out, install P600 behind through
M.O.S.T. and make a bridge connection using the split
F.O. cable in the package) see fig.02
Fig. 02 Split F.O. cable
2. Getting the power source : Connect Red wire lead to
12+ Constant power from car wiring harness and
Black wire lead to ground.
3. At your own choice you can wire up microphone at
your desire position, it is recommended to wire
through “A” Pillar and to the top of windscreen.