2 Unit Connection
On test stand left side, ensure that all 5 barb ttings are in
place & straight before connecting cylinder holder or
another test stand.
Press 2 units together until barb ttings are fully inserted &
ange screw holes align.
Insert 3 screws: to connect multiple test stands, remove
white gas plugs from all units except farthest right test stand.
Continue adding test stands to right, cylinder holders to left.*
GALAXY® GX2 Automated Test System Quick Start Guide -
Description and Setup
M
e
m
o
r
y
c
a
r
d
p
o
r
t
p
r
o
v
i
d
e
d
o
n
t
e
s
t
s
t
a
n
d
i
s
f
o
r
c
a
l
i
b
r
a
t
i
o
n
&
b
u
m
p
r
e
c
o
r
d
s
t
o
r
a
g
e
;
S
D
o
r
S
D
H
C
m
e
m
o
r
y
c
a
r
d
c
a
n
b
e
p
u
r
c
h
a
s
e
d
f
r
o
m
M
S
A
o
r
e
l
s
e
w
h
e
r
e
.
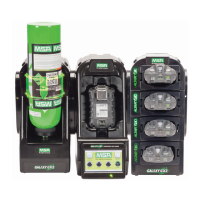
Test stand Ethernet jacks
1 System Components
Touch screen display
Status LED
Test stand to test stand connector
SD card port
USB port
Gas plugs
If using MSA cylinder holders, left-most cylinder holder should
have fresh air lter attached to top port.
*If using ammonia or chlorine test gas, read restriction found under instruction manual chapter 2.8 “Special Conditions for Use with
Reactive Gases” .
GB/EN