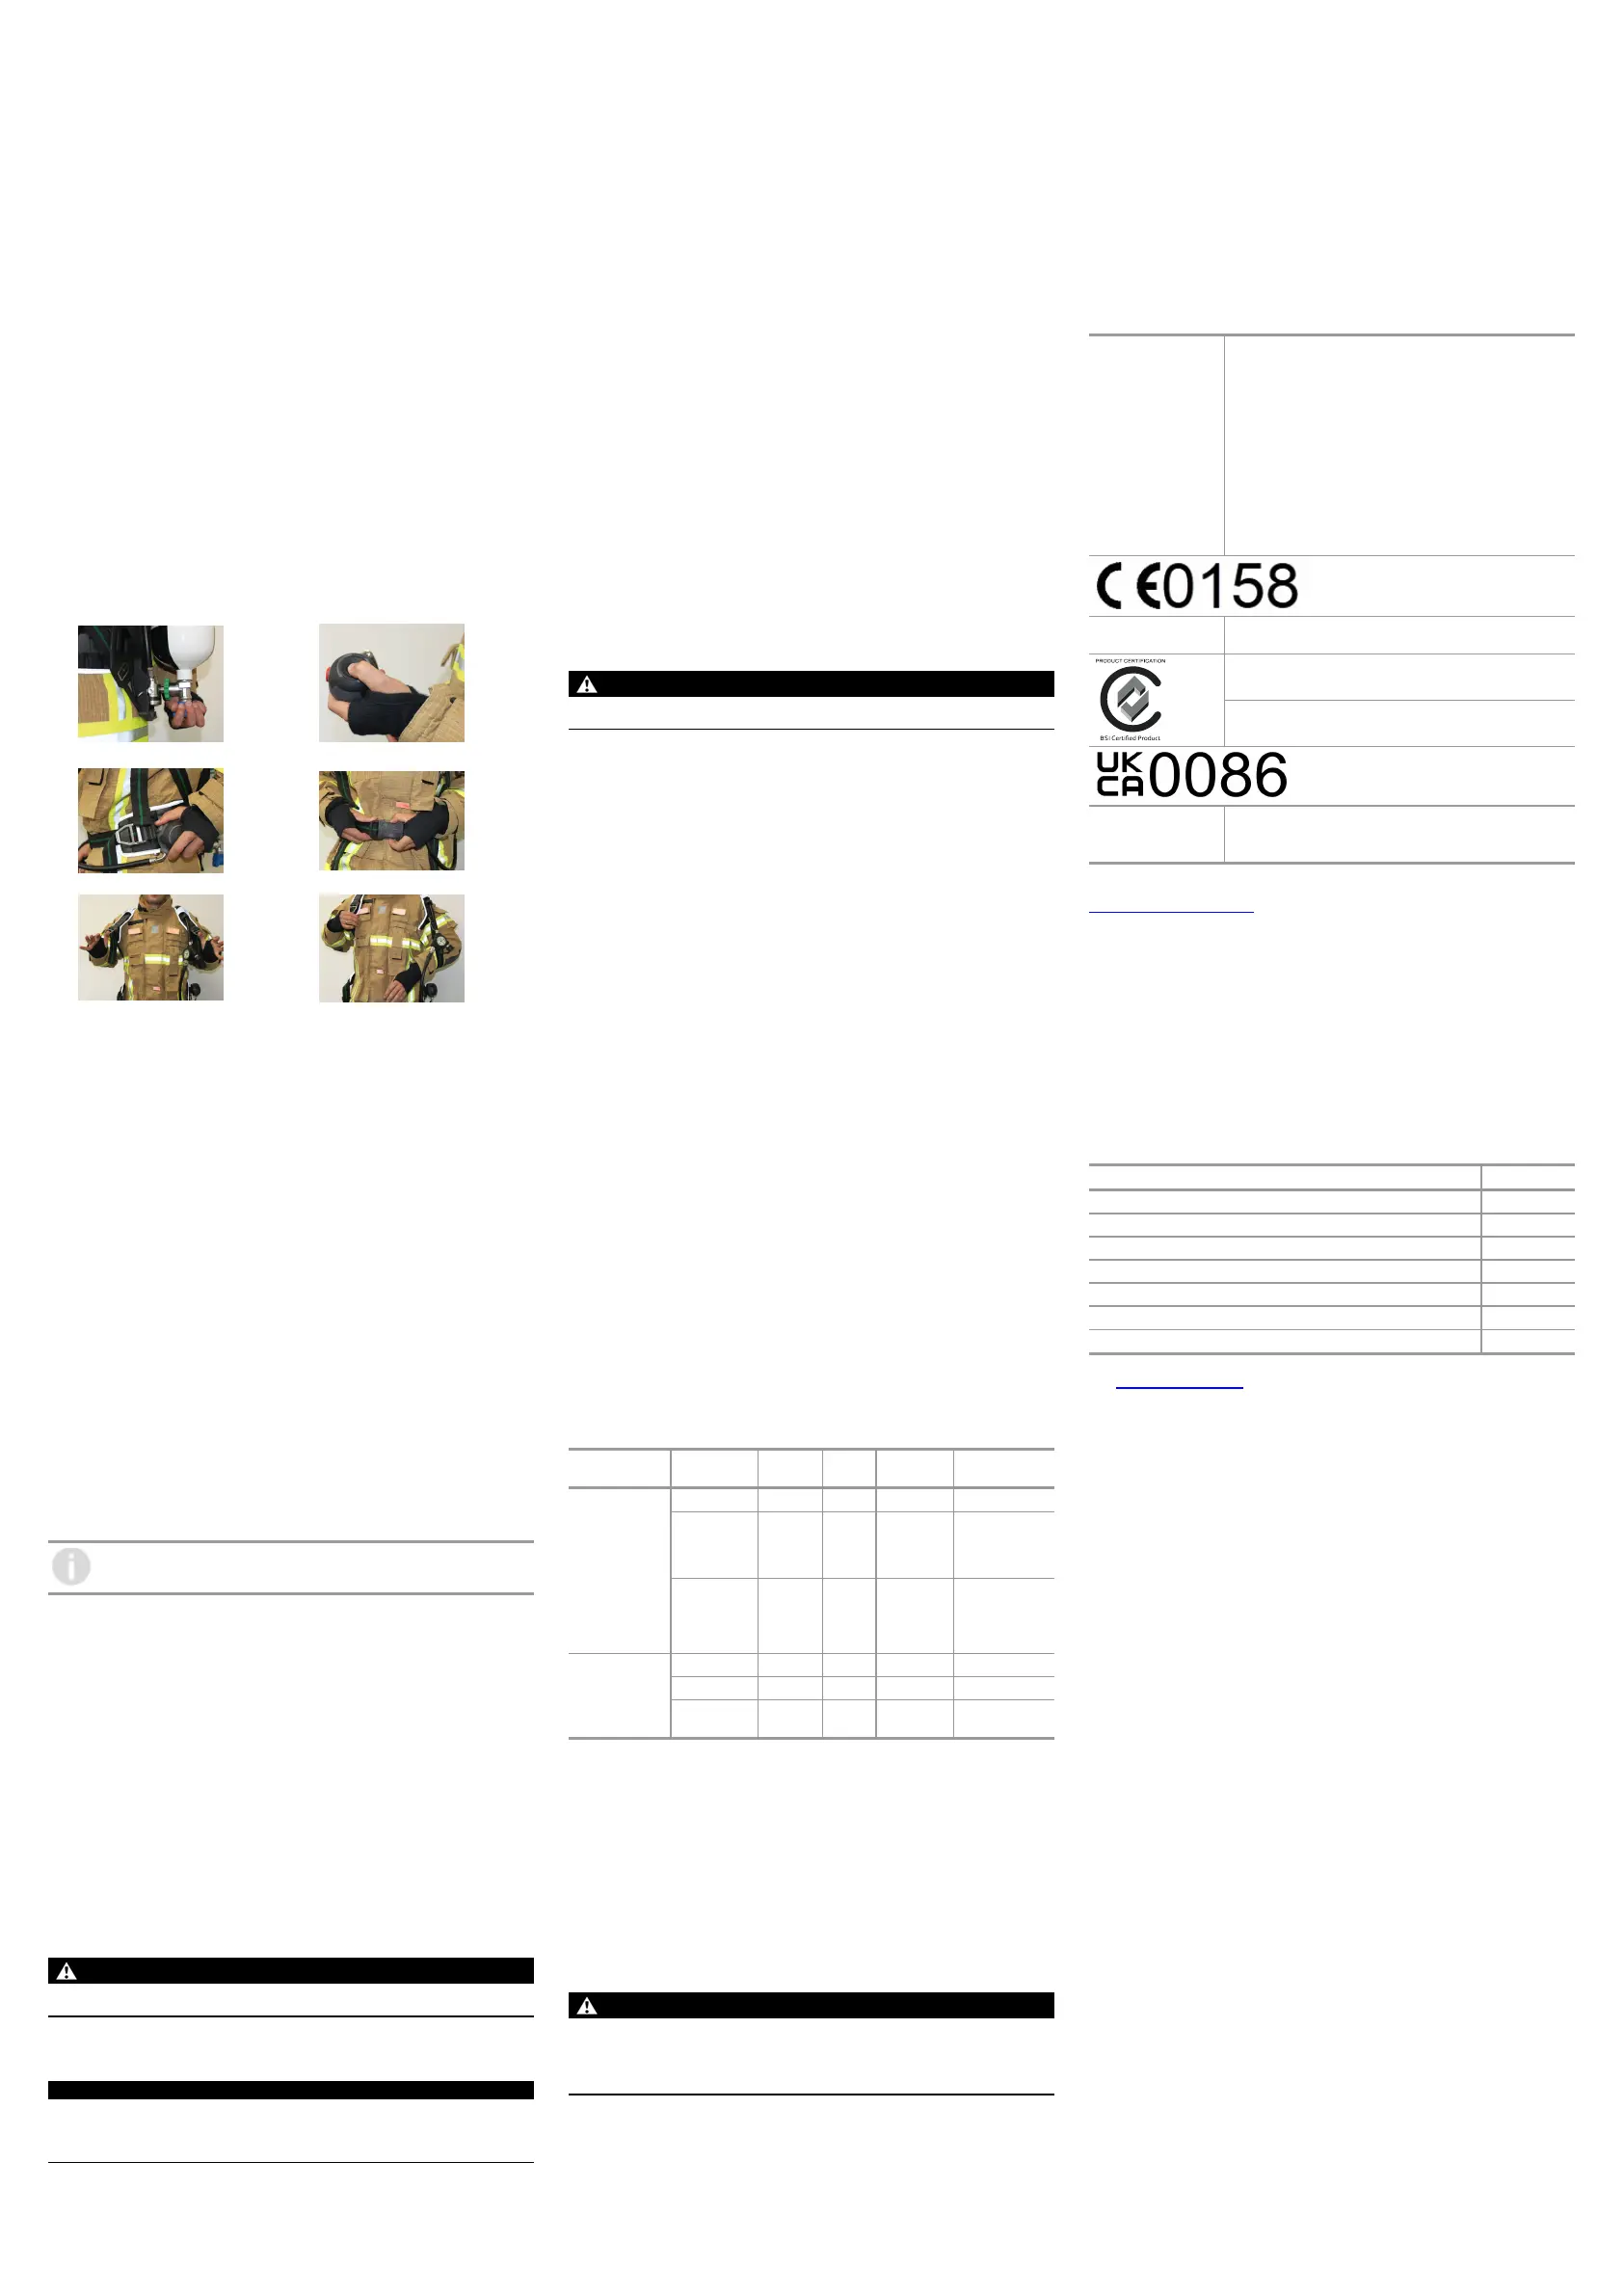
2. Bend forward slightly; resting the carrier on the back. Pull down shoulder
straps to pre-tighten SCBA.
3. Fasten the hip belt and pull forward on the waist strap pull tabs to tighten
for a snug fit (advanced harness). For basic harness, pull sidewards on
the waist strap pull tabs to tighten.
a. Most of the SCBA weight should be carried on the hip.
4. Stand up straight. Pull down on the shoulder strap pull tabs to tighten
straps. Adjust the hip belt if necessary. Fasten chest strap (if used).
5. Grab the LGDV and push the side buttons to release the LGDV from the
LGDV retainer.
6. Make sure the LGDV is switched off before opening the cylinder valve(s).
7. Reach behind and fully open the cylinder valve(s).
3.5 During Use
Periodically check the pressure indicated on a chest mounted pressure indicator
during use.
When the needle on the pressure indicator reaches the red zone on the gauge
face, the primary low pressure warning device alarms.
The primary low pressure warning device indicates when cylinder pressure drops
below these approximate values:
• 55bar ±5bar for a 300bar system
Immediately return to a non-hazardous atmosphere if:
• SCBA free-flows (provides air when not inhaling).
• Low pressure warning device sounds.
• When the pressure warning device indicates 35% cylinder pressure,
immediately return to a non-hazardous atmosphere.
• If the air flow in the SCBA is reduced: Immediately keep purge pressed.
Immediately return to a non-hazardous atmosphere.
3.6 After Use
1. 2.
3. 4.
5. 6.
1. Close the cylinder valve(s) fully.
2. Press the purge button to release system pressure.
3. Stow the LGDV in the LGDV retainer when it is not in use.
4. To remove the carrier and harness, press both buttons of the hip belt
buckle.
5. Disconnect the chest strap buckle by pressing both buttons at the same
time (if used). To loosen the shoulder straps, lift the pull tabs and push
them out and away from the body.
6. Slip the left arm out of the shoulder strap first, then remove the harness.
3.7 Cylinder Fitting and Removing
Removing the Cylinder(s)
1. Lay the backplate of the SCBA horizontal with cylinder(s) facing up.
2. Ensure there is no pressure in the system before replacing a cylinder.
a. Close the cylinder valve(s).
b. Press the purge button of the LGDV until air no longer
discharges.
3. Hinge down the securing bracket.
4. Hinge up cylinder buckle at cylinder strap and thus loosen the strap.
5. Disconnect the cylinder(s):
Threaded connection:
• Unthread handwheel from cylinder valve assembly and/or T-piece.
alphaCLICK2 connection:
• Turn the handwheel on the coupling side first clockwise, when the stop is
reached, push downwards in the direction of the pressure reducer.
• The cylinder adapter releases from the alphaCLICK2coupling.
When exchanging compressed air cylinders of the same diameter, only
the cylinder buckle needs to be opened.
6. Lift cylinder(s) at the valve and pull out of cylinder strap.
7. Close high pressure connection cylinder valve(s) with protection cap (not
required for alphaCLICK2).
Attaching One Cylinder
1. Lay the backplate of the SCBA horizontal with cylinder side facing up.
2. Slide the fully charged cylinder into the carrier.
3. Open cylinder buckle on the cylinder strap eliminating any tension and
extend the strap using the slider (if necessary).
4. Push compressed air cylinder through the cylinder strap with the cylinder
valve toward the pressure reducer, so that it lies on the cylinder cradle.
Threaded connection:
○ Thread cylinder valve to the pressure reducer, if necessary, bring
the SCBA with valve up into a vertical position.
alphaCLICK2 connection:
○ Align the compressed air cylinder with the alphaCLICK2axially
to the coupling and fit on the alphaCLICK2 coupling.
○ Close the coupling by pushing together using a light force.
CAUTION!
Never push the coupling system together using excessive force.
Failure to follow this caution can result in minor or moderate injury.
5. Tighten cylinder strap by pulling the free end.
6. Check position of compressed air cylinder, retighten if necessary.
NOTICE
Damage can occur when using excessive force to close the cylinder buckle and
the SCBA might not be ready for use.
• Do not overtighten the cylinder strap.
7. Hinge cylinder buckle down until it catches.
If strap tension is too high during hinging of the cylinder buckle, re-adjust
the strap length at the cylinder buckle. If the strap tension is too low, re-
adjust the strap length at the cylinder buckle.
8. Hinge up the securing bracket until it catches.
9. Fasten end of the cylinder strap by moving the small slider.
10. Briefly open cylinder valve and check for escaping air, retighten if
necessary.
11. To check that the cylinder is secure, place one hand on the backplate and
grab the cylinder valve with the other hand. Try to pull the cylinder and
valve down and out away from the carrier. Make sure that the strap holds
the cylinder securely in the carrier.
NOTE: If the cylinder feels loose, check that the latch engages with the proper slot
on the strap. Ensure that the latch is fully tightened. Do not use the SCBA if the
cylinder is not held securely in the carrier.
12. Align the handwheel assembly to the cylinder valve.
Threaded connection:
○ Before installing the threaded handwheel, check that the O-ring
inside the handwheel coupling nut is present, clean and free of
damage. If the O-ring is damaged, it must be replaced before the
SCBA is used.
○ Thread the handwheel onto the cylinder threads. The handwheel
should be hand-tight (no tools).
alphaCLICK2 connection:
○ Before installing check that the male and female end of the
coupling are clean and free of damage. Ensure the adapter on
the cylinder valve is tight (torque 20 to 30Nm).
○ If necessary, thread the alphaCLICK2 cylinder adapter with a
specific torque of 20 to 30Nm into the cylinder valve.
○ Push the alphaCLICK2 connect coupling onto the cylinder valve
adapter until an audible snap is heard. The handgrip will rapidly
rotate approx. 45° counter clockwise indicating that the valve is
connected to the pressure regulator.
○ Grab the handwheel firmly and pull on it to ensure the handwheel
is fully attached.
Attaching Two Cylinders
CAUTION!
Never push the coupling system together using excessive force.
Failure to follow this caution can result in minor or moderate injury.
1. Open cylinder buckle on the cylinder strap eliminating any tension and
extend the strap using the sliders (if necessary).
2. Push one compressed air cylinder through the cylinder strap with the
cylinder valve toward the T-piece, so that it lies on one of the outer
supports.
3. Thread the cylinder valve onto the T-piece.
4. Push a second compressed air cylinder through the cylinder strap so that
the cylinder valve points to the T-piece and lies on the outer supports.
5. Thread the second cylinder valve onto the T-piece.
○ Before installing the threaded handwheels, check that the O-
rings inside the handwheel coupling nut on the pressure reducer
and the T-piece are present, clean and free of damage. If the O-
rings are damaged, they must be replaced before the SCBA is
used.
○ Thread the handwheels onto the cylinder threads and T-piece.
The handwheels should be hand-tight (no tools).
6. Align the compressed air cylinders with the T-piece and retighten
handwheels if necessary.
7. Tighten cylinder strap by pulling the free end.
8. Check position of compressed air cylinders, retighten if necessary.
9. Hinge cylinder buckle down until it catches.
If strap tension is too high during hinging of the cylinder buckle, re-adjust
the strap length at the cylinder buckle. If the strap tension is too low, re-
adjust the strap length at the cylinder buckle.
10. Hinge up the securing bracket until it catches.
11. Fasten end of the cylinder strap by moving the small slider.
12. Briefly open cylinder valves and check for escaping air, retighten if
necessary.
13. To check that the cylinders are secure, place one hand on the backplate
and grab the cylinder valves with the other hand. Try to pull the cylinders
and valves down and out away from the carrier. Make sure that the strap
holds the cylinders securely in the carrier.
NOTE: If the cylinders feel loose, check that the latch engages with the proper slot
on the strap. Ensure that the latch is fully tightened. Do not use the SCBA if the
cylinders are not held securely in the carrier.
4 Maintenance and Care of the SCBA
4.1 Maintenance Intervals
Component Work to be
performed
Before
use
After
use
Annually Every
120months*
M1
Cleaning X X
Visual,
function and
tightness
check
X X X
Overhaul
X
or after
600hours of
active use**
alphaCLICK2
coupling
Cleaning X
Lubricate X***
Check by
user
X
*
Applicable national regulations must be observed (e.g. GFPA German
Fire Protection Association directive 0840, attachment 2).
**
For SCBA apparatus that are frequently used, MSA recommends a
complete overhaul after approx. 600 hours.
For example, this corresponds to 1200 applications with a duration of
30minutes.
***
Lubricate alphaCLICK2 coupling every 500 coupling cycles or when
necessary.
See “Maintenance alphaCLICK2 high pressure coupling”.
5 Storage
WARNING!
DO NOT drop the cylinder or bump the valve knob. An unsecured cylinder can
become an airborne projectile under its own pressure if the valve is opened even
slightly.
Failure to follow this warning can result in serious personal injury or death.
• Do not store the SCBA or spare cylinders within or near an area where the
SCBA can or might be exposed to any substances and ambient conditions
that will or might attack any part of the SCBA, causing the SCBA to not
perform as designed and approved.
• Prior to storing the SCBA in a jumpseat, ensure there is no interference
between the SCBA and the seat. Ensure the SCBA and cylinder can be
removed easily without damaging the components.
• Do not store the SCBA for extended periods with the batteries installed in
the electronic components (if available) if the SCBA is not intended for
service. If the SCBA is in service, ensure that the batteries in the
electronic components (if available) have an adequate charge.
• Do not store the SCBA with an empty or partially filled cylinder. Always
install a fully-charged cylinder so that the SCBA is ready for use.
• Ensure the entire SCBA is clean and dry.
• Ensure the SCBA harness and full face mask head harness adjustment
straps are fully extended. Place the complete SCBA in the storage case or
suitable storage location so it can be easily reached for emergency use.
• For prolonged storage of the SCBA, remove the batteries from all
electronic components (if available) and housings to prevent battery
corrosion. Store the units in a cool, dry place.
6 Certification
6.1 Complete Device
Approvals
The compressed air breathing apparatus conforms to the
Regulation (EU) 2016/425, Directive 2014/34/EU and
PPE Regulation (EU) 2016/425 as retained in UK Law
and amended. It is a self-contained open circuit
compressed air breathing apparatus in accordance with
harmonized/designated standard EN 137:2006, type 2,
for the extended temperature range from -40 °C to +60
°C.
The function of the electronic components were not
assessed for the certification in accordance with
Regulation(EU)2016/425, because even in case of a
complete failure of all electronic components, the
respiratory protection provided by MSA M1 remains
unchanged.
Notified body
DEKRA Testing and Certification GmbH, Dinnendahlstr.
9, 44809Bochum, Germany
AS/NZS 1716:2012 Lic: BMP No 713832
Australian/New Zealand Standards
BSI Group ANZ Pty Ltd, Suite 2, Level 7, 15 Talavera
Road, MacquariePark, NSW 2113
Approved body for
product certification
and site surveillance
BSI Assurance UK Ltd, Kitemark Court, Davy Avenue,
Knowlhill, Milton Keynes, MK5 8PP, United Kingdom
The Declaration of Conformity can be found under the following link:
https://MSAsafety.com/DoC.
6.2 Marking
For ATEX marking for use in potentially explosive atmospheres see M1 Modular
SCBA System operating manual. For CBRN application and component selection
see M1 Modular SCBA System operating manual. Full face mask: see operating
manual for Full Face Mask and Mask/ Helmet Combination. The ATEX class of any
other equipment used together with this device has to be regarded as well. The
lowest class sets the limit.
7 Ordering Information
For this product, order numbers have been replaced by an ATO (Assemble To
Order) code. See M1 Modular SCBA System operating manual.
Manual Part Number
Operating Manual Modular M1 SCBA System 10195758
Operating Manual M1 LGDV 10190261
Operating Manual G1 Facepiece 10161150
Operating Manual alphaBELT 10156929
Operating ManualSingleLine SCOUT 10186539
Operating Manual 3S and Ultra Elite full face masks 10126346
Cleaning and Disinfection Guidelines M1 Modular SCBA System 10203757
See www.MSAsafety.com.
 Loading...