EasyManua.ls Logo

MSR HUBBA NX - User Manual

MSR HUBBA NX
2 pages
Print Icon
To Next Page IconTo Next Page
Loading...
M OUNTAIN S AFETY R ESEARCH
®
HUBBA
NX
Assembly Instructions
© 2014 Cascade Designs, Inc.
4000 First Avenue South
Seattle, WA 98134 USA
1-800-531-9531
1-206-505-9500
PACKAGE INCLUDES:
Frame assembly, tent body, rainfly, 1 guy cord, 1 tensioner,
6 MSR
®
Mini-Groundhog™ Stakes, 1 repair sleeve
80-466-1
PREPARE FOR SETUP
ATTACH HUBBED POLES
ATTACH CLIPS
ATTACH RAINFLY
1. Attach clips to pole along length of tent and ridge pole.
1. Spread tent out and stake out four corners tightly.
2. Assemble poles.
1. Insert tips of two hubbed poles into grommets at one end of tent
floor, followed by the remaining two at the other.
2. Insert short ridge pole into two grommets at midpoint of tent
ceiling.
1. Lay rainfly over tent, aligning red webbing to red stake loops,
gray webbing to gray stake loops. Attach the rainfly’s midpoint
grommets to ridge pole.
2. Stretch out vestibule until taut and stake down, making sure
seams align with frame.
USE TIPS: All tents require staking; unsecured tents are susceptible to
wind damage. In some conditions, additional stakes and cord may
be required. Readjustment of stakes and rainfly may be necessary
to keep tent tight and weatherproof. A footprint can help keep your
tent clean, dry and protected from abrasion. Following these tips will
prolong the life of your tent. MSR
®
offers a full line of accessories to
secure, maintain and enhance your tent.
Please follow these instructions to guide you through assembly only.
For complete instructions on the recommended care and use of your tent,
please refer to Owner’s Manual at www.msrgear.com/tents/ownersmanual
For German, French, Spanish, Italian, Dutch and Japanese instructions go to www.msrgear.com/tents/ownersmanual
Watch video setup instructions, including Fast & Light
®
options,
at www.msrgear.com/Hubba
All manuals and user guides at all-guides.com
all-guides.com
Question and Answer IconNeed help?

Do you have a question about the MSR HUBBA NX and is the answer not in the manual?

Summary

Standard Tent Assembly

Prepare for Setup

Spread tent out and stake corners tightly, then assemble poles.

Attach Hubbed Poles

Insert tent floor poles into grommets and short ridge pole into ceiling grommets.

Attach Clips

Attach clips to the tent and ridge poles along their length.

Attach Rainfly

Lay rainfly over tent, aligning webbing and attaching midpoint grommets, then stake vestibule.

Fast & Light Setup with Rainfly and Footprint

Prepare for Setup and Attach Poles

Stake footprint, insert poles into corner grommets to create pole structure.

Secure Rainfly

Attach rainfly webbing to pole tips and insert ridge pole into rainfly grommets.

Secure Tent

Stake out vestibule and guy out if necessary for stability.

Fast & Light Setup with Rainfly Only

Prepare for Setup

Assemble poles and lay rainfly on the ground for setup.

Attach Poles

Insert poles into rainfly bottom grommets and ensure frame fits properly.

Secure Tent

Stake corners, tension straps, and secure vestibule for stability.

Overview

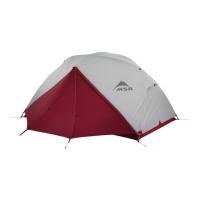
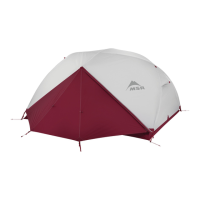
The provided manual describes the assembly and setup of the MSR Hubba™ NX tent, a lightweight shelter designed for outdoor use. The tent is engineered for ease of setup and offers various configurations to suit different weather conditions and user preferences, including a standard setup, a "Fast & Light®" setup with a rainfly and MSR® Footprint (sold separately), and a "Fast & Light®" setup with the rainfly only.

Function Description:

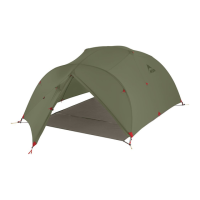
The MSR Hubba™ NX is a single-person backpacking tent designed to provide shelter and protection from the elements during outdoor adventures. Its primary function is to offer a comfortable and secure sleeping space, keeping the user dry and protected from wind, rain, and insects. The tent's design emphasizes lightweight portability, making it suitable for backpackers, hikers, and campers who prioritize minimal gear weight without compromising on durability and weather resistance. The tent features a hubbed pole system that creates a stable and spacious interior, maximizing livable space while maintaining a compact packed size. The inclusion of a rainfly ensures comprehensive weather protection, while the option for a footprint (sold separately) adds an extra layer of ground protection and extends the tent's lifespan.

Usage Features:

Standard Setup:

The standard setup of the Hubba™ NX involves a straightforward, four-step process.

  1. Preparation: The user begins by spreading the tent body out on the ground and staking out its four corners tightly. This initial staking provides a stable base for the subsequent steps. The tent poles, which are hubbed for integrated assembly, are then assembled.
  2. Attaching Hubbed Poles: The assembled hubbed poles are then connected to the tent body. The tips of two hubbed poles are inserted into grommets at one end of the tent floor, followed by the remaining two at the other end. A short ridge pole is then inserted into two grommets located at the midpoint of the tent ceiling, which helps to create the tent's structure and maximize interior volume.
  3. Attaching Clips: Once the poles are in place, the tent body is secured to the pole structure using clips. These clips are attached along the length of both the main poles and the ridge pole, pulling the tent fabric taut and forming the tent's shape.
  4. Attaching Rainfly: The final step in the standard setup is to attach the rainfly. The rainfly is laid over the tent, ensuring that the red webbing on the rainfly aligns with the red stake loops on the tent body, and the gray webbing aligns with the gray stake loops. The rainfly's midpoint grommets are then attached to the ridge pole. The vestibule, an extended area created by the rainfly, is then stretched until taut and staked down, with careful attention to aligning the seams with the frame for optimal weather protection and stability.

Fast & Light® Setup with Rainfly and MSR® Footprint (sold separately):

This configuration is ideal for users who want to reduce weight and bulk while still benefiting from ground protection.

  1. Preparation and Pole Attachment: The setup begins by staking out the MSR® Footprint with the MSR logo facing up. The assembled poles are then inserted into the footprint's corner grommets, creating the same pole structure as the standard setup. This effectively replaces the tent body with the footprint as the base.
  2. Securing Rainfly: The rainfly is then secured by attaching its webbing to the pole tips using the grommets. The ridge pole is inserted into grommets located above the vestibule door on the rainfly, completing the structural integrity.
  3. Securing Tent: The vestibule is staked out, and the tent is guyed out if necessary, ensuring stability and weather resistance.

Fast & Light® Setup with Rainfly only:

This is the lightest possible configuration, suitable for conditions where ground protection is less critical, or when extreme weight savings are paramount.

  1. Preparation: The poles are assembled, and the rainfly is laid out on the ground.
  2. Attaching Poles: The tips of the poles are inserted into grommets at the bottom of the rainfly on one side. The other end of the poles is then placed into grommets on the opposite side of the rainfly, ensuring the frame fits properly under the rainfly. The ridge pole is inserted into grommets above the vestibule door on the rainfly, providing structural support.
  3. Securing Tent: The corners of the rainfly are staked out, and the webbing straps are tensioned to create a taut structure. The vestibule is then staked out, and the tent is guyed out if necessary for added stability.

Usage Tips:

The manual provides crucial usage tips to ensure the longevity and performance of the tent:

  • Staking is Essential: All MSR tents require staking. Unsecured tents are highly susceptible to wind damage.
  • Additional Stakes and Cord: In certain conditions, such as high winds or uneven terrain, additional stakes and cord may be required to enhance stability.
  • Readjustment: Regular readjustment of stakes and the rainfly may be necessary to keep the tent taut and weatherproof, especially as fabric stretches or conditions change.
  • Footprint Benefits: Using a footprint (sold separately) is highly recommended. It helps to keep the tent clean, dry, and protected from abrasion, significantly prolonging the life of the tent floor.
  • Accessories: MSR offers a full line of accessories designed to secure, maintain, and enhance the tent's performance.

Maintenance Features:

While the manual primarily focuses on assembly, the "USE TIPS" section implicitly highlights maintenance practices that contribute to the tent's longevity:

  • Proper Staking and Tensioning: Ensuring the tent is always properly staked and the rainfly is taut prevents undue stress on the fabric and poles, which can lead to premature wear and tear. This also helps maintain the tent's waterproof integrity.
  • Footprint Use: The recommendation to use a footprint is a key maintenance feature. By protecting the tent floor from abrasion and punctures, it directly extends the lifespan of the most vulnerable part of the tent. This minimizes the need for repairs to the tent floor.
  • Regular Readjustment: The advice to readjust stakes and the rainfly as needed is a form of preventative maintenance. It ensures the tent maintains its structural integrity and weather resistance over time, preventing sagging or flapping that could damage the fabric or poles.
  • Cleaning and Drying: Although not explicitly detailed in the assembly instructions, the emphasis on keeping the tent "clean, dry and protected" implies the importance of proper cleaning and drying after each use to prevent mildew and fabric degradation, which are critical aspects of tent maintenance.
  • Accessory Utilization: The mention of MSR's full line of accessories suggests that users can invest in specific products designed for tent care, repair, and enhancement, further supporting long-term maintenance. For example, seam sealers, repair kits, and specialized cleaning agents would fall under this category, though not explicitly listed in this particular manual.

In summary, the MSR Hubba™ NX is a versatile and user-friendly tent designed for solo adventurers. Its thoughtful design, multiple setup options, and emphasis on proper usage and care ensure a reliable shelter experience in various outdoor environments. The manual provides clear, step-by-step instructions for assembly and valuable tips for maximizing the tent's performance and lifespan.

MSR HUBBA NX Specifications

General IconGeneral
Type-
ColorationMonochromatic
Living area1.67 m²
WeatherproofYes
Product colorGreen, Red
Number of doors1 door(s)
Number of sleeping places1 person(s)
Package depth150 mm
Package width460 mm
Package weight1290 g
Ground cloth materialNylon
Weight and Dimensions IconWeight and Dimensions
Depth760 mm
Width2160 mm
Height910 mm
Weight1120 g

Related product manuals