Do you have a question about the MTI AUTOFRY MTI-10X and is the answer not in the manual?
Details warranty coverage for manufacturing defects in workmanship and materials for one year.
Defines warranty applicability for original purchasers within the 50 US states and District of Columbia.
Lists conditions like accident, misuse, negligence, or improper maintenance that void the warranty.
Provides instructions on notifying the manufacturer about defects and required information for service.
States MTI is not responsible for incidental or consequential damages resulting from equipment use.
Explains purchaser's legal rights and suggests retaining the bill of sale as proof of purchase.
Explains safety symbols including caution, electric shock, fire, and hot warnings.
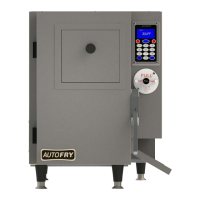
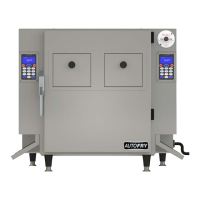
Specifies the AutoFry is for commercial kitchens and requires trained staff.
Lists prohibited uses like outdoor storage, use with wet hands, or with low/no oil.
Requires a licensed electrician for installation according to codes, prohibiting extension cords.
Advises choosing a sturdy, level, cleanable, and fire-resistant surface.
Inspect unit for damage upon arrival and notify the carrier if damaged.
Lists components to be removed: legs, chutes, basket, heater box, oil pot, deflector.
Details removing shipping bolts and installing adjustable legs by rotating clockwise.
Level the unit and ensure exhaust system is not obstructed.
Describes washing and sanitizing removable parts like the oil pot, basket, and chutes.
Emphasizes sanitizing all parts before reassembly and installation.
Guides on removing the cover plate and inserting the charcoal filter into the tracks.
States all interior surfaces must be sanitized.
Explains placing the oil pot with the drain valve facing front, ensuring it's closed.
Details placing the heater box onto the shelf and connecting plugs to sockets.
Instructs to place the oil deflector over the heating element and onto the oil pot.
Describes sliding the chute through the side cut-out and over the interior wall edge.
Guides on filling the oil pot to the cold fill line, warning against over/under filling.
Explains how to insert the basket rod into the cam and receiver clip.
Instructs to close the door, plug in the unit, and confirms readiness for cooking.
Describes pressing the POWER button, observing heating progress, and waiting for the READY status.
Explains using the keypad to enter desired cook times, referencing product packaging.
Guides on opening the entry door, placing food, closing the chute, and pressing start.
Details shutting down the unit by pressing the POWER button, noting the oil cooling process.
Instructions for activating standby mode to conserve energy and maximize oil life.
Steps to exit standby mode and return the unit to ready temperature or shut it off.
How to repeat the last entered cook time, useful for single product menus.
Steps to enter programming mode, including turning off the unit and pressing keys 2 and 0.
Overview of system programming options: Presets, Counters, Parameters, Tests.
Explains programming up to 18 cook cycles, including product name, cook time, temp compensation, and basket shake.
Details how to edit preset names using the keypad and ARROWS.
Instructions for editing cook times, including clearing and entering new values.
How to edit the temperature compensation feature from Yes to No.
Steps to enable or disable the basket shake feature and set time intervals.
Explains how this feature adjusts cook time based on oil temperature drops.
Describes the basket shake feature for reducing sticking and improving product quality.
How to exit programming by pressing the POWER key.
Instructions for selecting and using programmed presets via buttons or arrow keys.
Explains how to view and reset cycle counts for inventory control.
Lists daily tasks including washing removable parts, drying, and wiping exterior surfaces.
Instruction to perform daily cleaning tasks.
Cautionary steps for removing the heater box, advising against spraying or submerging it.
Guides on discarding oil environmentally and cleaning surfaces to bare metal.
Reminder to execute the weekly cleaning steps.
Instructions for cleaning removable stack, fire damper, and fan section with a dry cloth.
Advises removing filters and cleaning the entire interior to bare metal.
Instruction to reinstall the clean, dry stack cover and fire damper.
Guideline to replace used filters with new ones.
Emphasizes changing the filter every three months for ventless operation and provides ordering info.
States the second filter must be changed every six months and provides ordering info.
Details the mandatory six-month inspection of the fire suppression system by a certified company.
Procedure for testing the front door safety switch by removing components one by one.
Method to test the airflow switch by blocking exhaust flow with cardboard.
Confirms versatility for various products, recommending pre-cooked, frozen items.
Advises changing oil based on usage, recommending weekly or as needed for freshness.
Explains the sound is normal, caused by the basket contacting the cabinet during dispensing.
Lists reasons for no output: premature order entry or incorrect basket installation.
Suggests changing oil, charcoal filter, or checking for food debris in the oil pot.
Explains this error relates to oil temperature not reaching 325°F within 30 minutes.
Suggests checking cook time, sensor plug connection, or oil temperature accuracy.
Explains errors like "BASKET MOTOR ERROR" and "COULD NOT FIND HOME", possibly due to installation or motor issues.
Lists causes for temp errors: probe issues, temp too high, slow heating, or excessive fluctuation.
Addresses unit displaying room temp instead of heating; suggests hi-limit reset or plug issues.
Explains normal fluctuations and potential causes like dirty plugs or low oil level.
Covers errors like "Basket Motor Error", relating to basket adjustment or mechanical issues.
Discusses product missing basket, often due to incorrect seating or premature chute opening.
Relates to basket adjustment issues and potential gear box damage if not positioned correctly.
Addresses external heat issues, often linked to charcoal filter or airflow problems.
Explains odor causes: charcoal filter, fan issues, or type of cooking oil used.
Attributes condensation to product moisture or worn door gaskets.
Points to potential causes like open drain valve, high oil level, or oil pot leaks.
Suggests issues with the display board or ribbon cable connection.
Covers troubleshooting for a unit not powering on, including breaker resets and fuse checks.
Addresses mid-cycle shutdowns, possibly due to jammed baskets, blown fuses, or switch issues.
Troubleshoots fan not operating, linking it to safety switches, charcoal filter, or fan blockage.
Explains issues related to grease baffle installation or switch contact.
Covers problems with filter cover plate installation or switch contact.
Discusses potential issues with the fire suppression system, such as discharge or low pressure.
Addresses problems with the fire damper installation or switch contact.
Notes this is normal behavior for ensuring complete product dumping.
| Model | MTI-10X |
|---|---|
| Category | Commercial Food Equipment |
| Type | Ventless Fryer |
| Voltage | 208-240V |
| Material | Stainless Steel |
| Temperature Range | 375°F |
| Temperature Control | Digital |
| Cooling System | Yes |
| Safety Features | Automatic fire suppression system |
| Clearance Requirements | 6 inches on all sides |
| Exhaust | Ventless operation |