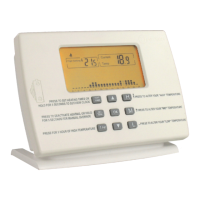
OK
H
M
L
HEAT
TIMES
PRESS TO ALTER YOUR HEATING TIMES
PRESS TO DEACTIVATE HEATING, OR HOLD
FOR 5 SECONDS FOR MANUAL OVERRIDE
PRESS FOR 1 HOUR OF HIGH TEMPERATURE
PRESS TO ALTER YOUR “HIGH” TEMPERATURE
PRESS BOTH TOGETHER TO SET/VIEW CLOCK
PRESS TO ALTER YOUR “MID” TEMPERATURE
PRESS TO ALTER YOUR “LOW” TEMPERATURE
OFF
MAN
1 Hr
High Setting
Current
Temp
0 2 4 6 8 10 12 14 16 18 20 22 24
+
MPRT RF
WIRELESS PROGRAMMABLE THERMOSTAT
The MPRT RF consists of a room unit and a relay box.
The Room Unit senses the room temperature and if he
at is called
for, it transmits a radio signal to the relay box whic
h in turn
activates the heating.
WIRING THE RELAY BOX.
The relay box is powered by 230V ac, 50Hz.
The figure below shows both low voltage and 230V ac wiring op
-
tions for switching the heating equipment.
WARNING: Installation and maintenance to be carried out
only by suitably qualified personnel and in accordance with cur
-
rent IEE wiring regulations.
ROOM UNIT
RELAY BOX
INSTALLATION INSTRUCTION
C
-
1 L
N
C 1 L N
O
C
C 1 L N
N
L
N 230V ac, 50 Hz
input power
input power
To heatin
g
equipmen
t
230V ac, 50 Hz
L
O
C
HEATING
EQUIPMENT
C
-
1 L
N
C 1 L N
O
C
C 1 L N
N
L
N 230V ac, 50 Hz
input power
input powe
r
To heatin
g
equipmen
t
230V ac, 50 Hz
L
O
C
HEATING
EQUIPMENT
Volt Free/Low Voltage Switching of
Heating Equipment.
C
-
1 L
N
C 1 L N
O
C
C 1 L N
N
L
N 230V ac, 50 Hz
input power
input powe
r
To heatin
g
equipment
230V ac, 50 Hz
L
O
C
HEATING
EQUIPMENT
230V ac Switching of Heating Equipment
ACTIVATING THE ROOM UNIT
Release the cover from the base by pressing at the arrow.
Remove the plastic strip which is preventing the battery connec-
tion in the battery compartment.
The LCD should display as shown below.
Reassemble the cover to the base.
LOCATING THE ROOM UNIT
The room unit can be mounted on its plastic stand and placed on
a sideboard or other item of furniture. Alternatively it can be wall
mounted using the two screws provided.
WHEREVER the Room Unit is mounted/used it should be out of
direct sunlight, out of draughts, and clear of any heat source (e.g.
radiators, fires or electronic equipment). For optimum use the unit
should be sited between 1 and 1.5metres from the floor.
MON
TUE WED
THU FRI SAT SU
N
High Setting
Current
Temp
0 2 4 6 8 10 12 14 16 18 20 22 24
MON TUE WED THU FRI SAT SUN
0 2 4 6 8 10 12 14 16 18 20 22 24
High Setting
Current
Time
MON TUE WED
THU FRI SAT SU
N
TO ACCEPT & CONTINUE PRESS OK
TO CHANGE VALUE PRESS OR
TO ACCEPT & CONTINUE PRESS OK
TO CHANGE VALUE PRESS OR
FOR LOW PRESS “L”, FOR MEDIUM PRESS “M”, FOR HIGH PRESS “H”
TO ACCEPT & CONTINUE PRESS OK
Low Setting
Current
Temp
0 2 4 6 8 10 12 14 16 18 20 22 24
12 14 16 18 20 22 24
SAT SUN SMART START
12 14 16 18 20 22 24
SAT SUN SMART START
0 2 4 6 8 10 0 2 4 6 8 10
0 2 4 6 8 100 2 4 6 8 10
OK
H
M
L
HEAT
TIME
S
PRESS TO ALTER YOUR HEATING TIMES
PRESS TO DEAC
TIVATE HEATING, OR HOLD
FOR 5 SECONDS FOR MANUAL OVERRID
E
PRESS FOR 1 HOUR OF HIGH TEMPERAT
URE
PRESS TO ALTER YOUR “HIGH” TEMPERAT
URE
PRESS BOTH TOGETHER TO SET/VIEW CLOC
K
PRESS TO ALTER YOUR “MID” TEMPERATUR
E
PRESS TO ALTER YOUR “LOW” TEMPERA
TURE
OFF
MA
N
1 Hr
High Setting
Current
Temp
0 2 4 6 8 10 12 14 16 18 20 22 24
OK
H
M
L
HEAT
TIMES
PRESS TO ALTER YOUR HEATING TIMES
PRESS TO DEA
CTIVATE HEATING, OR HOLD
FOR 5 SECONDS FOR MANUAL OVERRIDE
PRESS FOR 1 HOUR OF HIGH TEMPERATURE
PRESS TO ALTER YOUR “HIGH” TEMPERATURE
PRESS BOTH TOGETHER TO SET/VIEW CLOC
K
PRESS TO ALTER YOUR “MID” TEMPERATUR
E
PRESS TO ALTER YOUR “LOW” TEMPERATURE
OFF
MAN
1 Hr
High Setting
Current
Temp
0 2 4 6 8 10 12 14 16 18 20 22 24
(1.0 - 1.5) m