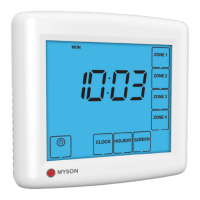
The MYSON TOUCH4 is a flush-mounted time clock designed for controlling up to four zones, offering flexible programming options for heating or other timed outputs. It features an intuitive LCD touchscreen display for easy setup and operation.
Function Description:
The TOUCH4 time clock allows users to program switching times for up to four independent zones. It supports both 5/2 day (weekday/weekend) and 7-day programming modes, providing adaptability for various schedules. The device displays the current time and day, and in normal run mode, it can show the status for a particular zone. A "Holiday" function disables all timed outputs for a specified duration, reverting to the programmed schedule afterward. The "Boost" facility allows users to temporarily extend the ON period for any zone for a set number of hours without reprogramming the regular schedule. A "Copy" function simplifies programming by enabling the transfer of switching times from one zone to another. Each zone can operate in three modes: Auto (programmed switching times), Off (zone switched off completely), and Constant (zone stays on indefinitely).
Important Technical Specifications:
- Mounting: Flush mounted, requiring a back box of 35mm minimum depth to be sunk into the wall prior to installation.
- Power Supply: 230VAC (as indicated in the wiring diagram).
- Outputs: Four switched live outputs (CH1, CH2, CH3, CH4).
- Display: LCD touchscreen.
- Programming Modes: 5/2 Day (Weekday/Weekend) and 7 Day.
- Zones: 4 independent zones, each with 4 On/Off times.
Usage Features:
- Normal Run Mode: Displays the current time. Users can view the status of a particular zone by pressing Zone 1-4, then DONE to return to the main menu.
- Setting the Clock:
- Press the CLOCK key.
- Use the Left Up/Down keys to set the hour.
- Use the Right Up/Down arrow keys to set the minute.
- Press the DAY key to set the day.
- Press DONE to confirm and exit.
- Holiday Setting:
- Press HOLIDAY.
- Enter the desired duration in days using the Up/Down arrow keys.
- Press DONE to confirm and exit.
- To cancel, reduce the holiday time to 00 days. Note: A holiday period starts at 00:00 the next day. For example, a 2-day holiday set on Friday will count Saturday as the first day, and the time clock will revert to the programmed schedule at 00:00 on Monday.
- Selecting 5/2 Day or 7 Day Programming:
- Press ZONE 1 (or the desired zone).
- Press DAY.
- Use the Up/Down arrow keys to set the programming mode: 00 for 5/2 Day, 01 for 7 Day.
- Press DONE to confirm and exit. In 5/2 Day mode, the display will show Mon > Fri, prompting programming for the weekend. In 7 Day mode, it will display Mon.
- Adjusting Switching Times:
- Select the zone to program (e.g., Zone 1).
- Press EDIT.
- If in 5/2 day mode, the display will show Mon, Tue, Wed, Thu, Fri. If in 7 day mode, it will show Mon.
- Press the DAY key to select the day to program.
- Use the Up/Down arrow keys to set the ON time.
- Press the OFF key to program the OFF time.
- Use the Up/Down arrow keys to set the OFF time.
- Repeat for Time 2, 3, and 4.
- Press DONE to confirm and exit.
- Copy Function:
- Select the zone to copy from and press EDIT.
- Press the COPY key.
- Select each zone you want to copy to (ZONE 1, ZONE 2, ZONE 3, ZONE 4).
- Press DONE to confirm and exit.
- Mode Select:
- Select the zone to program.
- Press MODE until the desired mode (Auto, Off, Constant) is displayed.
- Press DONE to confirm and exit.
- Boost Facility:
- Select the zone.
- Press BOOST.
- Use the Up/Down arrow keys to enter the boost period in hours.
- Press DONE to confirm and exit. The remaining boost time will be displayed.
- To cancel early, reduce the boost time to 00.
- LCD Display Indicators:
- Day Indicator: Displays the day (MON TUE WED THU FRI SAT SUN).
- Copy: Enables copying of switching times.
- On Until/Off Until: Displays current operational status.
- Timer Status: Displays current status of timed output.
- Up/Down Keys: Increase or decrease values.
- Select Zone: Prompts a zone selection.
- Boost Left/Holiday Left: Displays remaining duration.
- Power/Cancel: Press once to turn off display; used to exit setup/program operations.
- Setup/Programming Keys (CLOCK, HOLIDAY, SCREEN, MODE, CANCEL, EDIT, DAY, BOOST, DONE): Used to navigate setup options.
- Off/Constant/Auto: Displays selected zones' programming mode.
- Zone/Time Selection Keys (ZONE 1, ZONE 2, ZONE 3, ZONE 4, TIME 1, TIME 2, TIME 3, TIME 4): Used with Zone/Times configuration.
Maintenance Features:
The manual does not explicitly detail maintenance features. However, it provides clear installation instructions and operational guidelines, which are crucial for the proper functioning and longevity of the device.
Installation Procedure:
- Do: Mount the time clock at eye level. Read instructions fully for best results.
- Don't: Do not install near a direct heat source as this will affect functionality. Do not push hard on the LCD screen as this may cause irreparable damage.
- Step 1: Carefully separate the front half of the time clock from the back plate by placing a small flat head terminal driver into the slots on the bottom face.
- Step 2: Place the front of the time clock somewhere safe. Terminate the time clock as shown in the wiring diagram on page 14.
- Step 3: Screw the time clock back plate securely into the back box.
- Step 4: Clip the front of the time clock onto the back plate.
The wiring diagram shows connections for Neutral (N), Live (L), and four switched live outputs (CH4, CH3, CH2, CH1) for the respective zones.