15 16
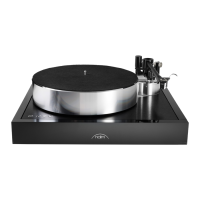
Slide the bearing housing and sub platter over the bearing. Note the sub
platter oats due to the magnetic force required to oppose the weight of
the platter.
Slide the belt over the sub platter edge and around the motor. Note the belt
will not sit ush on the edge of the sub platter at this stage. Take care not to
dislodge the belt during tting of the platter.
Finally slide the platter on to the sub platter, taking care not to dislodge the
belt. Gently run the platter around a few times to seat the belt. Do not t the
felt mat at this stage.
6.4 Verify level once platter is tted
Using the large bubble level placed near the centre of the platter, re-adjust the
three feet on the turntable to ensure the platter is perfectly level if required.
6.5 Tracking force setup
Slide the counterweight on to the end of the ARO tonearm.
Place the digital stylus gauge on the aluminium platter, removing the felt mat if
it has already been tted.
Turn the digital stylus gauge on.
The display should read in grams (g). If not, tap the unit button on the screen
until the display shows (g).
Remove the stylus guard.
Raise the tonearm using the lift lever on the side.
Align the stylus gauge measuring area (the red dot) with the arm so the stylus
will drop on to the centre of the measuring area.