This document is a user manual for the Nano Hearing Aids RX2000, providing comprehensive instructions and information for users to effectively utilize, maintain, and troubleshoot their hearing devices. The manual aims to guide users through their "hearing journey," emphasizing the process of adapting to and benefiting from the hearing aids.
Function Description
The Nano Hearing Aids RX2000 are designed to provide an affordable solution for hearing loss challenges, aiming to help users hear more clearly. These devices are intended to amplify sounds, making it easier for individuals with hearing impairment to engage in conversations, watch TV, listen to music, and participate in other activities involving sound. The core function of the device is to enhance auditory perception by processing and delivering sound to the ear canal.
Usage Features
The RX2000 hearing aids come with several user-friendly features to ensure comfort, adaptability, and ease of use.
Getting Started:
Upon receiving the package, users are encouraged to contact the Nano Welcome Team for assistance with setting up and powering on their devices. The manual also directs users to the tutorial section on Nano's website for manuals and video tutorials. A quick-start guide is available for immediate setup, but reading the full manual is recommended for complete familiarity.
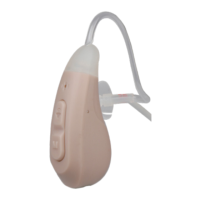
Device Components:
The manual provides a clear diagram of the RX2000, identifying key components:
- ON/OFF - Change mode button: Used for turning the device on/off and switching between different listening modes.
- Rocker Switch (Vol. Up/Down): Allows users to adjust the volume.
- Thin Tubes: Connect the main device body to the ear dome.
- Domes: Soft, interchangeable tips that fit into the ear canal.
- Recharge end: The port for charging the device.
- Stabilizer bar: A component designed to help secure the device in the ear.
Charging the Device:
The RX2000 is a rechargeable device. The charging process involves:
- Plugging the USB cable into a wall charger and then connecting the other end to the device.
- Plugging the wall charger into an electrical outlet.
- The initial charge requires 8 hours, while subsequent charges should not exceed 4 hours.
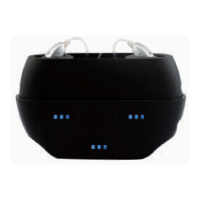
- If using a charging case, it will display a solid green light when fully charged, with individual indicators showing orange during charging and solid green when complete. If no charging case is available, the hearing aids can be connected directly to the USB cable and wall charger.
The charging case itself can hold up to 3 charges for a pair of hearing aids or 6 charges for a single aid, and should not be charged for more than 4 hours.
Wearing the Device:
Proper placement is crucial for comfort and effectiveness:
- Users should choose an appropriate dome size and place the device behind their ear.
- Hold the bend of the thin tube close to the dome and gently insert the dome into the ear canal. The dome should fit snugly but not too tightly.
- The stabilizer bar should be pressed into the inside of the ear using an index finger. It can be cut if too long, as this will not affect the functionality of the thin tubes. Users are advised to adjust the device until it fits comfortably, as ears may need time to adapt to the sensation.
Adjusting Volume and Modes:
- Turning On/Off: The device is turned on or off by pressing the ON/OFF button for 3 seconds.
- Volume Adjustment: The rocker switch allows users to increase or decrease the volume. Pressing the top increases volume, while pressing the bottom decreases it. There are 6 levels of volume to choose from.
- Changing Modes: The device offers different listening modes to adapt to various environments. Users can switch modes by quickly pressing and holding the ON/OFF button. A beep will confirm the mode change.
- P1: Normal: Suitable for quiet environments like home or a quiet office.
- P2: Noise Reduction: Features a different filter to reduce overall ambient noise, ideal for noisy places.
Choosing and Installing Dome Size:
Selecting the correct dome size is important for comfort and to prevent feedback. Users can check the fit by gently shaking their head and chewing; if the domes slide out, they are too small. An oversized dome will feel uncomfortable. The manual includes an illustration for installing a dome.
Changing Thin Tubes:
The thin tubes can be replaced or cleaned:
- To remove, firmly hold the hearing device with one hand and rotate the tube counter-clockwise with the other, ensuring not to yank them.
- Once loose, pull the tube out. It can then be cleaned or replaced.
- To reinsert or attach a new tube, rotate it clockwise until it feels solidly in place.
Left and Right ear tubes are marked with Blue or Red, respectively, for easy identification.
Hearing Journey:
The manual outlines a "hearing journey" to help users adapt to their new devices:
- Week 1: Users may experience sounds as too loud or feel like they are in a "cave or tunnel." This is normal, and the brain will adjust with continued use.
- Week 2: New sounds can be overwhelming but exciting. Conversations will become easier, and users may need to lower TV volume or ask others to speak softer.
- Week 3: Users are encouraged to experiment with different volumes and ambiance modes, wearing the devices daily and cleaning them properly. The "tunnel" effect should gradually subside.
- Week 4: Hearing becomes much easier, and users feel more present in conversations. The brain adapts to the sounds. Some may take 5-6 weeks to reach this stage, emphasizing patience.
Maintenance Features
Proper maintenance is essential for the longevity and performance of the RX2000 hearing aids.
Cleaning Your Device:
Regular cleaning prevents wax buildup and debris from affecting sound quality:
- After removing the device from the ear, take out the ear dome.
- Clean the ear dome with warm water and soft soap, gently massaging it until it is free of wax or debris.
- If necessary, clean the thin tubes with soap and water, ensuring they are removed from the device first.
- Clean the device with a dry wipe and allow it to dry completely before reinstalling the eardome and thin tubes.
Troubleshooting Common Issues:
The manual provides solutions for common problems:
- Feedback / Chirping: A high-pitched sound indicates feedback. Users should change to a better-fitting dome size and insert the device swiftly.
- Battery Doesn't Last: Ensure the device is turned off when not in use. Never charge for more than 4 hours, as this can cause damage. The only exception is the initial charge, which is 7 hours.
- Battery Not Charging Correctly: A table outlines possible reasons and solutions:
- Plug not plugged in/well: Check if the plug is well-connected, if the 110V AC plug has power, and if the plug works.
- USB cable not connected well: Check and replug both ends of the USB cable if loose.
- Hearing aid not placed on right place: Replug the USB cable or check if the cable works.
- Charging contact is dirty: Clean with 95% alcohol.
If battery issues persist, charge for 10 minutes, let it drain completely, then charge for 4 hours. If the problem continues, contact support.
- Volume / Amplification Not Enough: If sound is reduced, it may be due to ears clogged with wax. Users are advised to consult a family physician for an evaluation and professional ear cleaning.
Additional Support:
Nano Hearing Aids offers customer support via phone at (480) 637-7541 and email at support@nanohearingaids.com. They also provide extra accessories, which can be purchased by calling (480) 336-9292 or visiting www.nanohearingaids.com.
The manual concludes with an invitation to a "60-Day Hearing Journey Contest," where users can win a $200 coupon by wearing their hearing aids for 60 days and sending a picture with their order number to challenge@nanohearingaids.com.