Do you have a question about the NCR XL7 and is the answer not in the manual?
This document outlines the installation procedure for the XL7 Pole Mount Bracket, designed to facilitate the mounting of an XL7 Display onto a CX7 Pole Mount. The kit, identified by part numbers 7772 and 7773, provides the necessary components and instructions for a secure and functional setup.
The primary function of this device is to serve as an intermediary mounting solution, allowing the XL7 Display to be physically attached to a CX7 Pole Mount. This integration is crucial for various point-of-sale or customer interaction environments where a display needs to be elevated and positioned for optimal visibility and accessibility. The bracket ensures that the display is held firmly in place, providing stability and preventing accidental dislodgement during operation.
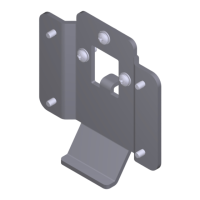
The installation process is straightforward, beginning with the preparation of the pole mount. Users are instructed to first remove the existing cap from the pole mount. This step clears the way for the bracket to be properly seated and secured. The kit includes specific screws for this purpose: Metric, Flat Head, Phillips, Machine Screws made of Zinc-Plated Steel, M4 size, 8mm length (part number 006-8613226), and Metric, SEMS, Phillips, Pan Head Screws, M4x10, 10mm length (part number 006-0654018). These screws are designed to provide a robust connection between the bracket and the pole mount, ensuring the display's stability.
Once the cap is removed, the Customer Display Bracket (part number 497-0527029) is installed onto the pole mount using three of the provided screws. The visual aids in the manual clearly depict the orientation and placement of the bracket, guiding the installer through this critical step. Proper tightening of these screws is essential to prevent any wobbling or instability of the display once it is mounted.
A key aspect of the installation involves connecting the necessary cables. The XL7 Display requires a cable connection, and the manual emphasizes the importance of correctly connecting this cable to the XL7 Customer Display. A thumbscrew is used to secure this connection. A crucial note is provided regarding the tightening of this thumbscrew: it should only be turned until the silver knurled portion makes contact with the black plastic overmold. Overtightening is explicitly warned against, as it can damage the connector on the board, potentially leading to functional issues or the need for costly repairs. This detail highlights a user-friendly design consideration, aiming to prevent common installation errors that could compromise the device's longevity.
After the cable is connected, it needs to be routed properly. The instructions specify routing the XL7 Display Cable through the Customer Display Bracket and down the pole. This cable management step is important for maintaining a tidy and professional appearance, preventing cable clutter, and reducing the risk of accidental disconnections or damage to the cable. An additional note suggests that if there is a hole in the countertop, the cables can be routed through it, offering flexibility in installation depending on the specific setup environment. This feature allows for a cleaner installation, especially in environments where aesthetics and cable concealment are priorities.
Finally, the XL7 Display itself is installed onto the Customer Display Bracket using four screws. The manual clarifies that for illustrative purposes, the pole mount bracket is not shown in the corresponding image, but the focus is on how the display attaches to the bracket. This step completes the physical assembly, securing the display in its intended position. The use of four screws ensures a strong and stable attachment, capable of withstanding regular use in a commercial setting.
While the document primarily focuses on installation, several aspects contribute to the device's maintainability and long-term performance. The clear, step-by-step instructions and detailed illustrations serve as a valuable resource for future maintenance or re-installation. Should the display need to be removed or replaced, the manual provides the necessary guidance to reverse the installation process safely and efficiently.
The emphasis on proper screw tightening, particularly for the cable connection, is a critical maintenance-related instruction. By preventing overtightening, the risk of damage to the connector board is minimized, which in turn reduces the likelihood of future repairs or component replacements. This preventative measure directly contributes to the longevity and reliability of the XL7 Display and its mounting system.
The design of the bracket and the use of standard metric screws suggest that components are likely replaceable if damaged. The provision of specific part numbers for the screws and the bracket itself (e.g., 006-8613226, 006-0654018, 497-0527029) is a significant maintenance feature. These part numbers allow for easy identification and ordering of replacement parts, should any component become lost or damaged over time. This ensures that the mounting system can be repaired rather than requiring a complete replacement, offering cost savings and extending the overall life of the setup.
The cable routing instructions also contribute to maintenance. By ensuring cables are neatly routed and secured, they are less prone to wear and tear, accidental pulls, or damage from being snagged. This organized approach to cabling simplifies troubleshooting if connectivity issues arise, as the cable path is clear and accessible.
In summary, the XL7 Pole Mount Bracket is a functional and well-documented accessory designed for secure display mounting. Its installation process is made user-friendly through clear instructions and visual aids, while embedded warnings and detailed part information contribute to its overall maintainability and long-term operational efficiency.
| Category | Racks & Stands |
|---|---|
| Manufacturer | NCR |
| Model | XL7 |
| Material | Steel |
| Color | Black |