EasyManua.ls Logo

NE kids 5090 User Manual

NE kids 5090
22 pages
To Next Page IconTo Next Page
Page #1 background imageLoading...
Page #1 background image
ST
AIRCASE LOFT BED
Assembly Instructions Page 1 of 22
NE kids 2300 Prospect Dr
. Christiansburg, VA 24073
www
.ne-kids.com
NE
ki
ds
Item No. 4090, 5090, 6090, 7090
1. Follow the information on the warnings appearing on the upper bunk end structure and on the
carton. Do not remove warning label from bed.
2. Always use the recommended size mattress or mattress support, or both, to help prevent
entrapment or falls.
3. Surface of mattress must be at least 5 inches (127 mm) below the upper edge of guardrails.
4. Do not allow children under 6 years of age to use the upper bunk.
5. Prohibit more than one person on the upper bunk.
6. Periodically
, check and ensure that the guardrail, stairs, and other components are in their proper
position, free from damage, and that all connectors are tight.
7. Do not allow horseplay on or under the bed and prohibit jumping on the bed.
8. Always use the stairs for entering and leaving the upper bunk.
9. Do not use substitute parts. Contact the manufacturer or dealer for replacement parts.
10. Use of a nightlight may provide added safety precaution for a child using the upper bunk.
11. Always use guardrails on both long sides of the upper bunk. If bunk bed will be placed next to the
wall, the guardrail that runs the full length of the bed should be placed against the wall to prevent
entrapment between the bed and wall.
12.
13.
Keep these instructions for future reference.
!
!
STRANGULA
TION HAZARD
Never attach or hang items to any part of the bunk bed that are not designed for use with the bed;
including, but not limited to, hooks, belts and jump ropes
SIZE OF MA
TTRESS AND FOUNDATION
SAFETY
WARNINGS
SAFETY
FIRST!
All of NE kid’s Bunkbeds were
designed and manufactured with
your child’s safety as our top
priority.
Their unparalleled strength is a
bi-product of the safety design.
Our bunks meet all compliance
with ASTM F 1427-07 “Standard
for Bunk Beds” and Code of
Federal Regulations (CFR) 1213
“Safety Standards for Entrapment
Hazards in Bunk Beds” and
(CFR) 1513 “Requirements for
Bunk Beds”.
Safety is a cooperative eort
between us as the manufacturer,
and you as a guardian. Please
read and consider the
warnings listed on this page
when choosing a mattress and
discussing rules of use with your
child.
REPLACEMENT P
ARTS
Replacement parts, including
additional guardrails, may be
obtained from any of NE kids’
dealers.
Use only mattress, foundation and deck combined which is 74-75 inches long and 37 ½-38 ½ inches
wide on twin upper bunk or 53-54 inches wide on full upper bunk. Ensure thickness of mattress and
foundation combined does not exceed 8 inches and the mattress is at least 5 inches below upper edge
of guardrails
Question and Answer IconNeed help?

Do you have a question about the NE kids 5090 and is the answer not in the manual?

NE kids 5090 Specifications

General IconGeneral
BrandNE kids
Model5090
CategoryIndoor Furnishing
LanguageEnglish

Summary

Safety and Product Information

Safety First! General Warnings

Important safety guidelines, warnings, and hazard information for the bunk bed.

Mattress and Foundation Requirements

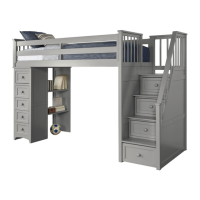
Specifies the correct size and thickness for mattresses and foundations.

Introduction and Support

Product Introduction

Overview of the assembly process and recommended preparation steps.

Customer Support Information

Guidance on how to get assistance or replacement parts from the retailer.

Parts Identification

Parts and Tools List

Required Tools

Lists the tools needed for assembly that are not included with the product.

Assembly Configuration Choice

Right-hand Staircase Configuration

Directs users to start right-hand side staircase assembly instructions.

Left-hand Staircase Configuration

Directs users to start left-hand side staircase assembly instructions.

Right-Hand Staircase Assembly (Steps 1-5)

Step 1: Toy Box and Support Assembly

Assemble the toy box and its supporting components as the first step.

Step 2: Attach Inner Staircase Support Panel

Connect the inner staircase support panel to the main assembly.

Right-Hand Staircase Assembly (Steps 3-4)

Step 3: Attach Outer Staircase Support Panel

Secure the outer staircase support panel to the structure.

Step 4: Attach Back Staircase Support Panel

Fasten the back staircase support panel to complete the staircase section.

Right-Hand Staircase Assembly (Step 5)

Step 5: Position Staircase Assembly

Lift and place the completed staircase assembly into its final position.

Left-Hand Staircase Assembly (Steps 1A-5A)

Step 1A: Toy Box and Support Assembly

Assemble the toy box and support for the left-hand staircase configuration.

Step 2A: Attach Inner Staircase Support Panel

Connect the inner staircase support panel for the left-hand side.

Left-Hand Staircase Assembly (Steps 3A-4A)

Step 3A: Attach Outer Staircase Support Panel

Secure the outer staircase support panel for the left-hand side.

Step 4A: Attach Back Staircase Support Panel

Fasten the back staircase support panel for the left-hand configuration.

Left-Hand Staircase Assembly (Step 5A)

Step 5A: Position Staircase Assembly

Lift and place the completed left-hand staircase assembly.

Desk Hutch Assembly (Steps 6-10)

Step 6: Attach Right Desk Hutch Side Panel

Connect the right side panel of the desk hutch to the desk cabinet.

Desk Assembly Configuration

Outside-facing Desk Assembly Steps

Guide for assembling the desk in an outside-facing orientation, starting with Step 7.

Outside-facing Desk Assembly (Step 8)

Step 8: Secure Desk Hutch Side Panels and Back Supports

Fasten the desk hutch side panels and back supports securely.

Outside-facing Desk Assembly (Step 9)

Step 9: Attach Desk Hutch Top Panel

Attach the top panel of the desk hutch.

Inside-facing Desk Assembly (Steps 7A-9A)

Step 7A: Fit Back Supports, Top, and Left Side

Connect desk hutch back supports, desk top, and left side panel for inside-facing.

Step 8A: Secure Side Panels and Back Supports

Fasten the desk hutch side panels and back supports for inside-facing.

Step 9A: Attach Desk Hutch Top Panel

Attach the top panel of the desk hutch for inside-facing.

Desk Hutch Placement and Drawers

Step 10: Position Desk Hutch and Replace Drawers

Move the assembled desk hutch into place and reinstall the drawers.

Upper Bed Assembly (Steps 11-14)

Step 11: Attach Headboard to Desk Hutch

Connect the headboard to the top of the desk hutch assembly.

Step 12: Attach Bed Side Rails and Staircase

Secure the bed side rails and the staircase to the main structure.

Upper Bed Assembly (Step 13)

Step 13: Attach Slats with Warning

Install the bed slats, ensuring they are screwed on both sides as per the warning.

Upper Bed Assembly (Step 14)

Step 14: Attach Guard Rails

Install the guard rails on the upper bed for safety.

Final Placement and Toy Box Installation

Step 15: Position Loft and Slide in Toy Box

Move the entire loft bed to its final location and insert the toy box.

Dresser/Chest Safety Warning

Important Safety Notice for Dressers

Crucial safety rules to prevent tip-over accidents with dressers and chests.

Care Instructions

Furniture Care and Maintenance

Guidelines for cleaning, protecting the finish, and maintaining the furniture.

Limited 1-Year Warranty

Warranty Limitations and Exclusions

Details conditions that limit or void the warranty, including use and modifications.

Warranty Claims Process

Outlines the procedure for submitting warranty claims and necessary documentation.

General Warranty Terms and Disclaimers

Covers natural wood variations, differences, transportation, and legal disclaimers.

Related product manuals