4
a
Quick start guide
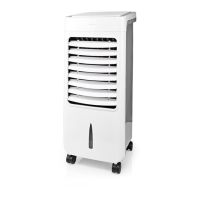
Air Cooler
COOL117CWT
For more information see the extended manual online:
ned.is/cool117cwt
Intended use
The Nedis COOL117CWT is an air cooler with a 6 L water tank
capacity.
The product is not intended for professional use.
This product can be used by children aged from 8 years and above
and persons with reduced physical, sensory or mental capabilities
or lack of experience and knowledge if they have been given
supervision or instruction concerning use of the product in a safe
way and understand the hazards involved. Children shall not play
with the product. Cleaning and user maintenance shall not be done
by children without supervision.
Any modication of the product may have consequences for safety,
warranty and proper functioning.
Specications
Product Air Cooler
Article number COOL117CWT
Dimensions (l x w x h) 270 x 275 x 690 mm
Weight 5500 g
Power input 220 - 240 VAC ; 50 / 60 Hz
Power 80 W
Water tank capacity 6 L
Air volume 300 m3/h
Fan speed Low / moderate / high
Ionizer function Yes
Automatic air swing Yes
Timer 1 - 12 h
Remote control Yes
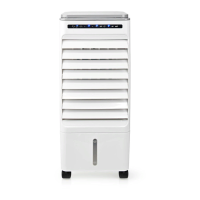
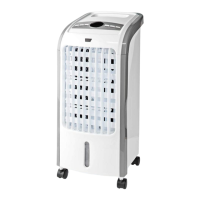
Main parts (image A)
1 Air outlet
2 Water level indicator
3 Power button
4 Swing button
5 Speed button
6 Timer button
7 Cool button
8 Ioniser button
9 Particle lter
q Honeycomb lter
w Water tank lock
e Water tank
r Power cable
t Ice packs
y LED display
Safety instructions
-
WARNING
• Ensure you have fully read and understood the instructions in this
document before you install or use the product. Keep the
packaging and this document for future reference.
• Only use the product as described in this document.
• Do not use the product if a part is damaged or defective. Replace a
damaged or defective product immediately.
• Do not drop the product and avoid bumping.
• This product may only be serviced by a qualied technician for
maintenance to reduce the risk of electric shock.
• Disconnect the product from the power source before service and
when replacing parts.
• Disconnect the product from the power source before removing
the fan guard.
Installation
1. For optimal performance, place the product on a location that
complies with the following:
• Flat and stable surface.
• 50 - 60 cm free space around the product.
2. Close open doors and windows.
4
If you notice that the humidity level reaches 60% or above,
ventilate the room for optimal performance.
3. Plug the power cable A
r
into a power outlet.
Filling the water tank
-
Do not ll the water tank above the “max” indicator.
-
Do not use the product if the water level is below the “min”
indicator.
1. Open the water tank lock A
w
.
2. Slide out the water tank A
e
and ll it with clean tap water up to
the "max" indicator.
3. Slide A
e
back into the product.
4. Close A
w
.
Using ice packs
4
The use of ice packs A
t
is optional.
4
Fill A
t
with water until the water level is at the "max" indicator.
4
Add A
t
to A
e
if tap water does not provide enough cooling.
-
Make sure the water level is between "min" and "max" after
adding A
t
.
Using the product
1. Press A
3
to switch on the fan.
2. Press A
5
to set the fan speed.
A
y
indicates the current fan speed.
3. Press A
3
to switch o the fan.
Using the cooling function
• Press A
7
to activate or deactivate the cooling function.
A
y
lights up when the function is active.
4
For optimal performance, switch o the cooling function 15
minutes before switching o the fan.
Setting air ow direction
• Press A
4
to automatically swing the air ow from left to right.
A
y
lights up when the function is active.
• Use A
1
to set the vertical air ow direction.
Using the timer
• Press A
6
to set the timer.
• Press again to increase the timer up to 12 hours.
The product switches o after the set time has passed.
A
y
shows the selected time.
Using the ionizer
• Press A
8
to switch on the ionizer.
A
y
lights up when the function is active.
Maintaining the lter
4
Clean the honeycomb lter A
q
every two months.
4
Let A
q
completely dry before storage to prevent molding.
4
Replace A
q
once a year or when the airow is decreasing.
4
To buy new lters, see www.nedis.com, or contact the Nedis
B.V. service desk.
To clean A
q
:
1. Remove A
9
and A
q
.
2. Wash A
q
with water and soap.
3. Rinse A
q
with clean water.
4. Let A
q
dry.
5. Place back A
q
and A
9
.