EasyManua.ls Logo

Nelson WINDOW+ - User Manual

Nelson WINDOW+
2 pages
Print Icon
To Next Page IconTo Next Page
Loading...
Nelson Irrigation Corporation — 848 Airport Road, Walla Walla, WA 99362 USA
Tel: 509 525 7660 — Fax: 509 525 7907 — www.nelsonirrigation.com — info@nelsonirrigation.com
Nelson Irrigation Corporation — 848 Airport Road, Walla Walla, WA 99362 USA
Tel: 509 525 7660 — Fax: 509 525 7907 — www.nelsonirrigation.com — info@nelsonirrigation.com
Nelson Irrigation Corporation — 848 Airport Road, Walla Walla, WA 99362 USA
Tel: 509 525 7660 — Fax: 509 525 7907 — www.nelsonirrigation.com — info@nelsonirrigation.com
WINDOW+
Controller
USERS GUIDE
Features
This battery operated controller irrigates in cycles that will repeat during a window of time
according to a program setup by the user. The wet and off cycles can be very frequent
(over 100 per day) if wanted. It is very useful for evaporative cooling of fruit and dust
suppression when irrigated for short wet/dry interval times. Cycle irrigation is also useful for
normal sequential rotation of irrigation ow between eld zones.
Operates in cycles during programmed window
Battery powered; no need for electrical hookup
Easy installation
Waterproof and weather resistant
Easy programming
Parts Identication
1. Top Cover 2. Controller Display
3. Controller 4. Program keys 5. Solenoid
Getting Started
Basic Controller Functions
This section gives a brief description of the Controller program key buttons. This gure
shows the layout and the function is described below.
Quick presses of the MODE button turn the controller off, or on. Longer presses of
the MODE button put the controller in programming mode.
Press the SET button to set a function and proceed.
Use these buttons to increase and decrease schedule functions.
Installation
The controller and solenoid will normally be installed on the valve at the factory.
Occasionally the latching solenoid valve opens in transit. To ensure that the valve is closed
before you turn on water pressure, rst make sure that the controller is not set to OFF (If
it is set to OFF, press briey on the MODE button to turn it on.) Then press + and SET
simultaneously to open, and press - and SET simultaneously to close. You are now ready
to program the Window+ controller. Caution note: Unique to latch solenoids is the potential
to fail in either OFF or ON! Before installation make certain that the irrigation system has the
proper pressure relief and some protection against damage if solenoid failure occurs.
MODE
SET
3W
N.O.
12 VDC
LATCH
1
2
5
3
4
MODE
SET
Fig. 1
Fig. 1a
MODE
SET
Controller on 2” 800 Series valve
Programming the Window (continued)
Setting the OFF Time (Interval)
The following screen shown in Fig 8 will appear:
On this screen the numbers refer to the interval between irrigations within the cycle
(measured in minutes and hours). ‘OFF’ ashes on the screen, alternating with the
numbers.
1. Use the + or - buttons to adjust the minutes
2. Press SET to continue
3. Use the + or - buttons to adjust the hours.
4. Press SET to continue.
Setting the Days
The following screen shown in Fig 9 will appear:
You must select the days you wish the irrigation ‘WINDOW’ to
operate. Each day selected will operate with the irrigation
schedule you setup in Figures 6-8.
1. Press SET to reach the day you wish to irrigate. The number
(corresponding to the day of the week) will ash.
2. Press + to select that day (the square which appears indicates day is selected).
3. Press - to deselect a day (the square will disappear).
4. Press SET until all days are programed as desired. Current day continues ashing.
5. Press SET to complete programming.
Example summary: The program has been set for a 10 hour Window (8:00 to 18:00)
having ‘On’ time duration of 1 hour 30 minutes 9 seconds and ‘OFF’ time interval of 3
hours 30 minutes. This cycle will repeat twice during the 10 hour Window each day
that is selected.
Note: The Window End time takes control over the schedule and turns off the valve even if the
cycle is not complete.
Warranty and Disclaimer: Nelson Window+ controllers are warranted for one year from date of original sale to be free of
defective materials and workmanship when used within the working specications for which the product was designed
and under normal use and service. The manufacturer assumes no responsibility for installation, removal or unauthorized
repair. The manufacturer’s liability under this warranty is limited solely to replacement or repair of defective parts, and
the manufacturer will not be liable for any crop or other consequential damages resulting from any defects in design or
breach of warranty. This warranty is expressly in lieu of all other warranties, express or implied, including the warranties
of merchantability and tness for particular purposes and of all other obligations or liabilities of manufacturer. No agent,
employee, or representative of the manufacturer has authority to waive, alter or add to the provisions of this warranty,
nor to make representations or warranty not contained herein
1 2 3 4 5 6 7 1 2 3 4 5 6 7
Fig. 8
1 2 3 4 5 6 7
Fig. 9
5
Window+Controller Guide.indd May08
G75 Irrigation Window Controller
13
Battery Installation
Replace the battery at the start of each irrigation
season and when the low battery symbol appears.
1. Using a Phillips screwdriver, remove the
four battery cover screws.
2. Remove the battery cover and seal.
3. Replace the battery.
4. After reattaching the seal, put the cover back,
and secure with the four screws.
Maintenance and
Troubleshooting
Seal
Battery cover
Screws
When replacing
seal, push seal tabs
into slots.
Fig. 10
6
Question and Answer IconNeed help?

Do you have a question about the Nelson WINDOW+ and is the answer not in the manual?

Summary

Programming the Window

Setting the OFF Time

Adjusts the interval between irrigations within the cycle using + or - buttons.

Setting the Days

Selects the specific days of the week for irrigation operation.

Maintenance and Troubleshooting

Battery Installation

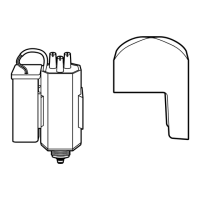
Guide for replacing the controller's battery using a Phillips screwdriver.

Getting Started

Basic Controller Functions

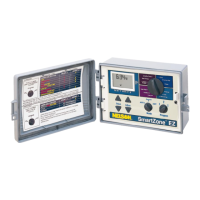
Overview of controller buttons like MODE and SET for programming.

Manual Operation

Programming the Controller

Meaning of Controller Icons

Explanation of icons used on the controller display for status and modes.

Setting the Clock

Understanding the Window

Programming the Window

Setting Window Start Time

Sets the start time for the irrigation window cycle.

Setting the Window End Time

Sets the end time for the irrigation window cycle.

Programming the Window (continued)

Setting the ON Time (duration)

Configures the duration of the 'On' time for each irrigation cycle.

Overview

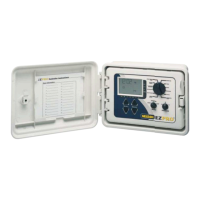
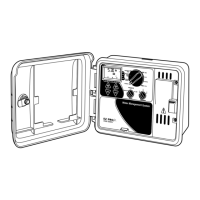
The Nelson Window+ Controller is a battery-operated irrigation controller designed for cyclic irrigation within a user-defined time window. It is particularly useful for applications requiring frequent wet and off cycles, such as evaporative cooling of fruit, dust suppression with short wet/dry intervals, and normal sequential rotation of irrigation flow between field zones.

Function Description:

The controller operates in cycles, repeating during a programmed window of time. Each cycle consists of an "On" time (actual irrigation time) and an "Off" time (interval between irrigation shut-off and the time until the next irrigation begins). The cycles recur repeatedly throughout the defined window. The device is battery-powered, eliminating the need for an electrical hookup, and is designed to be waterproof and weather-resistant. It offers easy installation and programming.

Important Technical Specifications:

The controller is designed to be installed on a valve, typically a 2" 800 Series valve, and comes with a latching solenoid. The display shows various icons indicating the irrigating days of the week, cycle start (time within the window cycle), irrigation (valve opened), timing or clock, low battery, and time adjustment. The programming allows for setting a "Window Start Time" and "Window End Time," defining the operational period. Within this window, users can set the "On Time" (duration of irrigation in seconds, minutes, and hours) and "Off Time" (interval between irrigations in minutes and hours). The "Window End Time" takes control over the schedule and will turn off the valve even if a cycle is not complete.

Usage Features:

  • Manual Operation: To manually open the valve, ensure the controller is not OFF, then press + and SET simultaneously. Irrigation will continue until the programmed interval passes. If irrigation duration is set to zero, the valve closes after one minute. To stop irrigating manually, press - and SET simultaneously.
  • Programming Mode: Quick presses of the MODE button turn the controller on or off. Longer presses of the MODE button enter programming mode.
  • Setting the Clock: If the screen is blank, press MODE to activate. In operating mode, press MODE until the adjustment icon appears (minutes flashing). Use + or - to adjust minutes, then SET. Repeat for hours, then SET. Use + or - to select the current day, then SET to return to operating mode.
  • Setting Window Start Time: From the clock settings screen, press MODE again until the "Str" (Start) screen appears with flashing minutes. Use + or - to adjust minutes, then SET. Repeat for hours, then SET.
  • Setting Window End Time: After setting the start time, the "End" screen appears with flashing minutes. Use + or - to adjust minutes, then SET. Repeat for hours, then SET.
  • Setting ON Time (Duration): The controller first displays seconds for adjustment. Use + or - to adjust seconds, then SET. Next, the screen displays minutes and hours. Use + or - to adjust minutes, then SET. Repeat for hours, then SET.
  • Setting OFF Time (Interval): The controller displays minutes for adjustment. Use + or - to adjust minutes, then SET. Next, the screen displays hours. Use + or - to adjust hours, then SET.
  • Setting Days: The controller displays the days of the week. Press SET to select a day (number flashes). Use + to select a day (square appears) or - to deselect (square disappears). Press SET until all desired days are programmed. The current day continues flashing. Press SET to complete programming.
  • Caution Note: Latch solenoids can potentially fail in either OFF or ON positions. Before installation, ensure the irrigation system has proper pressure relief and protection against damage if solenoid failure occurs.

Maintenance Features:

  • Battery Installation: The battery should be replaced at the start of each irrigation season and when the low battery symbol appears on the display.
    1. Using a Phillips screwdriver, remove the four battery cover screws.
    2. Remove the battery cover and seal.
    3. Replace the battery.
    4. After reattaching the seal, put the cover back and secure with the four screws. When replacing the seal, push the seal tabs into the slots.

Warranty and Disclaimer:

Nelson Window+ controllers are warranted for one year from the date of original sale against defective materials and workmanship under normal use and service within working specifications. The manufacturer assumes no responsibility for installation, removal, or unauthorized repair. Liability under this warranty is limited to replacement or repair of defective parts. The manufacturer is not liable for any crop or other consequential damages resulting from design defects or breach of warranty. This warranty is in lieu of all other express or implied warranties, including merchantability and fitness for particular purposes. No agent, employee, or representative of the manufacturer has authority to waive, alter, or add to the provisions of this warranty, or to make representations or warranty not contained herein.

Nelson WINDOW+ Specifications

General IconGeneral
BrandNelson
ModelWINDOW+
CategoryController
LanguageEnglish

Related product manuals