Your Charger Guide
For Patients in the Implant Phase
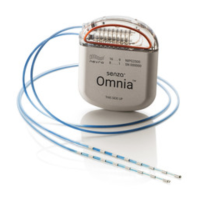
1. Charging Coil
2. Charger Battery Level Indicator
3. Antenna Strength Indicator
4. Stimulation OFF Button
5. Charge Start Button
6. Power Adapter Port
7. Implant Battery Level Indicator
Your Charger Guide
Tips
Do not press unless you want to turn OFF HF10.
To turn HF10 ON, use your Remote Control.
Charging times may vary for each session, depending on factors such as recharging frequency and stimulation
settings.
If the Charging Coil has an insufficient link (shown by the Antenna Strength Indicator), reposition the Charging Coil
slowly and wait 3 seconds. The Antenna Strength Indicator may take up to 3 seconds to update the new Charging Coil
position. Repeat as necessary.
If charging time is shorter than expected, your Implant may have been turned OFF. Make sure your Implant is turned
ON with the Remote Control.
Important reminders
Do not charge the Implant while the Charger is plugged into the wall. Always remove the Power Adapter before
pressing the Charge Start Button.
Recharge the Implant regularly to develop an easy-to-remember routine.
While charging, the implant site may become warm. If pain or discomfort is felt, stop charging and contact your doctor
or HF10 representative.
After recharging the Implant, plug the Charger back into the wall so the Charger will be ready for your next recharging
session.
Use the Remote Control after charging to verify that HF10 is ON. If charging times dramatically increase, please notify
your HF10 representative.
Videoinstructionsareavailableatwww.HF10.com/Resources.
2
3
4
7
5
6
1
 Loading...