USERS MANUAL
Item : EL1313/KD-101LC
Wireless (RF) optical smoke alarm
Connect up to 24 units
This manual contain important information about installation
and use of the RF base unit regarding receiving and transmit-
ting. Read the entire manual thoroughly before installing and
using this product. Please save the manual for later use.
3 x 1,5V
battery
1 x 9V
battery
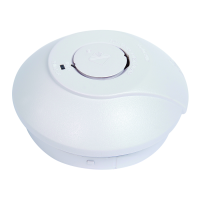
Alarm LED
(Red)
TEST
button
Alarm
signal
Learn LED
(Red or Green)
LEARN
button
This smoke alarm can be interconnected by a wireless (RF) link and can
be supplemented by further smoke alarms, up to a total of 24 units. This
requires that they should all be the same model.
The smoke alarms communicate with each other. If any of the smoke
alarms detects smoke, it sends a signal to all the other linked smoke
alarms, which also sound the alarm.
Do-it-yourself installation.•
For use in homes/ofces•
Built-in transmitter and reciever•
Wireless communication between each unit•
Up to 24 units may be interconnected in one system, all units sound •
the alarm at the same time.
Self-teaching code system.•
User manual.•
Complies with the Swedish National Board for Consumer Policies •
safety and function regulations.
Install the batteries in the smoke alarm. 1 x 9V/6LR61 + 3 x LR06/AA•
The batteries are installed in a separate compartment under the •
adapter plate.
Turn the adapter plate clockwise to undo it. •
The batteries must be installed and the red safety catch folded down •
before the adapter plate can be re-installed.
The adapter plate is the part you screw to the ceiling. Please refer to •
the installation suggestions.
The red LED to the left of the TEST button ashes every 40 seconds.•
To test a smoke alarm before use:
Press the TEST button and both LED’s will ash at the same time as the •
smoke alarm gives an audible warning.
If it does not work as above, check that the batteries are installed the •
right way round.
Test the smoke alarm before you start to use it, and at regular intervals •
after that.
The smoke alarm should be placed in bedrooms, stairways or similar •
areas. Mount the smoke alarm as high up as possible.
If there are several bedrooms in different areas of the house you •
should place one smoke alarm in each. There should at least be one
smoke alarm on each storey.
Do not place the smoke alarm outdoors, in damp or dirty •
environments or near a fan.
If your house catches re, it’s matter of seconds to save lives. It is very
important that everyone in the house is properly prepared.
Make an evacuation plan.
Choose the windows most suitable for evacuation in case the ordinary •
path should be blocked by smoke or re. If the windows are high above
the ground, make sure there’s a ladder outside.
Decide some place outside the house where the family gathers in case •
of an alarm.
If it’s possible, keep the bedroom door closed at night. A door might •
stand the re the necessarily amount of time to make an evacuation
through a window possible.
If you have access to re extinguishing tools make sure they work and •
that you are able to handle them.
Practice evacuation with the family. •
If there’s a re.
Wake up everybody else in the house and make sure they leave the •
house. Follow the evacuation plan.
If it’s possible, close all doors and windows in order to limit the re.•
Call the Fire Brigade (in Sweden 112).•
It it’s a small re you may try to put it out by yourself with a re •
extinguisher or a water hose.
If you can’t put out the re yourself, make sure to get out of the house •
as fast as possible.
Do not re-enter the house once you left it.•
How to avoid re.
Make sure that matches are out of reach for children.•
Never leave lit candles without supervision.•
Never empty ash trays in a paper bin or garbage can without being •
certain that the ashes are completely put out. You may rinse it with
water or leave it for the night before you empty it.
Make sure that the stove is properly put out or that the re is screened •
off so that no sparks spatters.
Store and handle inammable liquids in a safe way.•
Use only fuses with the correct rating. NEVER experiment with •
homemade fuses of any kind.
Immediately exchange faulty electric cables and plugs.•
Use only electric appliances marked with the “S” certication.•
Do not place combustible objects close to electric heating devices. •
Frequency: 433.92 MHz
Alarm signal: 85dB at 3 metre
Batteries: 1 x 9 Volt ABD 3 x LR06 (AA) 1.5 Volt
Max no. of units: 24 units
Max range: 40-60 metre between transmitter and
receiver (open environment)
Working temperature: 0 to +40°C
Relative humidity: < 45% - 75% RH
Service life: Smoke alarms should be replaced after
about 8 years.
Complies with the Swedish National Board for Consumer Policies Safety
and Function Regulations.
EN: 14604: 2005 / CE
R&TTE directive 199/5/EC
Choose a suitable position, as in the illustration above.•
The adapter plate must be xed with screws. •
The best result is obtained if the unit is installed on the ceiling.•
Carefully turn the smoke alarm clockwise to x it. •
Select one of the units that should serve as main unit.•
Install the main unit in the most central place in the house, for best •
signal propagation.
Test every individual smoke alarm, as above, to check that it works.•
Press the LEARN button on the main unit twice, so that the Learn LED •
turns green. As long as the LED is lit green you may link up other units.
Press the LEARN button on the on the other unit, within a few seconds, •
to connect it to the main unit.
To complete the interconnection the TEST button on the main unit •
should be pressed for 10 seconds while the Learn LED still is lit green.
The alarm signal will sound in all connected units.
IMPORTANT:• The TEST button must be pressed while the Learn LED still
is lit green.
Deleting codes
Press the LEARN button twice, so that the green LED lights up, then •
press the TEST button. The smoke alarm is no longer connected to the
system.
Wipe the outside of the smoke alarm with a soft cloth. Do not use any •
chemicals.
Vacuum the smoke alarm once a year for example every time you •
exchange the batteries. Use a soft brush. Test the smoke alarm
afterwards.
The smoke alarm automatically senses the battery level through a built-
in circuit. If the smoke detector emits a short ‘beep’ once a minute the
batteries are at the end of their life and should be replaced immediately.
Pic 1 - One storey
BEDROOM
BEDROOM
HALL
BEDROOM
BEDROOM
HALL
HALL
BATH ROOM
KITCHEN LIVING
ROOM
BASEMENT
BEDROOM LIVING ROOM
KITCHEN
Pic 3 - Placement
Pic 2 - Multiple storeys
DEAD AIR SPACE
Do not mount
within this
area