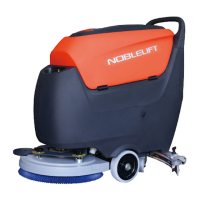
This document serves as an operator manual for the NB530 Walk-Behind Floor Scrubber, providing essential information for its correct and safe use, including technical data, safety guidelines, operation procedures, storage instructions, maintenance routines, and disposal information. It is crucial for operators and qualified technicians to thoroughly read and understand this manual before performing any operations or maintenance on the machine. Any questions or requests for related information should be directed to the manufacturer. The manual emphasizes that only qualified personnel or designated maintenance centers should perform maintenance and repair procedures, and only original spare parts and accessories are permitted.
The NB530 floor scrubber is designed for use in commercial and industrial environments, specifically for cleaning smooth and hard floors by both washing and collecting sewage. It must be operated in a safe environment by a qualified operator. This scrubber is not suitable for cleaning outdoor floors, carpets, or rough surfaces. The machine's model and serial number are located on an identification label, which is vital for ordering accessories or requesting service.
Before initial use, the machine should be carefully checked for any signs of damage, and any damage reported to the carrier for compensation. Upon uncrating, verify the presence of technical documents, including the operation manual, and the battery connecting cable.
Safety is paramount when operating the NB530. The manual highlights potential dangers through specific symbols: "DANGER!" indicates risks that may cause death, "WARNING!" denotes potential hazards leading to injury or object damage, "CAUTION!" points out important or useful functions requiring attention, and "NOTE" provides important matters and useful functions. A "CONSULTATION" symbol indicates the need to refer to the manual's instructions before performing any procedures.
General safety instructions include disconnecting the battery before maintenance, restricting operation to trained or authorized personnel, keeping the battery away from sparks, flames, and incandescent materials due to explosive gas release during normal operation, and avoiding wearing jewelry near electrical components. Operators must ensure the ground can bear the machine's weight and avoid using the scrubber near toxic, dangerous, flammable, explosive dust, liquid, or steam. During battery charging, the recovery tank should remain open, and the area must be well-ventilated and free from open flames.
When using the on-board charger, verify that the voltage and frequency match the serial number sticker. The charger cord should not be pulled to move the machine, passed through closed doors, wound around sharp objects, or run over. Keep the cord away from hot surfaces. Do not charge a damaged battery or if the machine is not working properly, has been outdoors, or dropped in water; instead, return it to a repair center. To prevent fire, electric shock, or personal injury, ensure someone is present when the machine is energized, and disconnect the charger from the power supply before any maintenance. Smoking is prohibited during charging. The machine must be stored indoors, protected from sunlight, rain, and bad weather. It is not a toy, and caution should be exercised around children. Only use the machine according to the manual and with company-approved accessories.
Precautions must be taken to prevent hair, jewelry, and loose clothing from getting caught in moving parts. The operator should only leave the machine after confirming it cannot move independently. The machine should not be used on slopes exceeding the specified angle or in particularly dirty areas. Operators must be careful not to injure people or objects and avoid colliding with shelves to prevent falling objects. Keep the machine away from corrosive liquids. The storage and operating ambient temperature should be between 0-40°C (32°F-104°F), with air humidity between 30%-95%. The machine is not a means of transportation and should not be used on slopes higher than 2%. For stationary operation, stop the working brush to prevent ground damage. In case of fire, use a dry powder extinguisher. Do not alter safety protections and always follow maintenance instructions. Keep the working area unobstructed, avoid using the machine in blocked aisles, and remove dust, hair, and objects that could obstruct air circulation.
Do not remove or change stickers on the machine. The machine's vibration during operation is safe, below 2.5m/s². It is not intended for use on roads or public streets. When transporting the machine in temperatures below 0°C (32°F), be aware that water in tanks and hoses may freeze and cause serious damage. Use only brushes and pads provided with the machine and specified in the manual, as others may reduce security. In case of malfunctions, ensure they are not due to lack of maintenance; if needed, seek assistance from authorized personnel or service centers. If accessories require replacement, obtain original parts from an authorized dealer or agent. Regular maintenance by authorized personnel or centers, as per the manual, ensures safe and correct use. Read all relevant instructions before maintenance. Do not rinse the machine directly with water or corrosive materials. The machine, including toxic and hazardous materials like batteries, must be disposed of properly at a specific center according to regulations.
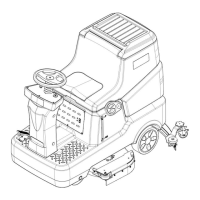
The machine setup involves understanding its main components. The control panel (1) is the central control unit. The handle (2) is used for operating the machine. The recovery tank lid (3) seals the recovery tank and can be hung on the fill-port during cleaning. The recovery tank (4) stores sewage. The hinge (5) connects the solution tank and recovery tank. The solution tank (6) holds cleaning solution or clean water. The brush disk cover (7) houses the brush disk, pad driver, and brush motor. The brush disk/pad driver (8) can be a brush disk or a pad driver with a polishing pad. The load wheel (9) supports the machine's weight. The solution tank level hose (10) indicates the water level. The caster (11) facilitates machine turning. The recovery tank drain hose (12) drains dirty water. The squeegee vacuum hose (13) transfers sewage to the recovery tank. The squeegee adjusting knob (14) fine-tunes the squeegee angle for optimal sewage suction. The squeegee fixing knob (15) secures the squeegee to the machine. The squeegee assembly (16) collects dirty water. The squeegee lift/lower foot pedal (17) lifts, lowers, or presses the brush disk. The squeegee lifting lever (18) lifts or lowers the squeegee. The charging socket (19) is for battery charging. The float shut-off screen (20) prevents vacuum motor clogging and must be kept clean. The float shut-off screen holder (21) secures the screen. The solution tank fill-port (22) simplifies filling water/detergent. The solution tank filter (23) prevents dirt from entering the tank. The draining electromagnetic valve (24) controls water flow. The filter (25) filters solution liquid before supplying it to the brush. The solution tank drain tap (26) empties the solution tank. The solution tank water tap (27) turns the solution liquid on/off.
The battery (28) provides power (optional 24V). The identification plate (29) displays machine data. The tank rope (30) helps hold the open recovery tank. The vacuum pressure plate (31) secures the filter sponge and protects the vacuum pump. The balance adjusting knob (32) adjusts the horizontal balance of the brush disk/pad driver to prevent shaking. The brush angle adjusting knob (33) adjusts the brush disk/pad driver angle, influencing machine speed. The battery indicator/fault code display (34) shows battery charge and fault codes. The vacuum motor indicator (35) shows the vacuum motor's working state. The vacuum motor button (36) turns the vacuum motor on/off. The brush/pad driver indicator (37) shows the brush motor's working state. The brush/pad button (38) turns the brush motor on/off. The brush/pad removal button (39) automatically releases the brush disk/pad driver when long-pressed. The brush/pad removal indicator (40) shows the status of the automatic brush removal switch. The key switch (41) turns the machine's power on/off. The solution flow indicator (42) shows three different solution flow levels. The solution flow button (43) adjusts the detergent/water flow to the brush, offering three flow options.
For operation, installing and removing disk brushes/pads is straightforward. The machine can use either a brush or a pad depending on the cleaning task. To install, place the brush disk or pad driver under the holder, lower the holder using the squeegee lower/lift foot pedal (17), turn the key switch to "ON," activate the brush disk/pad driver switch (38) and vacuum motor switch (36), then gently push the machine forward until the brush disk/pad driver is installed. To remove, depress the foot pedal (17) to lift the holder, then press and hold the brush removal switch (39) until the indicator light flashes, and the brush disk/pad driver will automatically fall. Manual removal involves rotating the brush disk/pad driver in the opposite direction.
Attaching the squeegee assembly (16) involves tightening it with the squeegee fixing knob (15) and connecting the vacuum hose (13).
To start the machine, follow preparation steps, turn the key switch (41) to "I," check the battery charge on the BDI (charge if red light is on), move the machine to the working area, and lower the squeegee (16) using the lifting lever (18). Press the pedal (17) to place the brush disk/pad driver on the ground, then press the brush disk/pad driver button (38) and vacuum motor button (36). Adjust water flow with the solution flow button (43) based on ground cleanliness. The angle adjusting knob adjusts machine speed: increasing tilt (rabbit mark) makes it easier to push and narrows the scrubbing path, while decreasing tilt (tortoise mark) makes it heavier to push and widens the path. Adjust the balance knob for straight movement. Check and adjust the squeegee (14) so the rear blade fully touches the ground and the front blade lightly contacts it. Hold the handle and push to start scrubbing.
To stop the machine, press the brush disk/pad driver switch (38) to turn off the drive motor. After the brush drive motor turns off, depress the foot pedal (17) to raise the brush disk/pad driver. Press the vacuum motor button (36) to turn off the vacuum motor (it will turn off after a 5-second delay to suck up remaining sewage). Lift the squeegee (16) with the lifting lever (18). Turn the key switch (41) to "O." Ensure the machine cannot move independently. For difficult cleaning, the brush disk/pad driver extra pressure function can be activated by pressing the pedal (17) to position (17c). A caution warns against leaving the brush/pad driver on when the machine stops, especially with extra pressure, to prevent floor damage.
The battery indicator (34) has 10 notches. When only the last red notch is on, the battery is low, and the brush disk/pad driver will automatically turn off. Move the machine to a charging area immediately. A caution advises against using the machine with a low battery to prevent damage and extend battery life.
Draining tanks is crucial. A sudden increase in vacuum motor noise indicates a full recovery tank (4). If the vacuum path is accidentally closed (e.g., by the float ball), turn off the vacuum motor (36), open the recovery tank lid (22), check if the float ball in the shut-off screen (20) has dropped, then close the lid (3) and restart the vacuum motor (36). To drain the recovery tank, stop the machine, raise the brush disk/pad driver (17), lift the squeegee (16), move to a sewage discharge area, and drain through the drain hose (12). To drain the solution tank, rinse the recovery tank, then turn on the solution tank water tap (27) and drain the solution tank (6), followed by rinsing with clean water.
After use, remove the brush disk/pad driver, drain both tanks, perform daily maintenance, and store the machine in a clean, dry place with the brush disk/pad driver and squeegee lifted or removed. For long-term inactivity (over 30 days), follow "After Use" procedures, disconnect the battery, and charge it regularly. After the first 8 hours of initial use, check for loose fastenings, visible damage, and leakage.
Maintenance is key to the machine's service life and operational safety. A checklist provides a general schedule, with intervals depending on working conditions. All maintenance must be done with the machine off and battery disconnected, following safety instructions. Only qualified personnel or authorized service centers should perform regular or extraordinary maintenance. The manual covers the easiest and most common procedures; for others, refer to the Service Manual.
The regular maintenance checklist includes daily (after use) tasks like charging the battery, cleaning the squeegee, brush/pad, solution tank, and recovery tank, checking tank seals, and checking the squeegee for replacement. Weekly tasks include checking the squeegee and replacing it if necessary. Semiannual tasks include cleaning the solution tank filter, vacuum motor filter, and checking all screws and nuts for tightness.
To charge the battery, turn the key switch (41) to "O," ensure the charger is suitable (DC 24V output), connect the charger to the charging socket (19) and power supply. Once fully charged, remove the charger from the power supply and charging socket. A caution warns against turning on the key switch or operating the machine during charging.
Cleaning the squeegee is important for good drying. It must be clean and its blades in good condition. Wear protective gloves due to potential sharp debris. Move the machine to level ground, turn the key switch (41) to "O," lift the squeegee (16) with the lifting lever (18), loosen the fixing knob (15), and remove the squeegee (16). Disconnect the vacuum hose (13). Clean the squeegee (16), especially compartments (A, Fig. 2) and the vacuum hose, from dirt and debris. Check front (C) and rear (D) squeegee blades for integrity; replace if necessary. Reassemble in reverse order.
Squeegee blade check and replacement involves cleaning the squeegee, checking that the edges (E, F) of the front (C) and rear (D) blades are horizontally level, and adjusting height if needed by loosening buckles (G) and retainers (M) for the rear blade, or unscrewing knobs (I) for the front blade. Check blades for integrity, cuts, and tears; replace if necessary. If the front edge (J) of the rear blade is worn, turn it upside down. If both edges are worn, replace the blade by loosening buckles (G), releasing pressure strips from retainers (M), removing retaining strips (K), and replacing the worn blade. For the front blade, unscrew knobs (I), remove retaining strips (L), and replace. After replacement, adjust height. Connect the vacuum hose (13) and reassemble the squeegee (16), tightening the knob (15). Adjust squeegee balance with knob (14) if necessary.
Cleaning the brush/pad also requires protective gloves. Remove the brush disk/pad driver, clean with water and detergent, check bristles for integrity and wear (replace if necessary), and check the pad for wear (replace if necessary).
To clean the recovery tank and filter, move the machine to a sewage discharge area, turn the key switch (41) to "O," remove the recovery tank lid (3), and rinse the lid, recovery tank (4), and screen (20) with clean water, draining sewage through the hose (12). If needed, loosen the screen buckle (20), clean the float ball and other parts, and refit them. Check the recovery tank lid's sealing for integrity and replace if necessary. The lid's seal is crucial for creating vacuum.
For vacuum filter cleaning, gently tilt the recovery tank, drain water if necessary, remove the filter cotton from the vacuum pressure plate (31), clean it with water and compressed air if dirty, and refit it. Return the recovery tank to its normal position.
Solution filter cleaning involves closing the solution tank water tap (27), removing the filter cover and screen, cleaning them with water, and refitting. Ensure the filter screen (E) is correctly fitted on the housing (G). Finally, turn on the solution tank water tap (27).
Troubleshooting includes a fault code table for the BDI (Battery Discharge Indicator) and common trouble shooting for issues like insufficient recovery water vacuuming, insufficient solution flow to the brush, and marks caused by the squeegee. Each problem has possible causes and remedies.
For scrapping and disposal, the machine must be handled by a qualified scrapper. Before scrapping, remove and separate materials like batteries, brush disk/pad drivers, plastic hoses, and electrical/electronic components, disposing of them according to relevant laws and regulations. A hazardous substance and content table details the presence of substances like Pb, Hg, Cd, Cr (VI), PBB, and PBDE in various components, indicating compliance with SJ/T 11364. "O" means the hazardous substance content is below the limit specified in GB/T 26572, while "X" means it exceeds the limit in at least one homogeneous material.