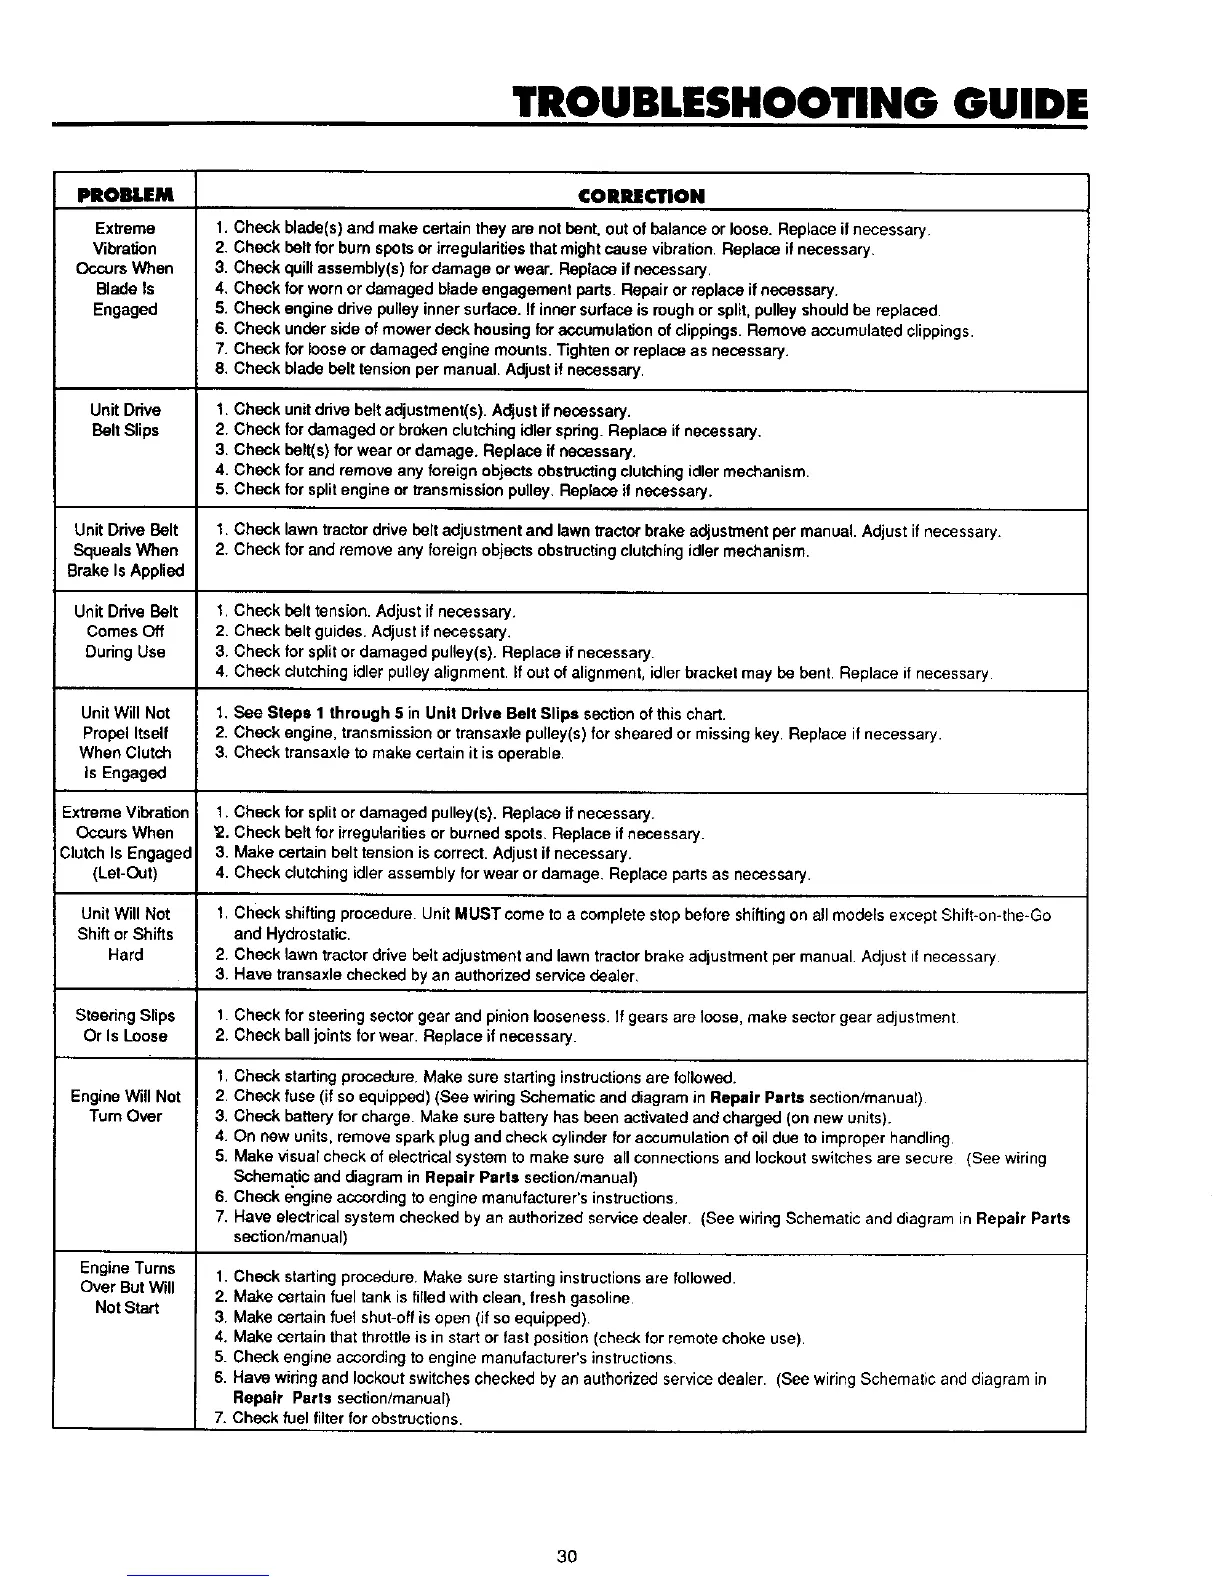
TROUBLESHOOTING GUIDE
PROBLEM CORRECTION
Extreme
Vibration
Occurs When
Blade ls
Engaged
1. Check blade(s) and make certain they are not bent, out of balance or loose. Replace if necessary
2. Check belt for burn spots or irregularities that might cause vibration. Replace if necessary.
3. Check quill assembly(s) for damage or wear. Replace if necessary.
4. Check for worn or damaged blade engagement parts. Repair or replace if necessary.
5. Check engine drive pulley inner surface. If inner surface is rough or split, pulley should be replaced.
6. Check under side of mower deck housing for accumulation of clippings. Remove accumulated clippings.
7. Check for loose or damaged angina mounts. Tighten or replace as necessary.
8. Check blade belt tension per manual. Adjust if necessary.
Unit Drive 1. Check unitdrive belt adjustment(s). Adjust ifnecessary.
Belt Slips 2. Check for damaged or broken clutching idler spring. Replace if necessary.
3. Check belt(s) for wear or damage. Replace if necessary.
4. Check for and remove any foreign objects obstructing clutching idler mechanism.
5. Check for split engine or transmission pulley. Replace if necessary.
Unit Drive Belt 1. Check lawn tractor drive belt adjustment and lawn tractor brake adjustment per manual. Adjust if necessary.
Squeals When 2. Check for and remove any foreign objects obstructing clutching idler mechanism.
Brake Is Applied
Unit Drive Belt 1, Check belt tension. Adjust if necessary.
Comes Off 2. Check belt guides. Adjust if necessary.
During Use 3. Check for split or damaged pulley(s). Replace if necessary.
4. Check clutching idler pulley alignment. If out of alignment, idler bracket may be bent. Replace if necessary
Unit Will Not 1. Bee Steps I through 5 in Unit Drive Belt Slip==section of this chart.
Propel Itself 2. Check engine, transmission or transaxle pulley(s) for sheared or missing key. Replace if necessary.
When Clutch 3. Check transaxle to make certain it is operable.
is Engaged
Extreme VilxatJon 1. Check for split or damaged pulley(s). Replace ifnecessary.
Occurs When '2. Check belt for irregularities or burned spots. Replace if necessary.
Clutch Is Engaged 3. Make certain belt tension is correct. Adjust if necessary.
(Let-Out) 4. Check clutching idler assembly for wear or damage. Replace parts as necessary.
e
Unit Will Not 1. Check shifting procedure. Unit MUST come to a complete stop before shifting on all models except _hift-on-the=Go
Shift or Shifts and Hydrostatic.
Hard 2. Check lawn tractor drive belt adjustment and lawn tractor brake adjustment per manual Adjust if necessary
3. Have transaxle checked by an authorized service dealer,
Steering Slips t. Check for steering sector gear and pinion looseness. If gears are loose, make sector gear adjustment
Or Is Loose 2. Check ball joints for wear. Replace if necessary.
Engine Will Not
"rum Over
Engine Turns
Over But Will
Not Start
1. Check starting procedure. Make sure starting instructions are followed.
2. Check fuse (if so equipped) (See wiring Schematic and diagram in Repair Parts section/manual)
3. Check battery for charge. Make sure battery has been activated and charged (on new units).
4. On new units, remove spark plug and check cylinder for accumulation of oil due to improper handling
5. Make visual check of electrical system to make sure all connections and lockout switches are secure (See wiring
Schematic and diagram in Repair Parts saction/manual)
6. Check engine according to engine manufacturer's instructions
7. Have electrical system checked by an authorized service dealer. (See wiring Schematic and diagram in Repair Parts
saction/manual)
1. Check starting procedure. Make sure starting instructions are followed.
2. Make certain fuel tank is filled with clean, fresh gasoline
3. Make certain fuel shut-off is open (if so equipped)
4. Make certain that throttle is in start or fast position (check for remote choke use).
5. Check engine according to engine manufacturer's instructions
6. Have wiring and lockout switches checked by an authorized service dealer. (See wiring Schematic and diagram in
Repair Parts section/manual)
7. Check fuel filter for obstructions.
3O
 Loading...