Owner’s Manual 15
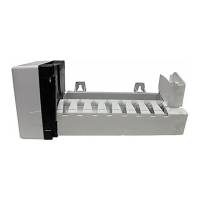
Ice Maker Storage (Optional)
To prepare the ice maker for seasonal storage:
1. Close the vehicle water supply valve to the ice maker.
2. Push the ice maker arm up until it locks into the OFF position.
3. Remove the garden hose adapter from the water solenoid valve.
4. Remove the ice maker water line from the water solenoid valve
- Do not unwrap the water line heater wires from around the water solenoid valve.
5. Drain all of the water from both the water supply line and the ice maker water line.
6. Put the end of the water supply line, the end of the ice maker water line, and the water solenoid valve each into a clean plastic bag.
7. Use tape to close each plastic bag around the water lines and the water solenoid valve.
To use the ice maker after seasonal storage:
Do not operate the ice maker when the ambient air temperature is 0° F. or lower. Damage to the water
solenoid valve and the water supply line can occur.
1. Remove the tape and plastic bags from the end of the water supply line, the end of the ice maker water line, and the water solenoid
valve.
2. Connect the ice maker water line to the water solenoid valve.
3. Connect the garden hose adapter to the water solenoid valve.
4. Push the ice maker arm down into the ON position.
5. Open the vehicle water supply valve to the ice maker.
You should discard and not use the rst two batches of ice cubes. It will take about three cycles for the ice maker to
make fully formed and clean ice cubes.
- Make sure the electrode is clean and the spark gap is 1/8 - 3/16 inch.
- Adjust if needed.
- Make sure the AC voltage is 108 -132 volts and the DC voltage is 10.5 - 15.4 volts.
Refrigerator Maintenance
Gas ame appearance:
While in LP GAS operation, examine the appearance of the gas ame:
- Push the TEMP SET button until the number “9” appears in the center display.
- Open the lower intake vent.
The burner box cover can be hot. Wear gloves to avoid burns.
CAUTION
!
CAUTION
!
NOTICE
 Loading...