Do you have a question about the Nova CAMBRIDGE NOV-CD-4005B and is the answer not in the manual?
Key information on warranty and care instructions to be kept for future reference.
Lists components for the table structure, including panels, top, and fasteners.
Details parts for the firepit system, including the burner and igniter.
Lists panels and connectors for the windguard assembly.
Essential pre-assembly checks and safety precautions for users.
Crucial safety instructions for product use, handling, and maintenance.
Loosely attach leg panels using screws and washers.
Loosely attach the second leg panel with screws and washers.
Loosely secure a side panel using screws and washers.
Loosely attach the side panel with the door using screws and washers.
Place the glass tabletop, ensuring suction cups are flat.
Remove nuts from the firepit system control panel.
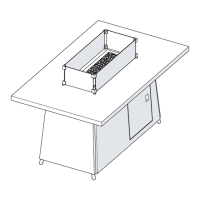
Lower the firepit system into the table, feeding parts through the hole.
Secure the firepit control panel to the table frame using removed nuts.
Fill the firepit with fireglass, ensuring no obstruction to the pilot cover.
Insert an AAA battery into the ignition, negative side first.
Loosely connect windguard panels using connectors and grub-screws.
Tighten windguard screws and place it around the firepit.
Addresses common problems like wiring, battery, pilot cover, and gas pipes.
Instructions for cleaning and maintaining the rattan furniture.
Details on warranty validity, claims, and coverage.
This document provides assembly instructions for the NOVA OUTDOOR LIVING CAMBRIDGE FIREPIT TABLE, available under SKUs NOV-CD-4005B and NOV-CD-4005G. It is a firepit table designed for outdoor use, featuring a central firepit system and a windguard.
The Cambridge Firepit Table serves as an outdoor furniture piece that incorporates a gas-powered firepit system for warmth and ambiance. It is intended for residential use within a garden or patio environment. The firepit system uses a 5kg patio gas propane bottle (not supplied) and requires a 1 x AAA battery (not supplied) for ignition. The table also includes a windguard to help prevent flames from being blown across the table, though it does not prevent the surrounding area from heating up.
Table Components:
Firepit System Components:
Windguard Components:
Power Requirements:
Safety Advice:
The firepit table is designed for ease of use and safety.
The manual provides general care instructions for rattan furniture, which the Cambridge Firepit Table is likely made of or incorporates.
Warranty Information:
| Brand | Nova |
|---|---|
| Model | CAMBRIDGE NOV-CD-4005B |
| Category | Outdoor Fireplace |
| Language | English |