EasyManua.ls Logo

Novus TM-619 - User Manual

Novus TM-619
2 pages
Print Icon
To Next Page IconTo Next Page
Loading...
NOVUS AUTOMATION 1/2
TIMER TM
-619
PROGRA
MMABLE TIME INTERRUPTERS - USER GUIDE V4.0x D
1. OPERATING FEATURE
The Programmable Time Interrupters NOVUS are electronic devices
that permit switching electrical loads (alarm, appliances, etc.) at
programmed time intervals with good accuracy.
Their microprocessor let you create at most eight (8) ON/OFF
programs, which can switch electrical loads at specifics moments
throughout the week.
They have a battery, that give to the TIMER the feature of hold the
programs and run the internal clock for many weeks, even in case of
power outage.
The output is consist of a relay with the terminals NO, COM and NC
(SPDT) available for user. In power outage this relay will not switch,
letting the output inoperative.
2. SPECIFICATIONS
POWER: de 12 Vdc, 24 Vdc, 110 Vac or 240 Vac, 50/60 Hz; (see
identification tag); no polarity of the terminals.
Switching low interval: 1 minute;
OUTPUT: Relay 16 A / 250 Vac, resistive; 8 A / 250 Vac, inductive;
Operational temperature: 0 to 60 °C;
Storage temperature: -10 to 75 °C;
Light indicator for output on (when powered);
Proper for be fixed with screw.
3. OPERATIONS MODES
There are three operation modes: ON, AUTO e OFF, select through
the MANUAL key. When the MANUAL key is pressed, observe that
the indicator (line) on the screen move upon the words
ON/AUTO/OFF:
MODO ON: When the indicator is upon ON the output turn on
immediately and keep this status while in ON mode.
MODO OFF: When the indicator is upon OFF the output turn off
immediately and keep this status while in OFF mode.
MODO AUTO: When the indicator is upon AUTO the output turn
on and turn off based on the programs.
When the TIMER isn’t powered, it turns off the output permanently.
4. UPDATING DAY/HOUR/MINUTE
Keep pressed the CLOCK key, then press:
DAY: to update the indicated day of week;
HOUR: to update the indicated hour;
MIN: to update the indicated minutes.
NOTE 1: The terms MO, TU, WE, TH, FR, SA e SU, correspond to
the weekdays in English:
MO= Monday; TU= Tuesday; WE= Wednesday;
TH= Thursday; FR= Friday; SA=Saturday;
SU= Sunday;
5. DETERMINING THE ON/OFF CYCLES
Press the TIMER key to access and configure the ON/OFF
programs. The program number, which is at editing, is showed on the
left side of the screen. See Fig. 04. The first edit refers to the
program 1 and determine the moment to turn on the output. Note that
the message ON is showed upon the program number.
Press DAY to determine the day which the output should turn on.
Observe that the indication of the weekdays is changed at each
time that DAY key is pressed:
Mo, Tu, We, Th, Fr, Sa, Su (everyday)
Mo (any day of the week);
Tu (Tuesday);
We (Wednesday);
Th (Thursday);
Fr (Friday);
Sa (Saturday);
Su (Sunday);
Mo, Tu, We, Th, Fr (business days);
Sa, Su (weekend);
Mo, Tu, We, Th, Fr, Sa (business days more Saturday);
Mo, Tu, We (Monday, Tuesday and Wednesday);
Th, Fr, Sa (Thursday, Friday and Saturday);
Mo, We, Fr (Monday, Wednesday and Friday);
Tu, Th, Sa (Tuesday, Thursday and Saturday);
Press the HOUR key to determine the hour on the chosen days,
in which the output turns on.
Press the MIN key to determine the minutes.
Press the TIMER key again to determine the moment to turn off the
output on the program 1. Note that the message OFF upon the
program number. The programming of day, hour and minute is made
identical of the programming of turn ON, showed before:
Press DAY key to determine the days when the output is turned
off.
Press the HOUR key to determine the hour when the output turns
off.
Press the MIN key to determine the minutes.
Press the TIMER key again and the program number displayed will
change to 2, indicating that the following adjusts refer to program 2.
Configure the program 2 as the instruction above. Then access and
determine the other programs, in a total eight programs.
These programs will be used by the TIMER when the operation
mode selected is AUTO. In the time programmed to ON, the output
turns on. In the time programmed to OFF, the output turns off.
In the case of overlapping programs, the output will act like the
example showed at the Fig. 01. When its already on, and came a
time when some program turn off, the output turn off. When came a
time in some program when turn on, the output doesn’t change.
All manuals and user guides at all-guides.com
all-guides.com
Question and Answer IconNeed help?

Do you have a question about the Novus TM-619 and is the answer not in the manual?

Summary

Operating Features of the Programmable Timer

Technical Specifications for TM-619 Timer

Understanding Timer Operation Modes

Updating Day, Hour, and Minute Settings

Configuring ON;OFF Cycles

Setting ON Time Days

Determine the days for the output to turn on by pressing DAY.

Setting ON Time Hour

Determine the hour for the output to turn on.

Setting ON Time Minutes

Determine the minutes for the output to turn on.

Setting OFF Time Days

Determine the days for the output to turn off.

Setting OFF Time Hour

Determine the hour for the output to turn off.

Setting OFF Time Minutes

Determine the minutes for the output to turn off.

Timer Identification and Screen Elements

Resetting the Timer

Battery Information and Replacement

Warranty Information

Overview

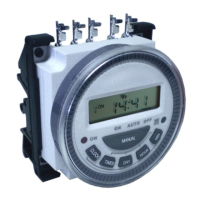
The NOVUS TIMER TM-619 is a programmable time interrupter designed to switch electrical loads at programmed time intervals with high accuracy. This electronic device is suitable for controlling various applications such as alarms and appliances.

Function Description

The TM-619 utilizes a microprocessor to allow users to create up to eight (8) ON/OFF programs. These programs enable the device to switch electrical loads at specific moments throughout the week. A built-in battery ensures that the programmed settings and the internal clock are maintained for many weeks, even during power outages. The output is provided by a relay with NO, COM, and NC (SPDT) terminals. During a power outage, the relay remains inoperative, meaning the output will not switch.

Important Technical Specifications

  • Power: Available in 12 Vdc, 24 Vdc, 110 Vac, or 240 Vac, 50/60 Hz (as specified on the identification tag). The terminals are non-polar.
  • Switching Low Interval: 1 minute.
  • Output: Relay with a rating of 16 A / 250 Vac (resistive) and 8 A / 250 Vac (inductive).
  • Operational Temperature: 0 to 60 °C.
  • Storage Temperature: -10 to 75 °C.
  • Indicators: Features a light indicator for output ON (when powered).
  • Mounting: Designed for screw fixing.

Usage Features

The TM-619 offers three operation modes: ON, AUTO, and OFF, which can be selected using the MANUAL key. An indicator line on the screen moves to show the currently selected mode.

  • MODO ON: When the indicator is on ON, the output turns on permanently.
  • MODO AUTO: When the indicator is on AUTO, the output turns on and off based on the programmed schedules.
  • MODO OFF: When the indicator is on OFF, the output turns off permanently.
  • If the TIMER is not powered, the output turns off permanently.

Updating Day/Hour/Minute: To update the current time, press and hold the CLOCK key, then use:

  • DAY: To update the indicated day of the week.
  • HOUR: To update the indicated hour.
  • MIN: To update the indicated minutes. The weekdays are abbreviated as: MO (Monday), TU (Tuesday), WE (Wednesday), TH (Thursday), FR (Friday), SA (Saturday), SU (Sunday).

Determining ON/OFF Cycles (Programming): Press the TIMER key to access and configure the ON/OFF programs. The program number (1-8) is displayed on the left side of the screen.

  1. Program 1 (ON): The first edit sets the ON time for program 1. The message "ON" appears next to the program number.

    • DAY: Press DAY to select the day(s) for the output to turn on. Options include:
      • Mo, Tu, We, Th, Fr, Sa, Su (everyday)
      • Mo (any day of the week)
      • Tu (Tuesday)
      • We (Wednesday)
      • Th (Thursday)
      • Fr (Friday)
      • Sa (Saturday)
      • Su (Sunday)
      • Mo, Tu, We, Th, Fr (business days)
      • Sa, Su (weekend)
      • Mo, Tu, We, Th, Fr, Sa (business days plus Saturday)
      • Mo, Tu, We (Monday, Tuesday, and Wednesday)
      • Th, Fr, Sa (Thursday, Friday and Saturday)
      • Mo, We, Fr (Monday, Wednesday and Friday)
      • Tu, Th, Sa (Tuesday, Thursday and Saturday)
    • HOUR: Press HOUR to set the hour for the output to turn on.
    • MIN: Press MIN to set the minutes.
  2. Program 1 (OFF): Press the TIMER key again to set the OFF time for program 1. The message "OFF" appears next to the program number. The programming for day, hour, and minute is identical to setting the ON time.

    • DAY: Press DAY to select the day(s) for the output to turn off.
    • HOUR: Press HOUR to set the hour for the output to turn off.
    • MIN: Press MIN to set the minutes.
  3. Subsequent Programs (2-8): Press the TIMER key again to move to program 2, and repeat the steps above to configure all eight programs.

These programs are used when the operation mode is set to AUTO. The output turns ON at the programmed ON time and turns OFF at the programmed OFF time. In cases of overlapping programs, the output behavior follows a specific logic: if the output is already ON and an OFF time for some program is reached, the output turns OFF. If an ON time for some program is reached while the output is OFF, the output turns ON.

Reset Feature: Pressing the RESET key (P) will reset the interrupter clock and delete all programmed settings.

Maintenance Features

Battery: The TM-619 stores its programs in a battery-protected memory. When the battery charge is low, a message will appear on the screen indicating that the battery needs replacement.

  • Battery Type: CR-2032.
  • Estimated Range: 2 years.

Battery Replacement Procedure: To replace the battery, follow these steps:

  1. Carefully open the device casing.
  2. Locate the CR-2032 battery.
  3. Remove the old battery.
  4. Insert the new CR-2032 battery, ensuring correct polarity.
  5. Close the device casing securely.

Warranty

Warranty conditions are available on the Novus Automation website: www.novusautomation.com/warranty. The product is marketed by Novus.

Novus TM-619 Specifications

General IconGeneral
BrandNovus
ModelTM-619
CategoryTimer
LanguageEnglish