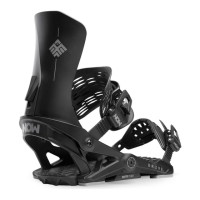
This document is a user manual for Now IPO and Select snowboard bindings, which are designed to enhance snowboarding performance and comfort. The bindings feature a revolutionary design inspired by skateboard trucks, aiming to provide unparalleled performance and comfort through efficient energy transfer.
Function Description
The Now IPO and Select bindings are designed to connect a snowboarder's boots to their snowboard, allowing for precise control and energy transfer. The core concept, "Skate-Tech," mimics the dynamics of a skateboard truck. The "Hanger" component efficiently transfers energy from the straps to the bushings and then directly to the board's edges. A "Kingpin" acts as a fulcrum, magnifying this energy through leverage. This design bypasses the traditional flexing and bending of the baseplate found in conventional bindings, which often leads to foot fatigue. By directing energy directly to the edges, the bindings aim to reduce the effort required to turn, allowing riders to maintain a more relaxed and comfortable stance for longer periods.
Important Technical Specifications
Binding Components:
- Hanger: The primary component responsible for transferring energy from the straps to the bushings and board edges.
- Nylon-ring: A component of the baseplate system.
- Nylon disc: A component of the baseplate system.
- Kingpin: Acts as a fulcrum to magnify energy transfer through leverage.
- Foot Pillow: A soft EVA pad located at the heel, designed for comfort and to cover the disc.
- Bushings: Customizable components that influence the binding's feel and response. IPO bindings come with Soft (45 shore) and Medium (50 shore) bushings. Hard (60 shore) bushings are also available. Toe and heel bushings are distinct and labeled on the underside.
- Straps: Tool-free adjustable straps for securing the boot.
- Toe Cap Strap: Designed to be positioned and centered at the tip of the boots.
- Highback: The rear support component, which can be removed for "NoBack mode."
- HighCups: Optional components used in "NoBack mode" to replace the highback.
- Forward Lean Block: Adjustable mechanism for setting the forward lean of the highback.
Disc Compatibility:
- 4x4 Hole Pattern Disc: Features slotted holes offset for strength and durability. The cross in the middle indicates the center of the disc. Riders may need to flip the disc to achieve their desired stance.
- EST Channel Disc: Compatible with EST channel systems.
Hardware:
- Phillips #3 screwdriver is needed for binding installation.
- 4mm Allen key is used for certain adjustments, such as securing t-nuts in "NoBack mode."
Boot Size Adjustment:
The manual provides a "Toe and Heel Boot Size Adjustment Chart" to help center the boot across the board. The chart shows different disc orientations for small, medium, and large bindings, accommodating various boot sizes (e.g., Boot Size 5, 6.5, 7, 7.5, 8, 10, 11, 12+).
Usage Features
Binding Installation:
- Opening the Foot Pillow: To access the disc for mounting, grab the soft EVA pad at the heel and pull upward.
- Mounting: Instructions on the disc cover should be read before mounting bindings onto the board.
- Disc Orientation: The manual illustrates options for adjusting stance width and boot size by rotating the disc. Slotted holes on the 4x4 disc are offset, and the cross indicates the center.
Adjustments:
- Strap Adjustments: Straps feature tool-free NOW levers. To adjust, open the lever, unscrew, move the strap to the desired location, tighten, and close the lever.
- Toe Strap Placement: The toe cap strap should be centered at the tip of the boots. Adjustment follows the same tool-free process as other straps.
- Forward Lean Adjustment: To change forward lean, pull down the lever, move the forward lean block up or down to the desired position, and then flip the lever back to lock it.
- Bushing Customization: Bushings can be popped out with a finger and replaced to suit riding style, snow conditions, weight, or personal preference. Toe and heel bushings are different and must be installed correctly according to their underside labels.
NoBack Mode with HighCups:
- Step 1 (Remove Highback): Remove the highback by unscrewing hardware on both sides using a Phillips #3 screwdriver and a 4mm Allen key.
- Step 2 (Replace with HighCup): Replace the highback with a HighCup and reinstall the hardware. Ensure t-nuts are properly fitted in the binding cavity and use a 4mm Allen key to hold them in place.
Closing the Foot Pillow:
After adjustments or installation, push down on the EVA pad while pulling the heelcup upwards until a "CLICK" is heard on both sides, indicating proper closure.
Maintenance Features
Hardware Check:
- Riders are advised to check and tighten all hardware before each use.
Warranty:
- Lifetime Warranty: Applies to baseplate components (Hanger, Nylon-ring, and Nylon disc) for the original purchaser.
- One-Year Limited Warranty: Applies to all other parts.
- The warranty is non-transferable, and Now reserves the right to repair or replace faulty parts at its discretion.
- More information on the warranty policy is available at now-snowboarding.com.
Safety Information:
- Snowboarding is a hazardous sport that can result in serious injury or death.
- Use these bindings at your own risk.
- Only use snowboard-specific boots.
- Read the instruction manual before installing and using the bindings.
- Bindings do not release on impact.
- A runaway snowboard is dangerous; riders are responsible for awareness.
- In compliance with ISO code 14573, a leash must be worn at all times, attached to the binding's baseplate and securely fastened to the body.