Do you have a question about the NRS SLIPSTREAM 129 and is the answer not in the manual?
Assemble the right side rail, including the pulley bracket and anchor line.
Place and orient the left and right side rails on the raft's top tubes.
Attach the foot bar to the side rails using U-bolts and LoPros.
Mount the remote bracket onto the right side rail behind the pulley bracket.
Connect the front left rail to the left side rail using a frame coupler.
Connect the front right rail to the right side rail using a frame coupler.
Join the front right and front left rails together with a frame coupler.
Secure angler thigh hooks to the front frame pipe sections.
Mount the front angler seat bar onto the side rails.
Connect the rower cross bar between the side rails.
Connect the back right rail to the right side rail using a frame coupler.
Mount the pulley bracket onto the back right rail.
Connect the back left rail to the left side rail using a frame coupler.
Mount the back angler seat bar onto the back rails.
Attach the back thigh hook bar to the side rails.
Secure angler thigh hooks to the back frame pipe sections.
Tighten all previously installed LoPro nuts and frame coupler bolts.
Mount the oar mounts onto the side rails at the desired position.
Assemble the oar locks onto the oar mounts.
Mount universal seat mounts onto seat bars and rower cross bar.
Attach the folding angler swivel seat to the universal seat mounts.
Mount the low back rower seat onto the rower seat cross bar.
Install rod holder pegs, straight rod tubes, and bent rod tubes.
Use tie-down straps to secure the assembled frame to the raft's D-rings.
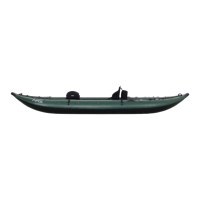
The NRS Slipstream 129 is a purpose-built raft designed for adventure anglers, featuring a modular frame system that allows for customization and secure attachment of various components. The assembly process involves constructing the frame, attaching seating and fishing accessories, and finally securing the entire frame to the raft.
The core of the Slipstream 129 is its robust frame, which begins with the Side Rails. The Side Rail - Right incorporates a pulley bracket and a remote bracket with an anchor cam cleat, essential for anchor management. The anchor rope is threaded through a slot in this rail and over a pulley wheel on the pulley bracket, which is then securely tightened. The Side Rail - Left is a simpler component, lacking the anchor mechanism. These side rails are positioned on top of the raft's straight side tubes, with the right rail's anchor slot oriented inward and angled upward. The remote bracket is attached directly behind the slot on the right side rail, with U-bolts securing it from underneath. The anchor rope is then run through the anchor cam cleat.
The frame continues with the Foot Bar, which is placed approximately 4-6 inches from the front end of the side rails, with its bent portion dipping towards the raft floor. U-bolts secure it from underneath the rails, and nuts are loosely tightened onto LoPros. The Front Rail - Left and Front Rail - Right are connected to their respective side rails using frame couplers. These couplers are slipped onto the front ends of the side rails, with bolt heads facing up and positioned on the outside. The slotted window in the frame coupler helps align the side rail in the middle. The front rails are oriented so their bends follow the raft tube. Once aligned, the frame coupler bolts are tightened to secure the front rails in position. The front rails are then connected to each other using another frame coupler, ensuring the ends touch and are visible in the slotted window before tightening the bolts.
The Rower Cross Bar is a straight bar connecting both side rails, positioned approximately 34 inches back from the foot bar. Like other frame components, it is secured with U-bolts and loosely tightened nuts. The Back Rail - Right and Back Rail - Left are attached to their respective side rails using frame couplers, similar to the front rails. The anchor line from the right side rail continues through a frame coupler at the back end of the rail, then through the front end of the back rail, and out its slot. The back rails are oriented to follow the raft tube, with the back anchor mast extending horizontally off the back center of the raft. A back pulley bracket is slipped over the back end of the back rail – right and centered with the slot, and a pulley wheel is assembled onto it, with the anchor line running over and around it.
The Slipstream 129 offers various seating and angling features. The Front Angler Thigh Hooks are attached by placing the open pipe ends of two bent frame pipe sections into the slots on the bottom of the thigh hook, secured with lock pins. U-bolts then secure the LoPros on these bent pipe sections to the straight front frame pipe. The thigh hook is centered in the middle of the boat and rotated to the desired height and angle before firmly tightening the LoPro nuts.
The Front Angler Seat Bar is placed on top of the side rails in front of the frame couplers, with its bend facing up. It is assembled with U-bolts from underneath the rail, and nuts are loosely tightened onto the LoPros. Similarly, the Back Angler Seat Bar is placed on top of the back rails, centered and angled upward, and secured with U-bolts and loosely tightened nuts. The Back Thigh Hook Bar is positioned approximately 12-16 inches back from the rower cross bar, secured with U-bolts and loosely tightened nuts. The Back Angler Thigh Hooks are attached to the thigh hook cross bar pipe in the same manner as the front thigh hooks, allowing for rotation to the desired height and angle.
The Oar Mounts are attached on top of each side rail, approximately 12-16 inches in front of the rower seat cross bar, with the exact position depending on the rower's arm length. U-bolts secure them from the bottom side of the rail, with the threads running through the oar mount holes. Washers are placed on the threaded ends of the U-bolts, and nuts are loosely tightened. The oar mount is rotated to a horizontal position before firmly tightening the LoPro nuts.
The Oar Locks are assembled by slipping the oar lock shaft into the hole at the top of the oar mount. Washers are added above and below the spring on the oar lock shaft, and a split ring is placed through the hole in the bottom of the shaft to hold the spring in place.
The Rod Holders consist of straight rod tubes and bent rod tubes. The Rod Holder Pegs are attached to the straight rod tubes with screws. The straight rod tubes are then placed on top of the side rail - left, secured with U-bolts from underneath the rail, with the threads running through the rod holder peg holes. The pegs can be positioned anywhere along the side rail. Washers are placed on the threaded ends of the U-bolts, and nuts are firmly tightened. Frame couplers are slipped onto the open (back) ends of the straight rod tubes, with bolt heads facing up and on the outside of the rod tube. The slotted window in the frame coupler helps position the straight rod tube in the middle. The bent rod tubes are then slipped into these frame couplers, oriented so their bend follows the raft tube. The ends of the straight and bent rod tubes should touch and be visible in the slotted window before tightening the frame coupler bolts. The rod tubes are designed to carry rods up to 9 feet long, and a bungee cord can be used to secure the rods by stretching it over and around the fishing reel. The mounting orientation of the rod tubes can be adjusted for accessibility by the back angler.
The Slipstream 129 supports multiple seating options. Universal Seat Mounts are centered on top of the angler seat bars and rower seat cross bar. U-bolts secure them from underneath, and nuts are loosely tightened. The universal seat mount is adjusted to a level position using a bubble level before firmly tightening the nuts.
The Folding Angler Swivel Seat is attached by aligning its base holes with the universal seat mount holes on the angler seat bars. Washers are placed on 1/4"x20 x 1" bolts, which are fed from the top through the mounting holes. Additional washers are placed underneath the universal seat mount. The bolts are held in place with an open-end wrench, and nuts are loosely tightened with a socket wrench. The 1/4" nuts are then firmly tightened to secure the swivel seat.
The Low Back Rower Seat is attached to the rower seat cross bar by aligning its bottom holes with the universal seat mount holes. 5/16" lock washers are placed on 5/16"-18 x 1-1/4" bolts, which are threaded into the seat base from underneath the universal seat mount. The 5/16" nuts are then firmly tightened to secure the rower seat.
Once all components are loosely assembled, a crucial step is to firmly tighten all bolts on LoPro fittings and frame couplers with a 1/2" socket wrench. This includes the nuts on the front angler seat bar, the bolts on the front three frame couplers connecting the side rails and front rails, the nuts on the foot bar, the nuts on the rower seat cross bar, the nuts on the back thigh hook bar, the bolts on the back two frame couplers connecting the side rails and back rails, and the nuts on the back angler seat bar.
Finally, the entire frame is secured to the raft using four NRS HD Tie Down Straps. These straps are fed underneath the side rail, then through the D-ring on the side of the raft tube. The strap end is run up to the locking cam of the strap, and the thumb lever is pressed down to open the cam, allowing the strap to be run through from the bottom side. The strap is then pulled down to tighten. This process is repeated for all four D-rings (two toward the bow and two toward the stern) until the frame is securely fastened. The frame should be centered on top of the raft tubes.
The modular design of the Slipstream 129 simplifies maintenance and replacement of individual components. The use of standard bolts, nuts, and wrenches (7/16" socket, 7/16" open end wrench, 5mm Allen wrench, Phillips screwdriver) means that common tools can be used for assembly and disassembly, facilitating repairs or adjustments. The inclusion of a repair kit and a 1/4" drive ratchet with a 1/2" socket further supports on-the-go maintenance. Regularly checking and tightening all fasteners, especially after initial assembly and subsequent uses, is essential to ensure the frame's stability and safety. The ability to adjust the position of various components like rod holders and thigh hooks allows for personalized setup and easy reconfiguration as needed. The anchor system, with its pulley and cam cleat, is designed for smooth operation, and periodic inspection of the rope and pulley mechanism would ensure continued functionality. The robust construction with U-bolts and LoPros is intended for durability in an outdoor, angling environment.
| Length | 12'9" |
|---|---|
| Tube Diameter | 20" |
| Bow Rise | 16" |
| Stern Rise | 16" |
| Valve Type | Leafield C7 |
| Self Bailing | Yes |
| Frame Material | Aluminum |
| Handles | 6 |
| Warranty | 5 years |
| Seats | 2 |
| Weight | 120 lbs |
| Material | PVC |