BUILT-IN IRONING CENTER
READ AND SAVE THESE INSTRUCTIONS
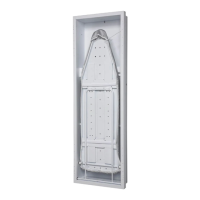
INSTALLATION (Fig. 1)
1. DETERMINE WALL OPENING.
The NuTone Ironing Centers are designed to fit between standard 16” on-center
wall studs. A 49-1/4 ” x 14-1/4 ”x 4” deep opening is required. 24” on-center studs
will require framing to proper opening size.
2. DETERMINE DISTANCE ABOVE THE FLOOR.
Use the following chart to determine the recommended wall opening above
the floor:
Wall Opening
Working Height
Above the Floor
AVD40 Series AVD50N
24” 30” 29”-30½”-32½”
28” 34” 33”-34½”-36½”
30” 36” 35”-36½”-38½”
32” 38” 37”-38½”-40½”
3. ATTACH CLEATS.
Fasten 2x4 cleats to wall studs to provide a level surface on which to rest cabinet.
4. MOUNT CABINET.
Lift cabinet into place and attach it to studs using the six supplied screws. Mount-
ing hole positions are indicated by the arrows. On Model AVD50N, remove the
wire cover to access mounting hole. Be sure to allow for wall covering thickness
behind cabinet face frame. Plumb and shim cabinet to fit.
5. CONNECT WIRING (Fig. 2) (Model AVD50N only)
Remove wire cover. Bring house wiring into cabinet access hole and attach wir-
ing to cabinet with an approved wire strain relief. Connect black to black, white
to white and green/bare wire from house wiring to ground fixing terminal at the
top end of the cabinet. Replace wire cover.
CAUTION: DO NOT ALLOW WIRE TO EXTEND OUTSIDE OF WIRING BOX.
WARNING
Model AVD50N Only
ALL ELECTRICAL WORK MUST BE DONE IN ACCORDANCE WITH
LOCAL AND/OR NATIONAL ELECTRICAL CODES AS APPLICABLE.
FOR SAFETY, THIS PRODUCT MUST BE GROUNDED. IF YOU ARE
UNFAMILIAR WITH METHODS OF INSTALLING ELECTRICAL WIRING,
SECURE THE SERVICES OF A QUALIFIED ELECTRICIAN.
The ironing center should be installed on a SEPARATE 15 amp circuit to
prevent circuit overload.
TURN OFF POWER AT SERVICE ENTRANCE BEFORE INSTALLING
WIRING OR SERVICING THIS PRODUCT.
1. Do not place EXCESSIVE WEIGHT (weight should not exceed 30 pounds)
on the ironing board when opened as it is designed to accept normal ironing
use only.
2. Allow iron to cool down before storing in the cabinet.
3. Empty water reservoir and turn off steam action prior to storing iron.
4. Turn power off when not in use.
5. Do not remove the board retainer.
6. The appliance is supplied with approved components and wires which must
not be changed. If any components or wires of this equipment are damaged,
they must only be replaced by the manufacturer, service agent or similarly
qualified person in order to avoid hazard.
7. This unit may be installed as a surface mount. If installed in this manner, you
MUST USE the Surface Mount Collar Assembly (AVDSMN). See instructions
included with Assembly, for mounting by this method.
EXPOSED WIRES CAN BECOME PINCHED
AND ELECTRICAL SHOCK HAZARD MAY
RESULT.
Fig. 1
Fig. 2
To register this product,
visit: www.nutone.com
WIRE
COVER
CABINET
ACCESS
HOLE