13
Publication No: US-ODY-TM-001 - April 2011
www.odysseybattery.com
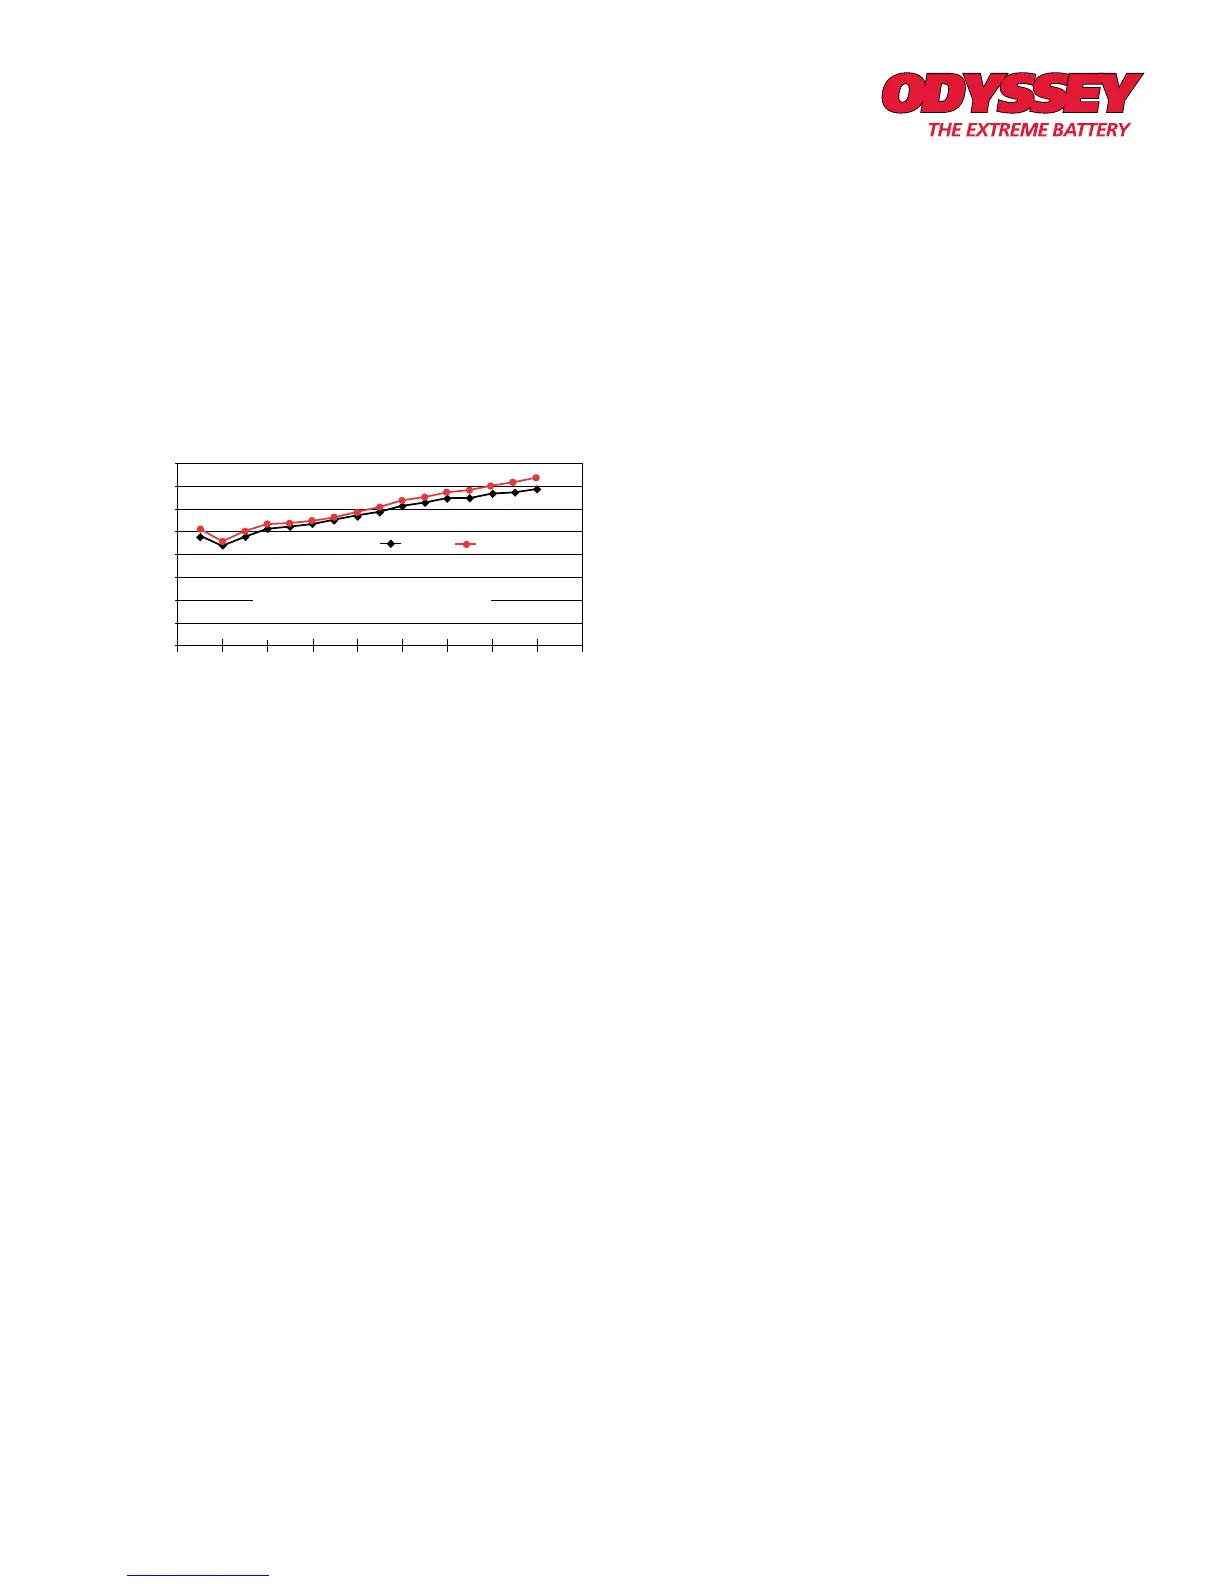
(2) High temperature discharged storage test
Two PC1200 samples were discharged in this test at the
1-hour rate to 9V per module, and then placed in storage at
50°C (122°F) in a discharged condition for 4 weeks.
At the end of 4 weeks, the two batteries were recharged
using a constant voltage (CV) charge at 14.7V per battery.
As Figure 4 below shows, both samples recovered from this
extreme case of abusive storage.
Figure 4: Recovery from high temperature discharged
storage
Deep Discharge Recovery Procedure
It is not unusual for batteries, particularly in automotive or
other engine starting applications to get over discharged
due to factors such as parasitic loads that drain batteries
in vehicles that are not used for extended periods of time.
Leaving a dome light on over a weekend can also have the
same effect on a battery.
This section will describe two separate procedures to
recover a deeply discharged ODYSSEY
®
battery. The first
procedure is for the average consumer who only has access
to a typical automotive charger for home use and sold in
auto parts stores.
Procedure #2 should be attempted by someone who has
access to more sophisticated charging equipment such as
regulated DC power supplies and has the capability to safely
discharge a battery using a controllable load bank.
Although over discharging a battery is not recommended,
ODYSSEY batteries have a much higher level of tolerance
for this kind of abuse than traditional starting, lighting and
ignition (SLI) batteries. Should an ODYSSEY battery be over
discharged and conventional charging techniques fail to
recover it, the following protocols may be used to recover
the battery. It is important to note that even if the battery
recovers following implementation of either protocol, it may
suffer some level of permanent damage.
Procedure #1
Since most typical automotive chargers for home use have
a built-in safety feature that prevents them from turning on
if the battery voltage is too low, this procedure may require
the user to “jump” the dead battery to a healthy battery by
connecting the positive of the dead battery to the positive
of the healthy battery; similarly the negative of the dead
battery must be connected to the negative of the healthy
battery.
Once the two batteries are connected as described above
the battery charger can be hooked up according to the
charger manufacturer’s procedure to the terminals of the
dead battery. The dead battery should now start accepting
a charge.
Continue charging for a while, then unplug the charger and
disconnect the healthy battery from the over discharged
battery. Then reconnect the charger to the discharged
battery and finish the charge.
Procedure #2
1. Bring the battery to room temperature—25°C (77°F)—if it
is not already there.
2. Measure the open circuit voltage (OCV). Continue to step
3 if it measures at least 6.00V.
3. Charge the battery for 24 hours using a constant current
charge that is 5% of the 20-hour capacity of the battery
(5A for a 100Ah battery). The charger should be able to
provide a driving voltage as high as 18.00V. Monitor the
battery temperature; discontinue charging if the battery
temperature rises by more than 20°C.
4. Allow the battery to stand for 18 hours after completion
of step 3.
5. Perform a capacity test on the battery and record the
amp-hours delivered. The longer the discharge the more
reliable the result. This is Cycle 1.
6. Repeat steps 3 through 5. The capacity noted in step 5
is the Cycle 2 capacity. Proceed to step 7 only if Cycle
2 capacity is greater than Cycle 1 capacity; otherwise
replace the battery.
7. Repeat steps 3 through 5 to get Cycle 3 capacity and
proceed to step 8 only if Cycle 3 capacity is equal to or
more than the capacity in Cycle 2. Replace the battery
if Cycle 3 capacity is less than Cycle 2 capacity. If the
capacity is greater than or equal to 80% of the rated
capacity of the battery it may be returned to service.
8. Recharge the battery and put back in service if Cycle 3
capacity is equal to or exceeds Cycle 2 capacity.
Cycle number
10
86 420
12
14 16 18
36
34
32
30
28
26
24
22
20
Sample 1
Sample 2
Capacity at the 1-hr rate
Constant voltage recharge at 14.7V per module
Current limit for cycles 1 & 2 : 0.125C10
Current limit for cycles 3 - 16 : 1C10