Do you have a question about the OEM Tools 25727 and is the answer not in the manual?
Defines signal words like WARNING, CAUTION, and NOTES to convey hazard levels.
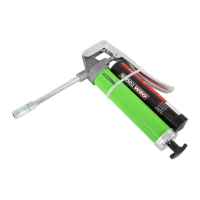
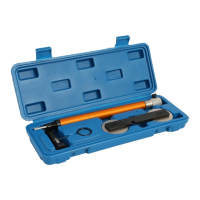
The OEMTOOLS™ 25727 Mini Grease Gun is a specialized tool designed for lubricating in tight areas that are inaccessible to regular grease guns. This manual provides comprehensive instructions for its safe and effective operation, maintenance, and troubleshooting.
The Mini Grease Gun is engineered to dispense yellow lithium grease, typically supplied in a 3 Oz. standard cartridge, for light-duty applications across various sectors including farm, automotive, industrial, and construction equipment. Its primary function is to deliver grease under pressure to lubrication points, ensuring smooth operation and longevity of mechanical components. The device consists of several key parts: a Head Assembly, Piston, Lever Handle, Cylinder, End Cap, Follower Rod, Extension, Coupler, and a Grease Cartridge Cap. The design allows for easy cartridge installation and controlled grease dispensing.
Before operating the Mini Grease Gun, users are strongly advised to thoroughly read and understand the product manual to familiarize themselves with its applications, limitations, and potential hazards. Safety is paramount, and users must observe all safety information, warnings, and cautions to prevent personal injury or property damage.
Unpacking and Initial Inspection: Upon receiving the unit, it is crucial to inspect it for any damage that may have occurred during transit. This includes checking for loose, missing, or damaged parts, as well as any signs of shock load. If any damage is noted, the product should not be used, and a shipping damage claim should be filed. Any damaged or abnormally operating Grease Gun must be removed from service immediately and checked by a factory-authorized service center.
General Safety Rules: The manual emphasizes several important safety rules. Users should always know their product, keep the work area clean and well-lit, and keep children away from the work area. Operating the product under the influence of alcohol or drugs is strictly prohibited. The use of appropriate safety equipment, such as ANSI-approved safety glasses, dust masks, non-skid safety shoes, hard hats, and hearing protection, is mandatory. Proper apparel should be worn to avoid entanglement with moving parts. Users should avoid overreaching and maintain proper footing and balance at all times. Regular checks for damage are essential, and the product should be discontinued if any part is damaged or if its intended function is compromised. The Grease Gun should be kept away from flammables to prevent serious injury or death. It must be stored out of reach of children and untrained persons, and kept dry and clean. Only accessories recommended by the manufacturer should be used.
Specific Safety Instructions for Automotive Use: When lubricating automotive parts, users must always reference the vehicle maintenance manual. Caution is advised around moving parts and pinch points. The vehicle should be parked on a level surface, turned off, and all wheels chocked before performing maintenance. Users are warned that pressure will build within the Grease Gun during normal use, and extremities should be kept clear of the extension or adapters to prevent fittings from bursting or detaching.
Grease Gun Cartridge Installation: The installation process is detailed with specific steps to ensure proper loading and air bleeding. First, the Head Assembly is unscrewed from the Cylinder. The Follower Rod is then slowly pulled back until fully extended and locked into the End Cap. Users are explicitly warned not to place fingers between the Follower Rod and End Cap to avoid personal injury from the spring-loaded rod. The plastic cap and seal are removed from the grease cartridge, which is then inserted into the Cylinder. The Head Assembly is screwed back onto the Cylinder, tightened, and then unscrewed slightly (1.5-2 turns) to allow air to bleed. The Follower Rod is then pulled and released to retract into the Cylinder, allowing air to escape as grease is pushed towards the Head Assembly. Once air is completely released, the Head Assembly is tightened, and the Lever Handle is pumped repeatedly until grease flows from the Coupler.
Regular maintenance is crucial for the longevity and optimal performance of the Mini Grease Gun.
Pre-Use Inspection: Before each use, the Grease Gun should be inspected for any damage, misaligned connections, or leaks. If any issues are noted that could affect performance, the unit should be discontinued from use. The Coupler should also be checked for dirt or debris and cleaned with a dry cloth.
Post-Use Cleaning: After each use and following extended periods of storage, the Grease Gun should be wiped clean with a dry cloth to remove all grease and debris.
Servicing: Service must only be performed by qualified repair personnel using identical replacement parts. Unauthorized parts or failure to follow maintenance instructions can create a risk of injury. Labels and nameplates on the product, which carry important information, should be maintained and replaced if unreadable or missing.
Troubleshooting: The manual includes a troubleshooting guide for common issues. For instance, if the Grease Gun fails to dispense grease, potential causes include cold grease, air trapped in the Cylinder, or a blocked Coupler/Extension. Solutions provided are to allow grease to warm, loosen the head and repeatedly pull the Follower Rod to bleed trapped air, or clean dirt and debris from the Head Assembly and Coupler/Extension. If the piston is damaged, the Grease Gun should be replaced. If grease leaks from the back of the gun due to thin grease, a thicker grease should be used.
Disposal: At the end of its useful life, the components of the Mini Grease Gun must be disposed of in accordance with all federal, state, and local regulations.
Warranty and Registration: The product comes with a limited lifetime warranty covering defects in material or workmanship under normal usage. Users are encouraged to register their new tool on the OEMTOOLS™ website for future reference. The warranty explicitly states that OEMTOOLS™ is not responsible for issues arising from modification and recommends against using the product for any application other than its designed purpose. It also clarifies that the warranty does not cover abnormal use, abuse, accident, alteration, neglect, unauthorized repairs, or lack of maintenance.
| SAE/Metric/Torx | SAE |
|---|---|
| Material | Chrome Vanadium Steel |
| Number of Points | 6 |
| Color | Silver |
| Product Type | Socket |
| Application | Automotive |