3
Operating Instructions and Parts Manual 25136
2/19
2019 OEMTOOLS
™
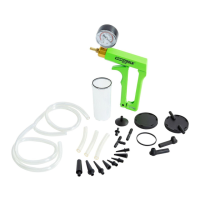
AUTOMOTIVE TUNE-UP AND
BRAKE BLEED KIT
SPECIFIC SAFETY INSTRUCTIONS
AND WARNINGS
CAUTION: DO NOT place on hot surfaces or expose any
part of the tool or adapters to direct flame.
CAUTION: Dropping the tool or impact with another object
may cause product damage, resulting in inaccurate gauge
readings.
CAUTION: DO NOT use petroleum-based lubricants (such
as WD-40, motor oil, etc.) to lubricate the pump, this will
cause irreparable damage to the pump.
INSTRUCTIONS
NOTE: To quickly release vacuum, press the vacuum re-
lease trigger located below the vacuum port.
For Tests Requiring a Vacuum
1. Attach the appropriate adapter, so that there is an air-
tight line between the pump and the component being
tested.
2. Squeeze the pump until the desired vacuum is
indicated on the gauge.
3. Press the vacuum release trigger located below the
vacuum port to release vacuum.
To Measure a Vacuum in a System
1. Attach the appropriate adapter, so that there is an air-
tight line between the pump and the component being
tested.
2. Read the gauge for vacuum in the system.
NOTE: DO NOT squeeze the pump, this will provide
inaccurate readings.
TRANSFERRING AND SYPHONING FLUIDS
NOTE: The pump is not designed to pass liquids through it;
an intermediate receptacle must be used to prevent liquids
from reaching the pump.
For Tests Requiring a Vacuum
1. Connect the pump to the desired short connection
tube.
2. Connect the open end of the selected connection tube
onto one of the ports on the cap of the fluid reservoir.
NOTE: Ensure the cap with o-ring is completely installed.
Failure to completely install the cap or o-ring will result in
malfunction, as no vacuum will be created.
3. Connect one end of the long connection tube to the
open port on the cap of the fluid reservoir.
4. Place the other end of the long connection tube into
the liquid that is being siphoned.
5. Keep the receptacle below the level of the liquid being
siphoned.
6. Squeeze the pump handle to initiate vacuum.
7. When the desired amount of liquid is reached, remove
the tubing from the tank.
NOTE: Stop siphoning before the reservoir is completely
full to avoid liquid drawing into the pump.
PRODUCT MAINTENANCE
1. Always store the Automotive Tune-Up and Brake Bleed
Kit in a well-protected area where it will not be exposed
to inclement weather, corrosive vapors, abrasive dust, or
any other harmful elements.
2. Keep the Automotive Tune-Up and Brake Bleed Kit
clean for better and safer performance.
DISPOSAL
At the end of the useful life of the Automotive Tune-
Up and Brake Bleed Kit, dispose of the components
according to all state, federal, and local regulations.
 Loading...