28
Italiano FrançaisEnglish
AVVIAMENTO
STARTING
AVVIAMENTO MOTORE
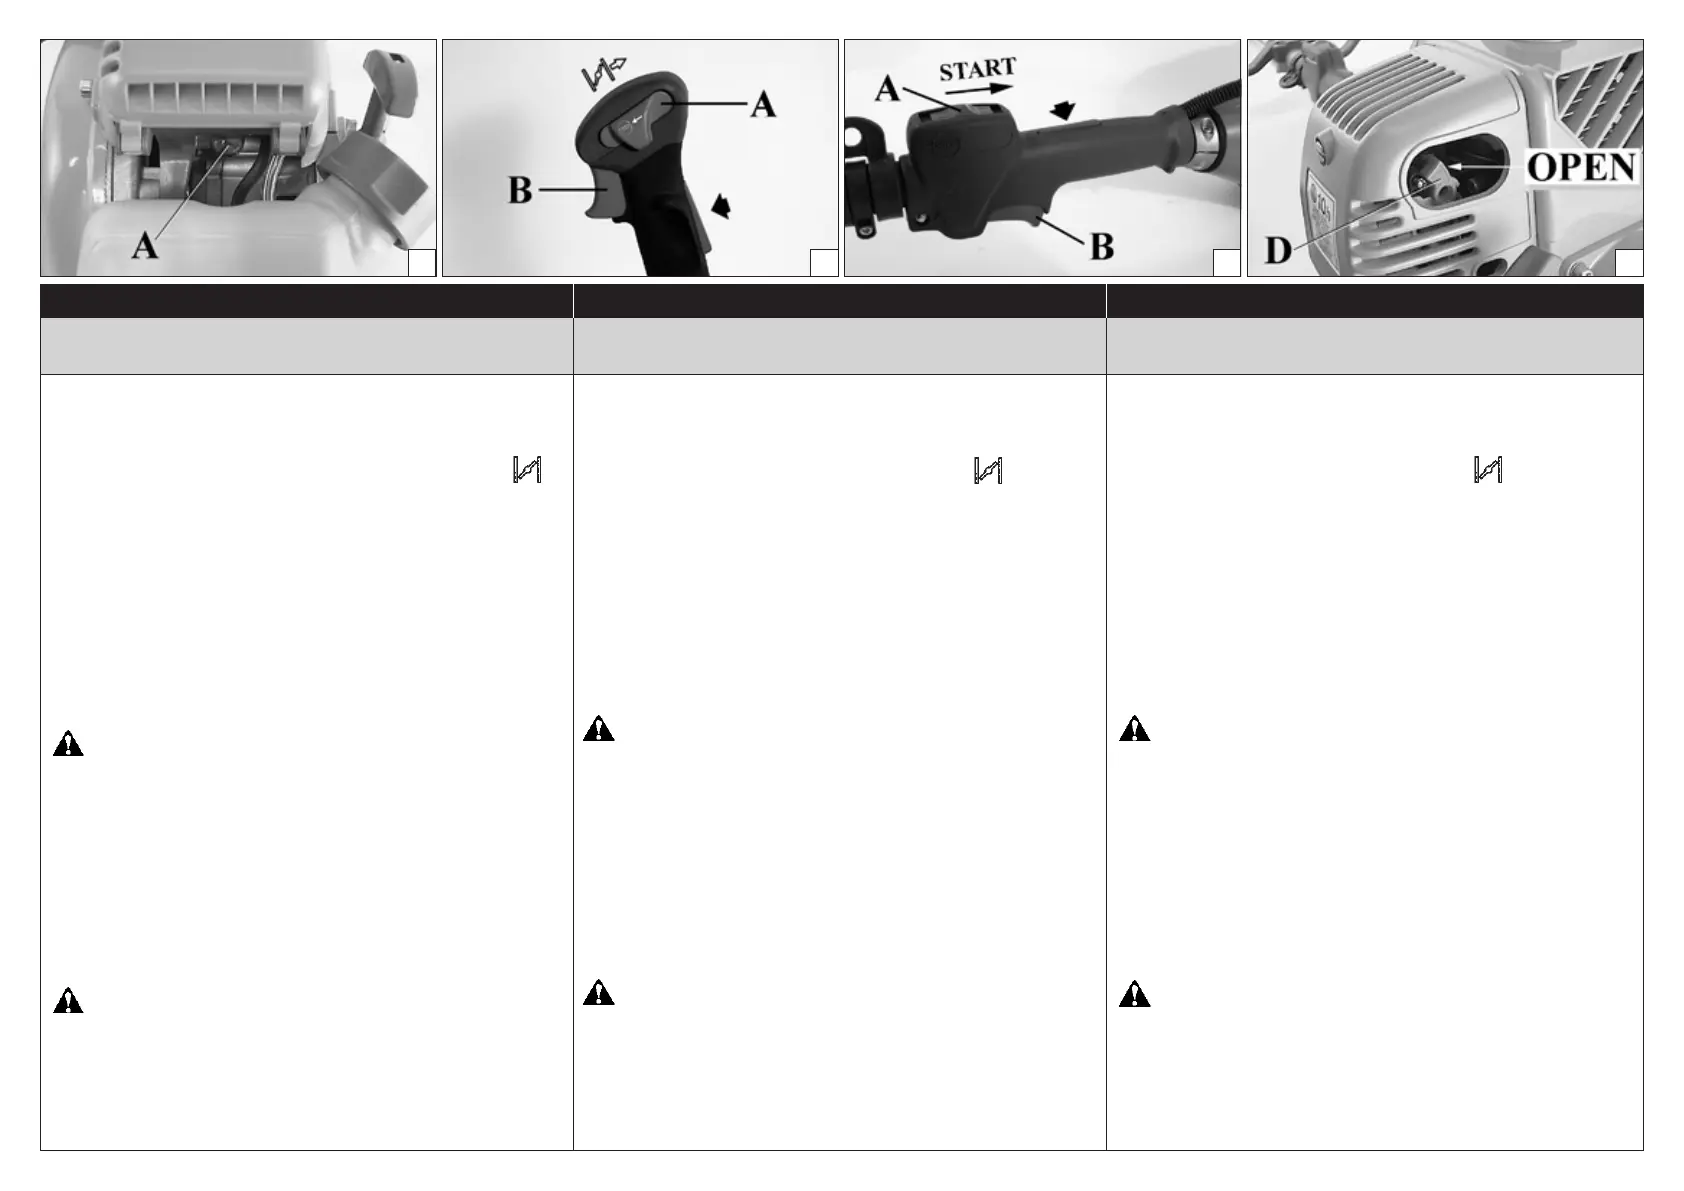
Caricare il carburatore premendo il bulbo varie volte
(A, Fig. 39).
Portare l'interruttore (A, Fig. 40-41) in posizione o
"START".
Portare la leva starter (D, Fig. 43) in posizione "CLOSE".
Appoggiare il decespugliatore sul terreno in posizione
stabile. Vericare che il disco sia libero di girare. Tenendo
fermo il decespugliatore, tirare lentamente la funicella
d'avviamento no ad incontrare resistenza (Fig. 44). Tirare
energicamente alcune volte no ad ottenere l’avviamento.
Aspettare circa 5÷10 secondi e quindi tirare la leva
acceleratore (B, Fig. 40-41), per riportare automaticamente
la leva starter (D, Fig. 42), nella posizione originale “OPEN”.
ATTENZIONE: Quando il motore è già caldo, non
usare lo starter per l'avviamento.
RODAGGIO MOTORE
Il motore raggiunge la sua massima potenza dopo 5÷8 ore
di lavoro.
Durante questo periodo di rodaggio non fare funzionare
il motore a vuoto al massimo numero di giri per evitare
eccessive sollecitazioni.
ATTENZIONE! - Durante il rodaggio non variare
la carburazione per ottenere un presunto incremento di
potenza; il motore potrebbe esserne danneggiato.
NOTA: è normale che un motore nuovo emetta fumo
durante e dopo il primo utilizzo.
39
40
41
42
MISE EN ROUTE
DEMARRAGE DU MOTEUR
Remplir le carburateur en agissant maintes fois sur le pompe
(A, Fig. 39).
Mettez l'interrupteur (A, Fig. 40-41) sur - "START".
Mettez le levier starter (D, Fig. 43) sur CLOSE. Posez la
débroussailleuse sur le terrain en position stable et vériez
si le disque tourne librement. En tenant la débroussailleuse
tirez lentement la cordelette de démarrage jusqu'à ce que vous
sentiez une certaine résistance (Fig. 44). Tirez énergiquement
plusieurs fois jusque vouz obtenez la mise en toute. Atteindez
environs 5÷10 secondes et puis tirez le levier de l’accélérateur
(B, Fig. 40-41), pour remetter automatiquement le levier du
starter (D, Fig. 42) dans sa position d’origine “OPEN”.
ATTENTION: Quand le moteur est chaud n'utilisez
pas le starter pour le faire démarrer.
RODAGE MOTEUR
Le moteur atteint sa puissance maximale au bout de 5 à 8
heures de travail.
Au cours de cette période de rodage, ne faites pas tourner le
moteur à vide au régime maxi pour lui éviter excessif eorts
de fonctionnement.
ATTENTION! - Durant le rodage, ne modiez pas
la carburation en vue d'augmenter la puissance; vous
risquez seulement d'endommager le moteur.
REMARQUE : il est normal qu'un moteur neuf dégage de la
fumée durant et après la première utilisation.
STARTING THE ENGINE
Fill the carburetor by pushing primer bulb a couple of times
(A, Fig. 39).
Put the ON/OFF switch (A, Fig. 40-41) in the - "START"
position.
Put the choke lever (D, Fig. 43) in the CLOSE position. Place
the brush cutter on the ground in a stable position. Check
that the blade is free. Holding the brush cutter down, pull
the starting rope slowly until you meet resistance (Fig. 44).
en pull it hard several times until the unit starts. When
the engine starts, wait for about 5÷10 seconds and then pull
the throttle lever (B, Fig. 40-41), the choke lever (D, Fig. 42)
will return automatically to the original “OPEN” position.
WARNING: Once the engine is warmed up do not
use the choke to start up again.
BREAKING-IN THE ENGINE
e engine reaches the maximum power aer 5÷8 hours of
activity.
During this period of breaking-in do not use the engine at
wide open throttle without load, to avoid excessive functioning
stress.
WARNING! - During the breaking-in period do not
vary the carburetion to obtain a presumed power increment;
the engine can be damaged.
NOTE: It is normal for smoke to be emitted from a new
engine during and aer rst use.
 Loading...