48
Italiano FrançaisEnglish
80
81B 83B81A 83A
82
MANUTENZIONE
ENTRETIENMAINTENANCE
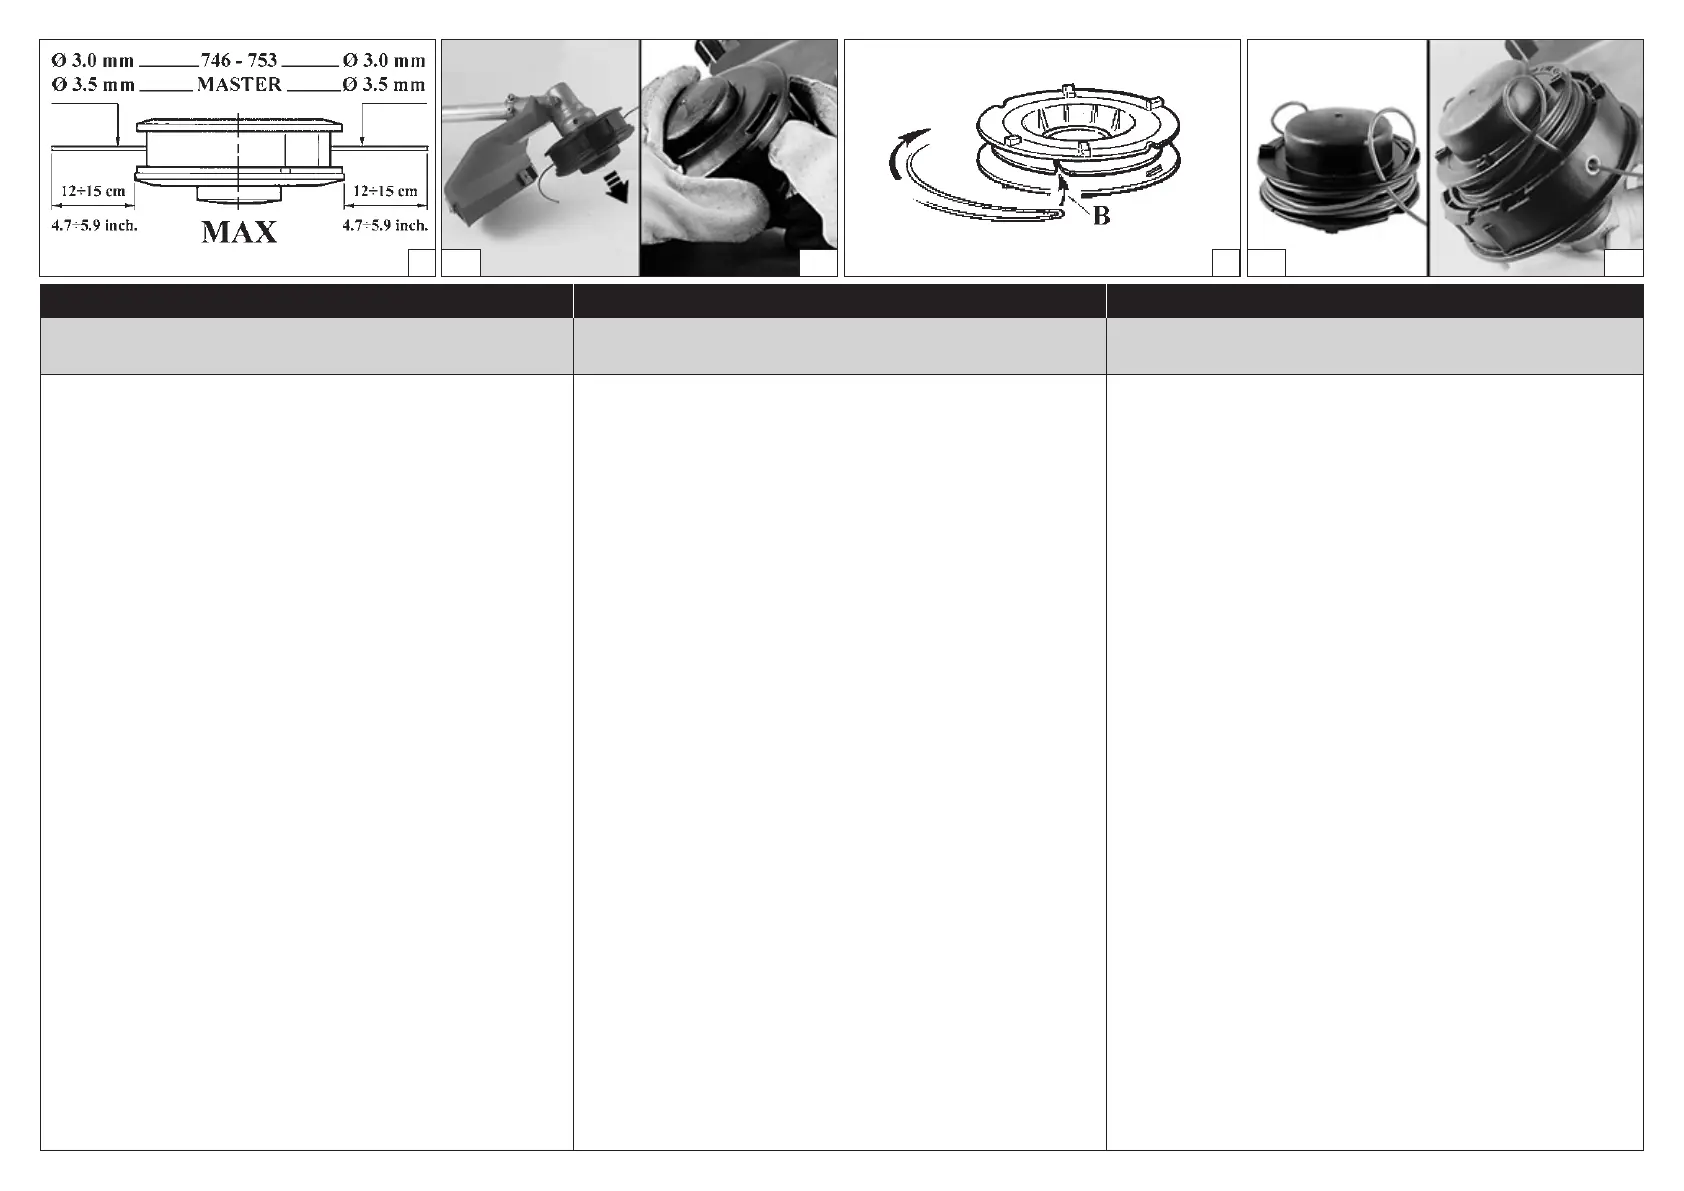
TESTINA A FILI DI NYLON
Usare sempre lo stesso diametro del lo originale per non
sovraccaricare il motore (Fig. 80).
Fig. 81A Per allungare il lo di nylon, battere la testina sul
terreno mentre si lavora.
NOTA: Non battere la testina sul cemento o sul selciato:
può essere pericoloso.
SOSTITUZIONE DEL FILO DI NYLON (TAP'N GO)
1 - Premere la linguetta (Fig. 81B) e togliere il coperchio
e la bobina interna.
2 - Piegare il lo a metà lasciando una parte più lunga
dell’altra di circa 14 cm. Bloccare il lo nell’apposita
tacca (B, Fig. 82) sulla bobina. Avvolgere, in direzione
della freccia, ogni lo nel proprio alloggiamento in
modo uniforme e senza intrecciarli.
3 - Terminato l’avvolgimento del lo, bloccarlo nelle
apposite feritoie come indicato in Fig. 83A. Montare la
molla. Inlare il lo attraverso gli occhielli (Fig. 83B) e
tirarlo verso l’esterno. Bloccare la testina con il coperchio.
Sostituzione del lo di nylon nella testina LOAD&GO
(Ø 130 mm): tagliare 6.0 m di filo di nylon Ø 3.0 mm.
1. Allineare le frecce ed inserire il filo nella testina (Fig. 84)
fino a che sarà uscito dalla parte opposta (Fig.85).
2. Dividere il filo in due parti uguali (Fig. 86) e quindi
caricare la testina ruotando il pomello (Fig. 87).
TÊTE A FILS DE NYLON
Utilisez toujours le même diamètre de l, comme celui
d'origine an de ne pas surcharger le moteur (Fig. 80).
Fig. 81A Si vous voulez allonger le l pendant que vous
travaillez, tapez la tête nylon par terre.
N.B.: Ne tapez pas la tête nylon sur du ciment ou sur le pavé,
cela pourrait être très dangereux.
REMPLACEMENT DU FIL NYLON (TAP'N GO)
1 - Appuyer la languette (Fig. 81B) et enlever le couvercle
et la bobine interne.
2 - Plier le l en deux en laissant une partie plus longue
d’environs 14 cm que l’autre. Bloquer le l en l‘entaille
spécial (B, Fig. 82) sur la bobine. Enrouler, en direction
de la èche, chaque le en son propre logement,
uniformement et sans les tresser.
3 - Après avoir terminé l’enroulement du l, bloquer-le
dans les fentes spéciales, comme indiqué en la Fig.83A.
Monter le ressort. Introduire le l à travers les œillets
(Fig. 83B) et tirer-le vers l’exterieur. Bloquer la tête avec
le couvercle.
Remplacement du fil Nylon sur la tête LOAD&GO
(Ø 130 mm): couper 6.0 m de l Nylon Ø 3.0 mm.
1. Aligner les èches et introduire le l dans la tête (Fig. 84)
jusqu’à ce qu’il sorte de l’autre côté (Fig. 85).
2. Diviser le l en deux parts égales (Fig. 86) et charger la
tête en tournant le pommeau (Fig. 87).
NYLON LINE HEAD
Only use line of the same diameter as the original to avoid
overloading the engine (Fig. 80).
Fig. 81A In order to get more line out of the cutting head,
tap it lightly on the ground while working.
Note: Never hit the nylon head against hard spots such as
concrete or stones, it could be dangerous.
REPLACING THE NYLON LINE (TAP'N GO)
1 - Press the tab (Fig. 81B) and remove the cover and the
internal spool.
2 - Double back the line, leaving one end 14 cm longer than
the other one. Lock the line in the notch (B, Fig. 82).
Wind the line in the direction of the arrow, each end in
its chink, regulary, without crossing them.
3 - At the end of the winding, lock in the slits (Fig. 83A)
Assemble the spring. Slip the line through the eyelet (Fig.
83B) and pull it towards the outside. Lock the head with
the cover.
Replacing the nylon line on the LOAD&GO trimmer head
(Ø 130 mm): cut 6.0 m of nylon line Ø 3.0 mm.
1. Align the arrows and insert the line into the trimmer
head (Fig. 84) until it is released from the opposite side
(Fig. 85).
2. Divide the line into two equal parts (Fig. 86) and then
load the trimmer head by turning the knob (Fig. 87).
 Loading...