Do you have a question about the Oleo-Mac PW 115C and is the answer not in the manual?
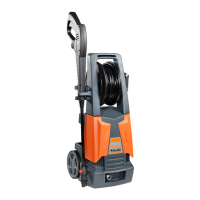
Visual guide for assembling the pressure washer components.
Assemble the hose reel components as shown.
Attach the assembled hose reel to the main unit.
Secure the hose reel with screws.
Connect the hose to the reel.
Final check of the assembled unit.
Overview and identification of all machine parts with numbers.
List of machine components with their English names and numbers.
Setting the power switch to OFF before connection.
Connect the water inlet hose.
Specifications for water inlet connection (1/2 inch, 13 mm).
Connect the high-pressure hose to the unit.
Connect the gun to the hose with a click.
Recommended water temperature and pressure limits.
Minimum time for priming the pump.
Assembling the gun and lance.
Connect the electrical plug.
Procedure for turning the machine ON.
Procedure for turning the machine OFF.
Explanation of different spray patterns and the turbo function.
Instructions for connecting and using the detergent suction system.
Use the hydrocleaner only if the hose is completely uncoiled.
General guidelines for machine care and maintenance.
Details about the manufacturer and their address.
Information on the machine's model and power supply.
Explanation of technical specifications like absorbed power and IP degree.
Explanation of working pressure, maximum pressure, and flow rates.
Details on water temperature, year of manufacture, and serial number.
Information on machine weight and sound power level.
Details on the intended applications and suitability of the appliance.
Information on safety catch, thermal protection, and bypass valve.
Explanation of key symbols and associated warnings for safe operation.
Guidance on ensuring the machine is kept stable during use.
Summary of main features like fuse, temperatures, pressures, and flow rates.
Instructions for putting into service, starting up, and using components.
Information on connecting to water supply and warnings.
Connecting to mains or open container, venting the unit.
Guidelines for safe electrical connection, including socket and breaker.
Recommendations for using extension cords safely outdoors.
Proper procedures for switching off and storing the machine.
Instructions for cleaning and maintaining the appliance.
Solutions for problems like no power, low pressure, or pressure fluctuations.
How to clean the high-pressure nozzle.
Permissible pump leakage and contact for service.
Guidance on using original spare parts.
Instructions for proper disposal of the product according to regulations.
Details of the limited warranty coverage and exclusions.
This manual must stay with the machine for its entire life.
Details of Emak S.p.A., the manufacturer.
| Power | 1.5 kW |
|---|---|
| Max Pressure | 115 bar |
| Flow Rate | 360 L/h |
| Weight | 7.0 kg |
| Hose Length | 5 m |
| Operating pressure | 80 bar |
| Pump type | Aluminium axial cam pump |
| Water Flow | 360 L/h |
| Power Supply | 230 V |
| Motor type | Electric |
| Engine Type | Electric |