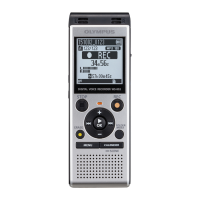
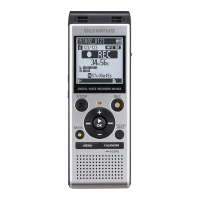
[ ]: Voice Playback
[ ]: Rec Level
[ ]: VCVA
[ ]: V-Sync. Rec
[ ]: Low Cut Filter
[ ]: Zoom Mic
[ ]: Mic Select*
[ ]: Limiter
[ ]: Voice Detect
5 Battery indicator
[ ]: Ni-MH
[ ]: Alkaline
6 Possible recording time
7 Available free space
* LS-P4 model only
Setup
Inserting the battery (Fig. 1)
Before using the voice recorder,
insert the battery in the battery
compartment of the voice recorder.
1 Press and hold the battery/card
cover lock button, and then slide
the battery/card cover to open.
2 Insert a AAA battery, making sure
its positive and negative terminals
are placed correctly.
a Insert the battery’s negative
terminal first.
3 Slide the battery/card cover
completely closed.
Turning the power ON (Fig. 2)
1 While the voice recorder is turned
off, slide the
POWER/HOLD
switch in the direction of the
arrow.
Selecting the battery setting
(Fig. 3)
1 Press the + or – button to select
the type of battery you inserted.
[Ni-MH]:
Select if you inserted an
Olympus nickel-metal hydride
rechargeable battery (model
BR404).
[Alkaline]:
Select if you inserted an
alkaline battery.
2 Press the `
OK
button to finalize
the setting.
Setting the time/date (Fig. 4)
1 Press the 9 or 0 button to
select the item to set.
2 Press the + or – button to change
the number.
• To change the setting of another
item, press the 9 or 0
button to move the blinking
cursor, then press the + or –
button to change the number.
3 Press the `
OK
button to finalize
the setting.
Setting the voice guidance
LS-P4 model only
1 Press the + or – button to select
[
On
] or [
Off
].
[On]:
Voice guidance will be enabled.
[Off]:
Voice guidance will be
canceled.
2 Press the `
OK
button to finalize
the setting.
Charging the battery by connecting
to a PC’s USB connector (Fig. 5)
NOTE:
• Before charging the battery, insert
the rechargeable battery provided
and set [Battery] to [Ni-MH].
• Never attempt to charge an
alkaline battery, lithium battery
or other primary cell battery. Fluid
leakage or overheating may cause
the recorder to malfunction.
1 Start the PC.
2 Slide the USB connector slide lever
in the direction of the arrow.
3 After making sure the voice
recorder is stopped, connect the
USB connector to a USB port on a
PC.
4 Press the `
OK
button to start
charging the battery.
• When [Battery] is set to
[Ni-MH], [Press OK to start
charging] appears on the
display. Press the `OK button
while this message is blinking.
5 Charging has finished when the
battery indicator changes to [
].
Turning the power OFF
1 Slide the
POWER/HOLD
switch
in the direction of the arrow for at
least half a second.
Power Save mode
When the voice recorder has been
stopped for at least 10 minutes after
power ON, the display disappears
and the voice recorder automatically
enters the Power Save mode.
• Pressing any button releases the
Power Save mode.
4
EN
 Loading...