28
Flight Mode Setting / Nastavení letových režimů / Einstellung der Flugmodi
Normal Mode / Režim Normal / Modus Normal
Throttle/Plyn/ Gas Collective Pitch/Kolektiv/Kollektiv
5 50 100 11°
4 50 60 5.5°
3 50 20 1.8°
2 25 0 -0.6°
1 0 -30 -2.4°
Idle1 Mode / Let. režim Idle1 / Flugmodus Idle1
Throttle/Plyn/ Gas Collective Pitch/Kolektiv/Kollektiv
5 68 100 11°
4 68 50 5.5°
3 68 0 0°
2 68 -50 -5.5°
1 68 -100 -11°
Idle2 Mode / Let. režim Idle2 / Flugmodus Idle2
Throttle/Plyn/Gas Collective Pitch/Kolektiv/Kollektiv
5 78 100 11°
4 78 50 5.5°
3 78 0 0°
2 78 -50 -5.5°
1 78 -100 -11°
Throttle Hold / Autorotace / Autorotation
Throttle/Plyn/Gas Collective Pitch/Kolektiv/Kollektiv
5 0 100 11°
4 0 50 5.5°
3 0 0 0°
2 0 -50 -5.5°
1 0 -100 -11°
Dual rates (D/R) / Dvojí výchylky / Dualrate-Ausschläge: 100/85/70%
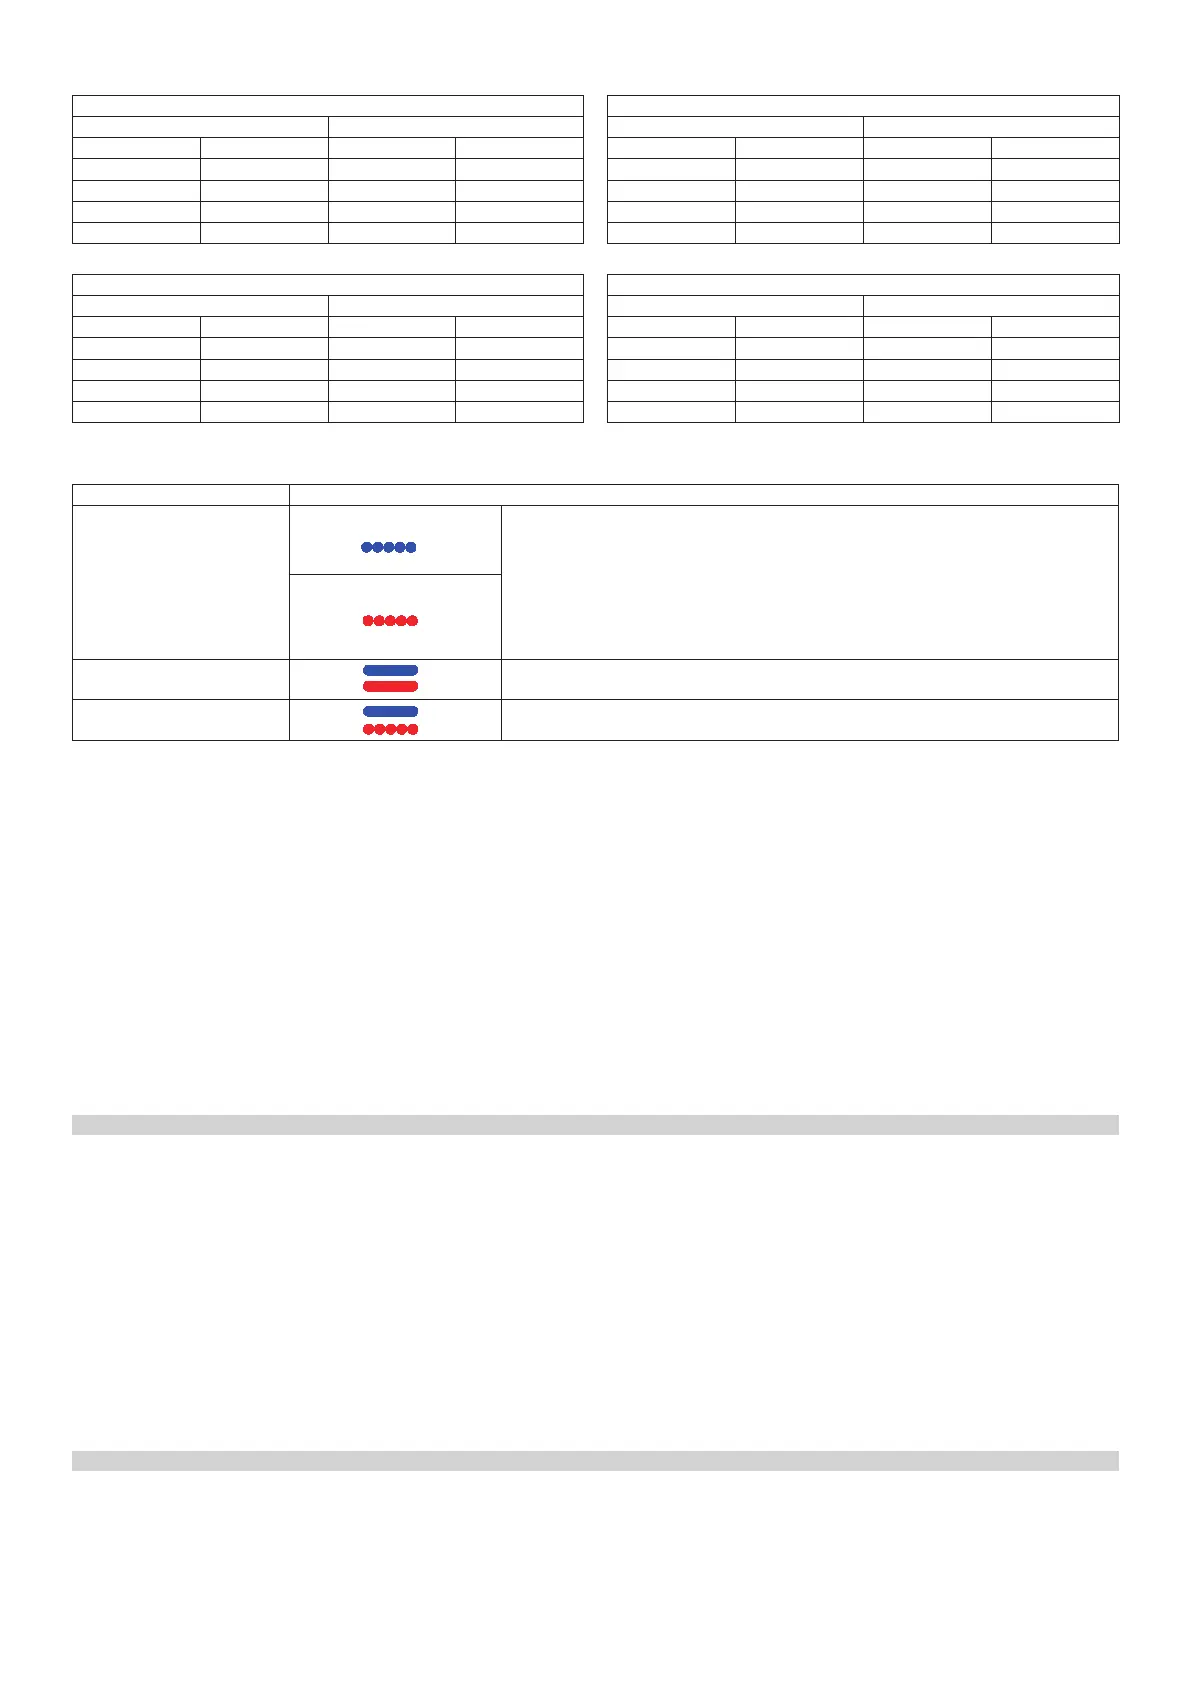
Power On Self Test / Autotest při zapnutí / Autotest beim Einschalten
Status/Stav/Status Flight Control LED/LED řídící jednotky/LED der Steuereinheit
Power On Self Test
Autotest při zapnutí
Autotest beim Einschalten
Blue/Modrá/Blau
The M1 should be placed on the ground to be powered on. After power on, the blue and
red LED ash quickly; wait for 3 seconds until the blue LED is steady lit.
M1 by měl být před zapnutím položen na zem. Po zapnutí červená a modrá LED rychle
blikají; vyčkejte 3 sekundy, až modrá LED svítí nepřerušovaně.
M1 sollte vor dem Einschalten auf den Boden gestellt werden. Nach dem Einschalten blin-
ken die rote und die blaue LED schnell. Warten Sie 3 Sekunden, bis die blaue LED konti-
nuierlich leuchtet.
Red/Červená/Rot
Attitude mode/Stabilizace ná-
klonu/ Stabilisierungsmodus
Blue LED Steady Lit/Svítí modrá/ Die blaue LED leuchtet
Red LED Steady Lit/Svítí červená/ Die rote LED leuchtet
3D Mode/3D režim/ 3D Modus
Blue LED Steady Lit/Svítí modrá/ Die blaue LED leuchtet
Red LED Blinks Slowly/Červená pomalu bliká/ Rote LED blinkt langsam
Servo Neutral Position Adjustment/Nastavení neutrálu serv/Einstellung der Servoneutrallage
CAUTION: Please disconnect the main and tail motor power cord before setting to avoid potential safety hazards!
1. Tum on the remote control and power on the aircraft. After the aircraft self-test, the servos can be normally controlled.
2. To adjust ight controller settings, press the SET key on the ight control unit for 3 seconds. Click SET key until SERVO light is on. Use the sticks of aileron,
elevator, and rudder to setup the mid-point of the servos. On your transmitter: CH1 is for aileron, CH2 for elevator, and CH4 for rudder. After desired mid-
-point is achieved, press SET key for 3 seconds to save the setting.
POZOR: Před nastavováním odpojte motory nosného i vyrovnávacího rotoru, abyste se vyhnuli možnému nebezpečí!
1. Zapněte řídící jednotku a model připojením pohonného akumulátoru. Po dokončení autotestu je možné serva normálně ovládat.
2. Pro vstup do nastavování řídící jednotky stiskněte a držte tlačítko SET po 3 sekundy. Potom tiskněte tl. SET, až svítí LED SERVO. Ovladačei klonění, klopení
a bočení serva nastavte do středu. Na vysílači: CH1 je klonění (AILE), CH2 je klopení (ELEV) a CH4 je bočení (RUDD). Po nastavení požadované hodnoty
stiskněte a držte tlačítko SET po 3 sekundy pro uložení nastavení.
ACHTUNG: Schalten Sie die Motoren des Haupt- und Heckrotors vor der Einstellung aus, damit Sie mögliche Gefahren vermeiden!
1. Schalten Sie die Steuereinheit und das Modell ein, indem Sie den Antriebsakku anschließen. Nach der Beendigung des Autotests können die Servos normal
betrieben werden.
2. Drücken Sie die Taste SET und halten Sie sie 3 Sekunden lang gedrückt, um die Einstellungen der Steuereinheit aufzurufen. Dann drücken Sie die Taste
SET, bis die LED SERVO leuchtet. Zentrieren Sie die Neig-, Kipp- und Gierknüppel um die Mittelstellung der Servos zu erlangen. Am Sender: CH1 ist Neigen
(AILE), CH2 ist Kippen (ELEV) und CH4 ist Gieren (RUDD). Nachdem Sie den gewünschten Wert eingestellt haben, halten Sie die Taste SET 3 Sekunden lang
gedrückt, um die Einstellung zu speichern.
PREFLIGHT CHECK / PŘEDLETOVÁ KONTROLA / VORFLUGKONTROLLE
Pitch / Klopení / Kippen
• Tilt the helicopter forward and the swashplate should tilt back to compensate.
• Nakloňte vrtulník dopředu a deska cykliky by se měla sklonit vzad pro vyrovnání tohoto pohybu.
• Neigen Sie den Hubschrauber nach vorne und die Taumelscheibe sollte rückwärts kippen, um diese Bewegung zu kompensieren.
Roll / Klonění / Neigen
• Tilt the helicopter to the right and the swashplate should tilt left to compensate.
• Nakloňte vrtulník doprava a deska cykliky by se měla sklonit vlevo pro vyrovnání tohoto pohybu.
• Neigen Sie den Hubschrauber nach rechts und die Taumelscheibe sollte nach links kippen (in Flugrichtung gesehen), um diese Bewegung zu kompensieren.
Collective and Cyclic Control Rates / Velikost výchylek cyklického a kolektivního řízení / Ausschlagsgröße der Zyklus- und Kollektivsteuerung
• With the throttle stick all the way up (and down), and roll and pitch stick left/right and up/down, check for any binding on the swashplate. If binding occurs,
adjust the rate settings on the ight control unit appropriately.
• Vychylujte ovladače kolektivu i cyklického řízení na maximální výchylky a kontrolujte, zda mechanismus desky cykliky a rotorové hlavy nejde někde na
doraz. Pokud je tomu tak, nastavte správně velikosti výchylek na řídící jednotce.
• Bewegen Sie die Knüppel der Kollektiv- und Zyklussteuerung bis zum maximalen Ausschlag und überprüfen Sie, ob die Mechanismen der Taumelscheibe
und des Rotorkopfes nicht falsch ausgerichtet sind. Ist dies der Fall, stellen Sie die Ausschlagsgrößen an der Steuereinheit richtig ein.
THE FIRST FLIGHT / ZALÉTÁNÍ / EINFLIEGEN
Step 1 / Krok 1 / Schrit 1
Take the helicopter o.
CAUTION: If the swashplate should tilt prior lifting o, do not try manually trim the swashplate level. This is due to vibration feedback to the sensors, and will
diappear once your helicopter lifts o the ground. If manual trim is applied, your helicopter will tilt immediately after it takes o.
S vrtulníkem vzlétněte.
POZOR: Pokud se deska cykliky před odlepením naklání, nepokoušejte se desku cykliky ručně vytrimovat do roviny. Naklonění je důsledkem zpětného přeno-
 Loading...